The way that people work continues to evolve, and as a result, so do the ways that they must authenticate into their organization’s resources and systems. Where once you simply had to be hardwired into the local office network, now you must expand your perimeter to include remote and hybrid workforces, on-prem and cloud environments, and take into account a growing list of factors that impact how and where people access critical company resources.

6 min read
Last updated on:
January 3, 2024
Found in:
Privileged Access Management
StrongDM manages and audits access to infrastructure.
- Role-based, attribute-based, & just-in-time access to infrastructure
- Connect any person or service to any infrastructure, anywhere
- Logging like you've never seen
So you’re ready to move away VPN or from complicated user management like LDAP, ready to stop worrying about private keys existing on developer laptops, and ready to up your compliance game with audit trails on all of your SSH and database sessions.
You’re ready to move forward and implement StrongDM, an alternative to VPN and LDAP, in you infrastructure.
Lucky for you, getting started is ridiculously easy. In this post we’ll cover the basics that will get you up and running with StrongDM. By the end we’ll have created a gateway, added a server to our inventory, added a database to our inventory, and added users to the platform.
Architecture Overview
The beauty of StrongDM is the extremely simple architecture. Essentially, all you need is a server to act as a gateway, the clients to have connectivity to the gateway, and the gateway to have connectivity to the target resource(s); your servers or databases.
A simple architecture, shown below, is more than enough to get you started with using the product. All you need is a StrongDM gateway placed within your VPC, to use AWS-specific parlance, that is able to connect to the target you are interested in enrolling in StrongDM.
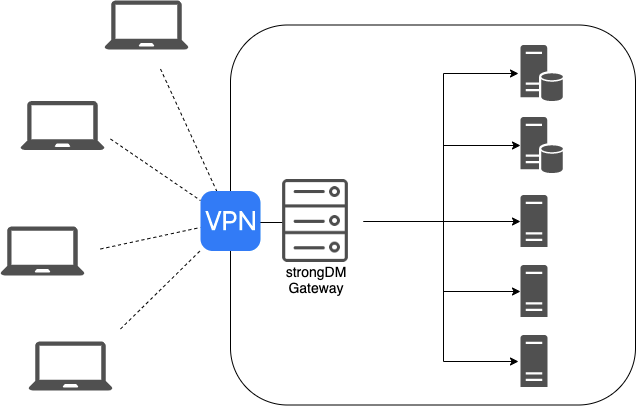
Your clients will need to first connect to the VPN, or whatever network tunneling solution you currently use, before the StrongDM client software will show the servers as connectable.
VPN— the age old question
In a pre-StrongDM world, creating and managing a VPN was a must. There was no security conscious way, save for a hardened bastion box, to allow access to your internal VPC or network without increasing the attack surface of your network.
With StrongDM in the picture, we can break down that old paradigm. If you assign your gateway instance a public IP address, then clients are able to talk to internal resources without a complicated VPN.
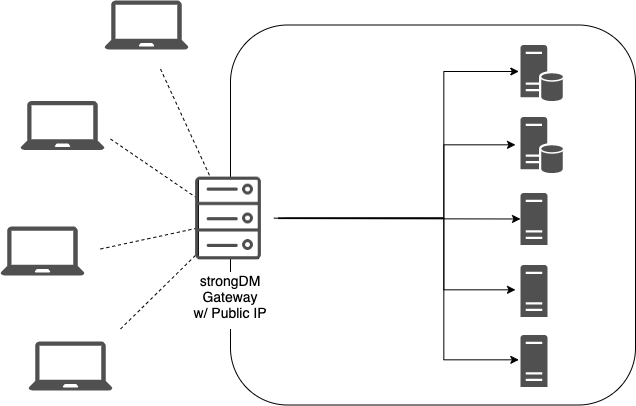
Eliminating a VPN for engineers reduces your network’s complexity and the maintenance burden on the teams that would normally have to manage it. Additionally, exposing a nonstandard port (e.g. not TCP 22) will help you avoid low-effort bots scanning for SSH servers on the public internet.
Learn how Greenhouse replaced VPNs with StrongDM.
Creating a Gateway
Gateways can be created quite easily! The only requirement is a 64bit linux server. Depending on your chosen architecture, this server can have a public IP, or be inside your private network only accessible by the VPN.
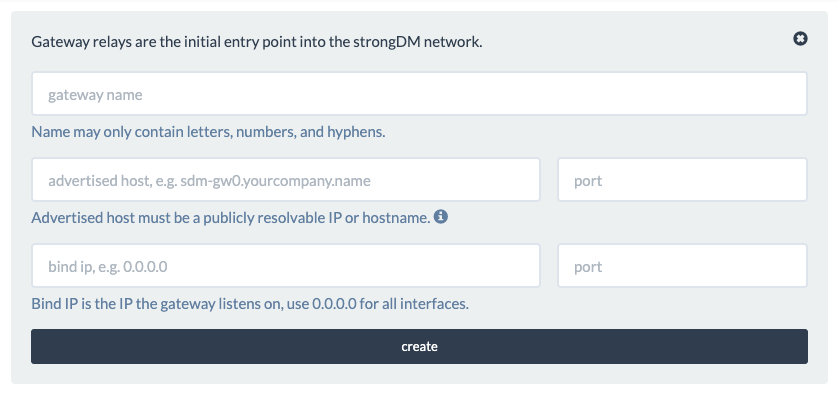
When you have the server created, go into the StrongDM admin panel, click ‘Relays,’ and choose ‘Add Gateway.’
- Gateway Name – the name for your gateway. StrongDM will randomly generate one for you that you can use. It must be unique.
- Advertised Host – the hostname or IP address that the client will connect to this gateway with (e.g. gateway.bestcompanyever.com or 192.168.24.222)
- Port – the port
- Bind IP – the IP/interface that the client will listen on (in almost all cases, you will want 0.0.0.0)
After submitting this information, StrongDM generates a relay token that you should store in a safe place. We’ll need it in a minute!
After you’ve created and provisioned your new Linux box, shell into it, download the StrongDM binary, and execute the gateway installation command to get it set up!
# download the binary
$ curl -J -O -L https://app.strongdm.com/releases/cli/linux
# unzip it:
$ unzip sdmcli_linux_amd64.zip
# install the relay:
$ sudo ./sdm install --relay
When prompted for the relay token, paste it in. This token is used to securely register the gateway with your account.
StrongDM gateways are completely stateless, so you can deploy more than one gateway to get a highly available solution. The StrongDM agent on client machines will automatically choose the best gateway for the network conditions!
Adding Your First Server (SSH)
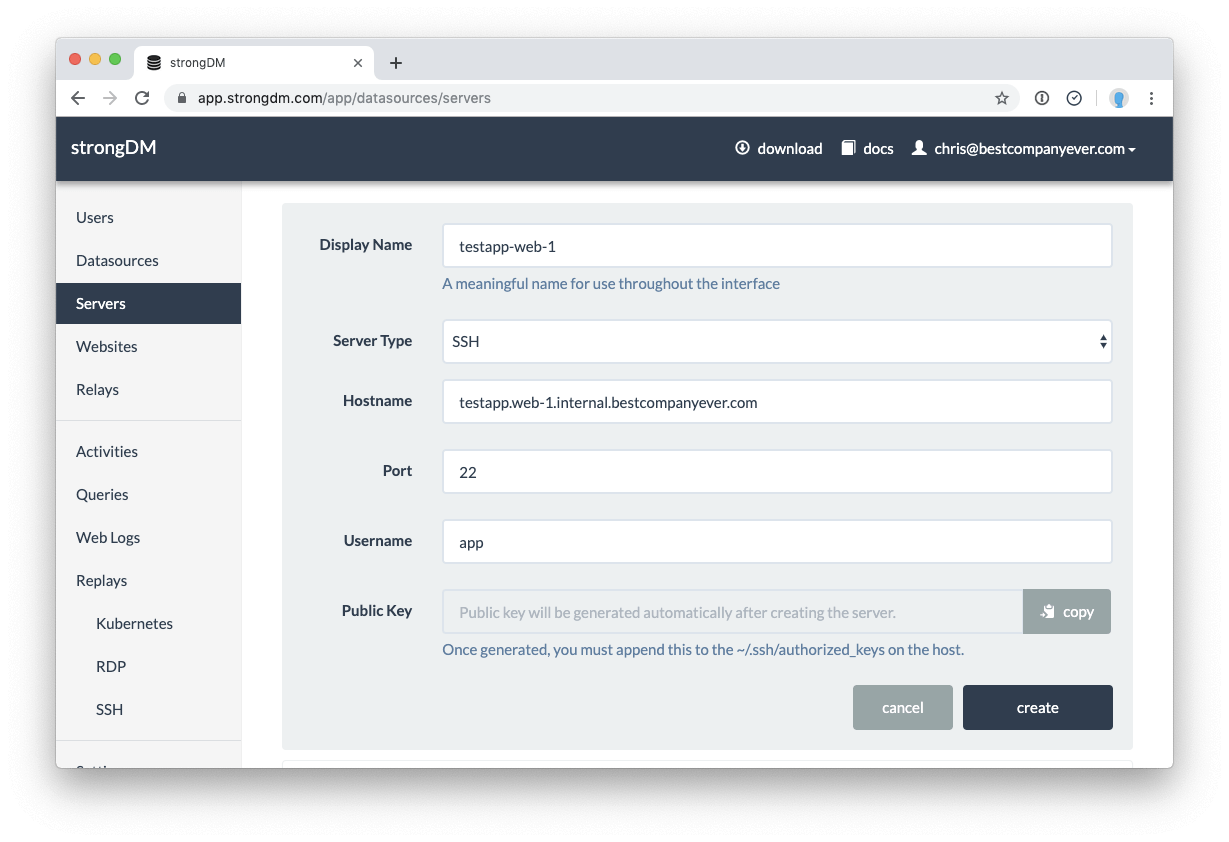
Adding your first server is as easy as clicking around in the web UI! On the navigation pane on the left side, click on ‘Servers,’ then ‘create’ in the right corner.
From here, we can fill in information about the server that will get passed to our clients.
- Display Name – the server’s name as it will show up in the StrongDM inventory. Note: this doesn’t have to match the DNS name, but I’d recommend keeping them as close to the server’s hostname as possible!
- Server Type – the protocol that the StrongDM relay will use to connect to the target instance. For this example, we will be using SSH.
- Hostname – the DNS-resolvable hostname or IP address of the target instance
- Port – the TCP port that the relay will use to connect to the SSH daemon on the target machine. Make sure to adjust your firewall(s) accordingly!
Common Patterns for Username(s)
StrongDM only allows one username per server resource. If your organization uses separate user accounts for each engineer, this can be a slightly unfamiliar (or even uncomfortable!) configuration.
Fear not! While the relay-to-target-server connection uses one username, authenticated with public/private keypair, the engineer’s username is recorded when he or she starts an SSH session with the StrongDM client.
After clicking ‘Create,’ the generated public key will be shown. Copy it to your clipboard and enter it into the ~/.ssh/authorized_keys file for the target user on the system.
I’d recommend taking this one step further and creating two users on each of your systems. Give one of them sudo privileges, and restrict the other. When you’re enrolling the server in StrongDM name them in a way that denotes the one server having admin access, and use the appropriate username and keypair!
As we’ll learn soon, we can split which servers are visible in a given user’s inventory based on their group/role membership. We can restrict which users or teams have sudo access by only allowing them to SSH into the non-admin accounts in the StrongDM inventory.
Adding Your First Database
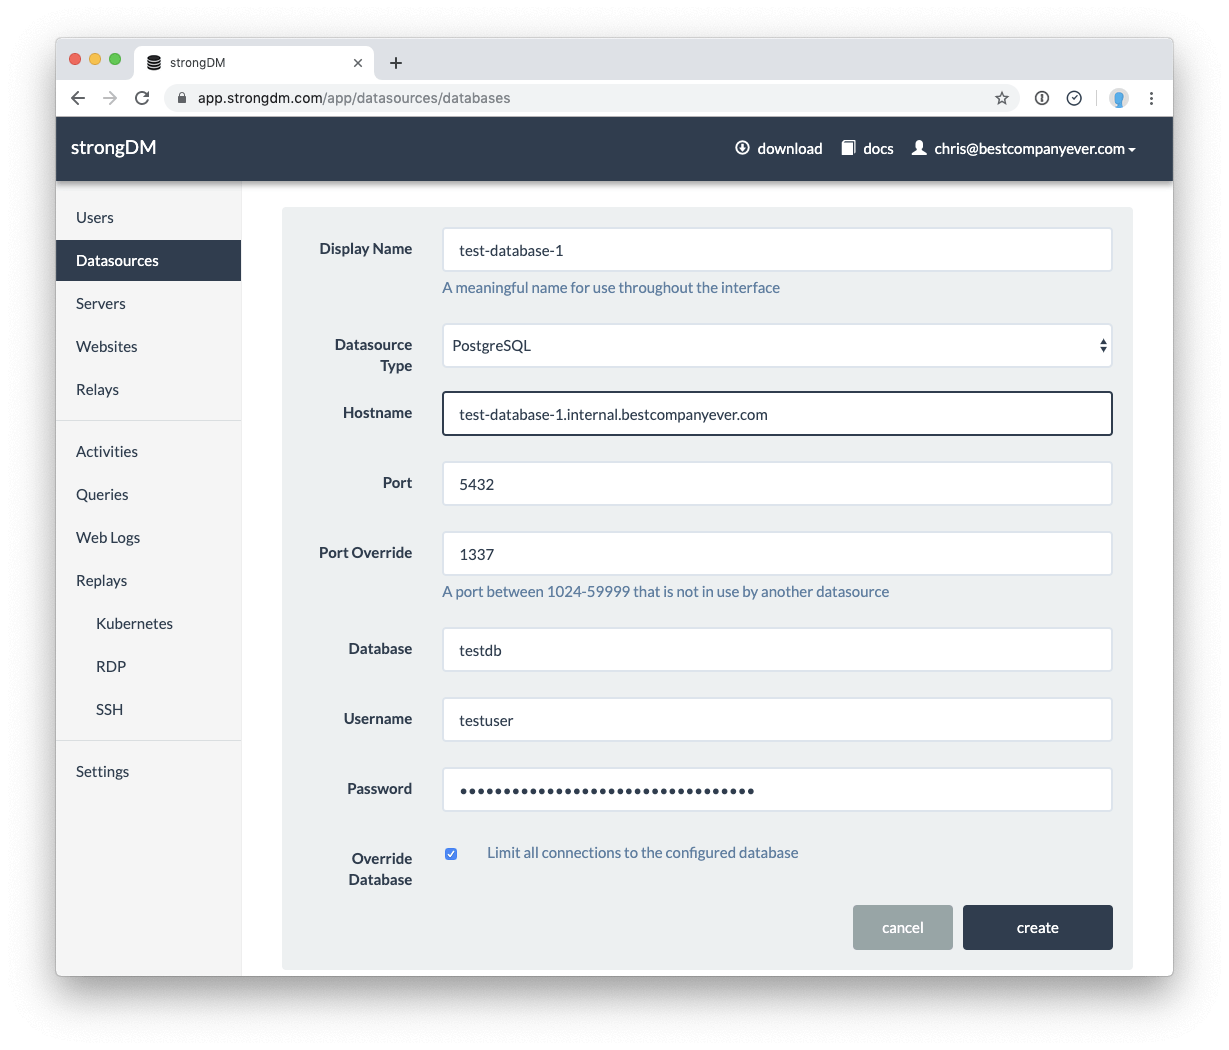
Adding a datasource to your StrongDM inventory is just as easy as adding a server! Enter the information about the database to enroll it into StrongDM.
- Display Name – the datasource’s name as it will show up in the StrongDM inventory. Again, this doesn’t have to match the DNS name, but I’d recommend keeping them as close as possible!
- Datasource Type – the database engine of the database you’re connecting to
- Hostname – the DNS-resolvable hostname or IP address of the target datasource
- Port – the port you are using to connect to the database. StrongDM will fill in the default port of the chosen datasource type, but you can adjust it if necessary
- Database – the database you want to enroll
- Username/Password – the credentials for the user with privileges to the database
Similar to server management, you can create multiple datasources for a single database server. I’d again recommend creating two users per server per database; one with write access and one with read-only access. As we’ll learn in the next sections, we can follow The Principle of Least Privilege and only give developers certain access based on their role in the organization!
User Management

For larger teams, or those who want to add users in a more automated way, you can use the sdm CLI to add users from a CSV file.
$ cat users.csv
Chris,Becker,chris@bestcompanyever.com
Liz,Zalman,liz@bestcompanyever.com
Bill,Gates,bill@bestcompanyever.com
$ sdm admin users add --csv users.csv
After you’ve added all of your teammates, you can assign four different permissions levels for them, listed here from most powerful to least powerful: Account Administrator, Database Administrator, Team Leaders, and User.
- Account Administrators – have complete administrative access to your account. They can access account settings and any sdm admin subcommand for managing the account. Additionally, account administrators can create any of the resources within StrongDM; roles, users, datasources, servers, etc.
- Database Administrators – can create, delete, configure, and manage datasources and servers
- Team Leaders – can manage users within a particular role. This role is designed for managers who are in charge of a team but don’t necessarily control the infrastructure they use. Team Leaders can invite new users exclusively to the role they manage, and those users will inherit the same access as the Team Leader.
- User – the default for anyone invited to the account. Users can query and access datasources and servers, but cannot perform any administrative tasks
This handy chart provided by the StrongDM shows a more detailed breakdown of the permissions scope:
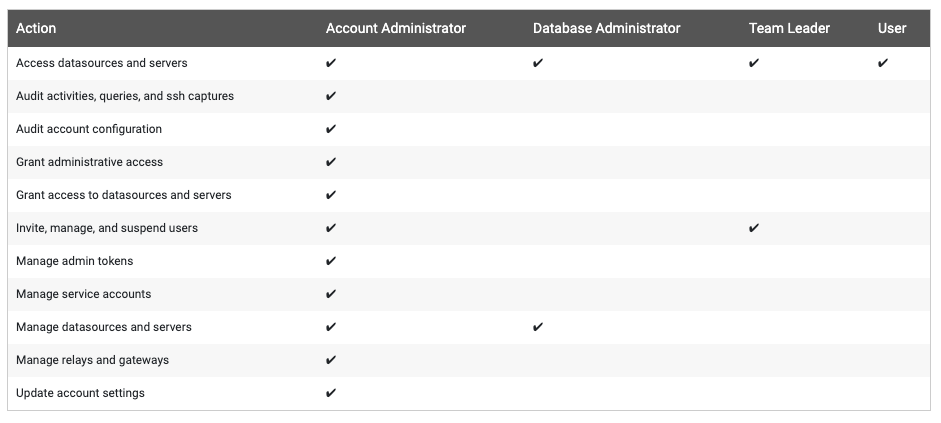
In most cases, the team managing the StrongDM infrastructure will be the only account administrators, and other engineers are assigned to Team Lead/User roles. I’d recommend starting out simple as possible and re-evaluating as the team grows and becomes more complex.
Provisioning Access with Roles
Servers and Datasources can be assigned to users in two ways: to their user accounts or roles that they are members of.
By User
When you’re starting out, or if you have a small team, the easiest way to manage access is by assigning resources to the user accounts directly.
By Role
After a team becomes sufficiently large, adding a new datasource or server to every user can become tiresome; enter roles! Roles allow you to group users together and assign resources to them en masse. Users can only be assigned to one role. For teams that touch infrastructure across different domains, you can use a composite role; a role made up of other roles in a hierarchy.
Conclusion
And just like that, we’re all set up! We created a gateway, added a server to our inventory, added a database to our inventory, and added users to the platform. From here, you can continue to onboard new servers and databases to StrongDM with ease, and even begin to think about more advanced topics like connecting multiple cloud networks via a StrongDM relay, and having your servers auto-register themselves with StrongDM at boot.
Replace LDAP or your VPN today, get started with a free, 14-day trial or learn how Troops rolled out StrongDM "literally within an hour".
To learn more on how StrongDM helps companies replace VPN, make sure to check out our VPN Alternative Use Case.
💙 this post?
Then get all that StrongDM goodness, right in your inbox.
You May Also Like
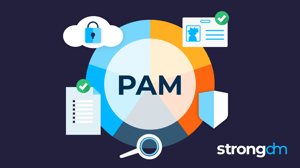
Understanding the pillars of access control and following best practices for PAM gives you a roadmap to an implementation that is secure and comprehensive with no security gaps. This article contains nine essential privileged access management best practices recommended by our skilled and experienced identity and access management (IAM) experts.
Vendor Access Management (VAM) is the systematic control and oversight of vendor access to an organization's systems, applications, and data. It involves processes such as onboarding and offboarding vendors, utilizing solutions for Just-in-Time access, ensuring security, and streamlining workflows to minimize operational inefficiencies.

The New York Department of Financial Services (“NYDFS”) Cybersecurity Regulation is a set of comprehensive cybersecurity requirements that apply to financial institutions operating in New York. The goal of the regulation is to ensure that the cybersecurity programs of financial institutions have robust safeguards in place to protect customer data and the financial sector.