The DROP DATABASE command in PostgreSQL is a powerful command that is used to delete a database along with all its associated objects, such as tables, views, indexes, and other database-specific elements. It is often a good practice to clean up your workspace by removing unused databases. However, keep in mind that deleting an existing PostgreSQL database deletes all objects and data within that database. This command should be used with caution as it irreversibly removes the specified database and its contents.

StrongDM manages and audits access to infrastructure.
- Role-based, attribute-based, & just-in-time access to infrastructure
- Connect any person or service to any infrastructure, anywhere
- Logging like you've never seen
MongoDB is a document-oriented cross-platform database that makes storing and retrieving complex data easy and fast. It uses a JSON-like structure for the documents, which is familiar to anyone working with modern applications.
Create a New User in MongoDB
MongoDB provides an internal method, db.createUser(), that is used for creating new users in the system. Unlike traditional SQL databases, MongoDB users are not global, but tied to what is called an Authentication Database.
From the MongoDB documentation:
The user’s name and authentication database serve as a unique identifier for that user. That is, if two users have the same name but are created in different databases, they are two separate users. If you intend to have a single user with permissions on multiple databases, create a single user with roles in the applicable databases instead of creating the user multiple times in different databases.
Connecting to the Database With The MongoDB Shell
Using the mongo CLI, also known as the mongo shell, connect to your database with the appropriate admin credentials:
mongo --host mongodb0.example.com \
 --port 27017 \
 --username your_admin_user \
 --password
Note: To force mongo to prompt for a password, enter the --password option as the last option and leave out the argument.
Adding the User
Use the db.createUser() method to add the user to the specified database. Adding a user with options is easy, it’s essentially inserting a user document into a NoSQL database!
use reporting               // specify the DB
db.createUser(
 {
   user: "reportsUser",
   pwd: passwordPrompt(),  // or cleartext password if you wish
   roles: [
      { role: "read", db: "reporting" },
      { role: "read", db: "products" },
      { role: "read", db: "sales" },
      { role: "readWrite", db: "accounts" }
   ]
 }
)
In the example above, after connecting to the MongoDB instance, we attach to the reporting database to execute our db.createuser() command. The database that we use will act as the user’s Authentication Database.
The username and password are specified as key-value pairs in the document we’re using for our method call. Access to databases is granted with roles. Roles are required for a user to access any database, even it’s own Authentication Database! In the example, we grant read to three databases, and readWrite to a fourth.
It’s that easy!
A Safer MongoDB With StrongDM
With StrongDM, we can abstract away usernames and passwords from our developers and allow us, the systems administrator, to keep the master passwords in a safe space under lock and key. StrongDM provides us with central authentication and auditing for all actions against a MongoDB host.
To add a new MongoDB host to StrongDM:
- Login to the StrongDM admin website and select datasources (If you don't yet have an account, you can create one here.)
- In the upper right-hand part of the screen, click the add datasource button.
- Select MongoDB (solo or sharded) from the available list of datasource types.
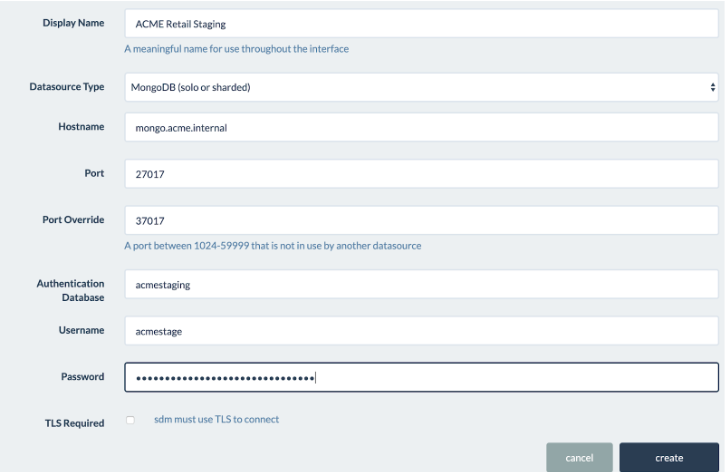
In this dialog, you’ll configure how your StrongDM gateways will connect to the MongoDB database. For this to work properly, you will need to ensure that at least one of your gateways has a network path to the target database system.
- Type in a Display Name — this is how the database will show up in the Admin UI and local clients - in the example above, we used ACME Retail Staging.
- Enter the hostname or IP address of the target database. Again, this endpoint must be connectable from at least one gateway instance.
- The port— in this case, 27017, will be automatically chosen based on you selecting MongoDB as your database type above. If your database is configured to run on a non-standard port, enter this custom port number here.
- The Port Override will automatically populate based on other datasources in your organization if you have others. This port is the one that clients will open on engineers’ workstations when they connect to the datasource with the SDM application. You can overwrite it with your own preferred port if you wish, but the default port number is almost always fine.
- Type in the Authentication Database. This is the database that the user was created for, and the database that they authenticate against. In our case, we created this user with the Authentication Database of acmestaging.
Note: A user’s privileges are not limited to their authentication database, they can have privileges across as many databases as needed. Using roles, you can give users access to other databases in the system. Configure this as you wish, but keeping users’ access scoped as small as possible aligns with the Principle of Least Privilege.
- Type in the Username that the relay will be connecting to the database with; in this case, acmestage.
- Type in the Password for the user.
- If your MongoDB database is configured to require TLS, check the box to have the StrongDM gateway negotiate a secure connection.
After you hit Create, your engineers will immediately have access to connect to this database, and any other that this user has access to, via their StrongDM app. Try for yourself with a free, 14-day trial.
💙 this post?
Then get all that StrongDM goodness, right in your inbox.
You May Also Like

Creating Postgres users isn't just a routine step in the complicated world of database management; it's a critical strategy that has a significant impact on how PostgreSQL databases operate and remain secure. An increasing number of organizations depend on sophisticated data systems, so it's critical to recognize the value of Postgres users. This blog post walks you through the steps of creating a Postgres user, as well as, explores the significance of these users in database administration, emphasizing their function in maintaining security, limiting access, and ensuring efficient data management.

The number and complexity of databases that every organization must manage has skyrocketed. If you need access - or need to provide it - it can sure be a pain in the access to manage.
Today, we’ll take a look at what just-in-time access (JIT) means and what types there are. You’ll also learn about what a JIT access solution can do for your organization. By the end of this article, you’ll understand how just-in-time access works, the best practices to ensure secured implementation, and how strongDM comes to the rescue.