Add an SSH Server with a Customer-Managed Key
Last modified on May 9, 2025
An SSH server is a combination of a specific SSH destination and the credentials to access it. This guide describes how to set up an SSH server with your own key in the Admin UI.
Prerequisites
Before you begin, you must ensure that the server you are attempting to add is accessible from the StrongDM relay or gateway. You must have a properly functioning relay up and running, and it must be able to reach the target server before you can proceed. Setting up a relay is out of the scope of this guide, but for more information, see Nodes.
Generate the Key
First generate your key. Use PEM or OpenSSH formatting to generate your key.
Add a Server in the Admin UI
Log in to the Admin UI and select Resources > Servers.
Click the add server button.
On the Add Server dialog, select SSH (Customer Managed Key) as the Server Type and set other resource properties to configure how the StrongDM relay connects to the server via SSH.
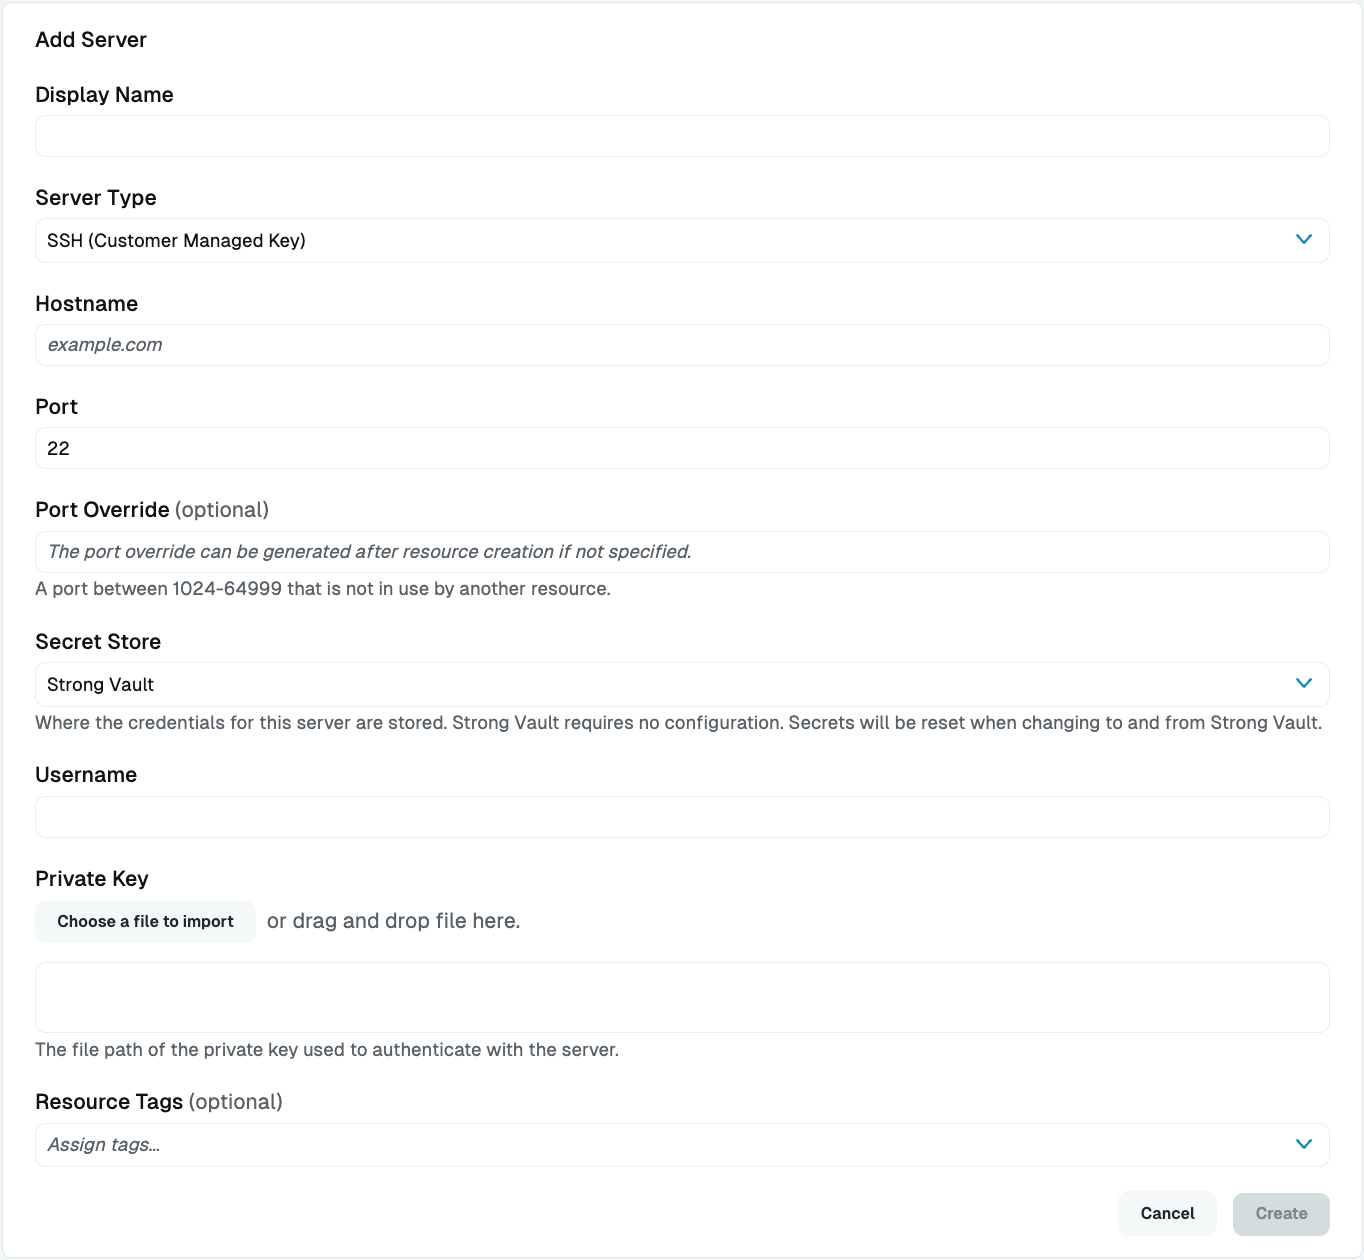
Add SSH Customer-Managed Key Configuration Properties Click create to save the resource.
Resource properties
Configuration properties are visible when you add a Server Type or when you click to view the server’s settings. The following table describes the settings available for your SSH (Customer Managed Key) server.
| Property | Requirement | Description |
|---|---|---|
| Display Name | Required | Meaningful name to display the resource throughout StrongDM; exclude special characters like quotes (") or angle brackets (< or >) |
| Server Type | Required | Select SSH (Customer Managed Key) |
| Proxy Cluster | Required | Defaults to “None (use gateways)”; if using proxy clusters, select the appropriate cluster to proxy traffic to this resource |
| Hostname | Required | Hostname or IP address to which you are connecting, such as testserver-01.example.org; relay server should be able to connect to your target server or hostname |
| Port | Required | Port to connect to the resource; default port value 22 |
| Bind Interface | Read only | Automatically generated IP address value in the 127.0.0.1 to 127.255.255.254 IP address range; default is 127.0.0.1; preferred bind interface value can be modified later under Settings > Port Overrides |
| Port Override | Read only | Automatically generated with a value between 1024-59999 as long as that port is not used by another resource; preferred port can be modified later under Settings > Port Overrides |
| Secret Store | Optional | Credential store location; defaults to Strong Vault; to learn more, see Secret Store options |
| Authentication | Required | Select Leased Credentials (default) or Identity Aliases |
| Username | Required | Displays if Authentication is set to Leased Credentials and using StrongDM Secret Store; enter the username the relay should utilize to connect to the server via SSH (for example, bob.belcher) |
| Username (path) | Required | Displays if Authentication is set to Leased Credentials and using a non-StrongDM Secret Store; path to the secret in your Secret Store location (for example, path/to/credential?key=optionalKeyName where key argument is optional) |
| Identity Set | Required | Displays if Authentication is set to Identity Aliases; select an Identity Set name from the list |
| Healthcheck Username | Required | Displays if Authentication is set to Identity Alias; enter the username that will be utilized to verify StrongDM’s connection to the server; username must exist on the target server |
| Private Key | Required | The key in either plaintext or Base64 encoding; paste the key or import the key |
| Resource Tags | Optional | Resource tags consisting of key-value pairs <KEY>=<VALUE> (for example, env=dev) |
Secret Store options
By default, server credentials are stored in StrongDM. However, these credentials can also be saved in a secrets management tool.
Non-StrongDM options appear in the Secret Store dropdown if they are created under Settings > Secrets Management. When you select another Secret Store type, its unique properties display. For more details, see Configure Secret Store Integrations.
Identity Aliases and third-party Secret Stores
When you use Identity Aliases in combination with a third-party Secret Store, it is possible to provide different keys for different Identity Aliases. During server configuration, the Private Key (path) field, which specifies the path to the SSH private key in the Secret Store, can optionally include the variable $SDM_USERNAME. This variable is substituted with the user’s Identity Alias when connecting to the resource. This allows a different SSH key to be used for different Identity Aliases connecting to the same resource.
For example, you could set Private Key (path) to path/to/credential/for/$SDM_USERNAME?key=ssh-key and store the keys for different users in the Secret Store under paths matching that pattern (path/to/credential/for/user1, path/to/credential/for/user2, …path/to/credential/for/userN). This is optional. If the path you provide does not include the variable, the same SSH key is used for each user. This is only supported for third-party Secret Stores, as using the Strong Vault only allows a single key to be configured.
Add Your Key to Your Hosts
If you have not already, add your public key to the targeted host.
Open a command prompt on the server you are adding and edit the authorized keys file for the user specified during server setup.
sudo vi ~/.ssh/authorized_keysAppend the generated public key to the end of the file, save, and exit.
Back in the Admin UI, go to the Servers section and click the server’s name to view status, diagnostic information, and setting details.
In the server settings, click the Update button.
The Admin UI displays that resource as unhealthy while the configuration is being applied. When the resource is ready, the Health icon indicates a positive, green status.