Google Cloud Provisioning Configuration Guide
Last modified on August 6, 2024
User provisioning provides you with the ability to continue to manage your organization’s users in one place, and have those users populate into StrongDM. Provisioning prevents the need to create a duplicate set of users in StrongDM that already exist in your identity management service. When provisioning users, the users are set up in the external service and are then synced to StrongDM. The provisioned users are not able to be individually edited within StrongDM. Changes to provisioned users are made at the source and are synced to StrongDM afterward. These users in StrongDM are given access to resources in the same manner as native users: by assigning them to roles that contain the desired access permissions.
This guide explains how to configure Google Cloud as an identity provider (IdP) for user and group provisioning. Configuration involves creating a Google Cloud service account and setting up the StrongDM Admin UI for provisioning. When done, you can use provisioning to securely automate and manage user identity information, such as user account creation, updates, and deactivation between Google Cloud and StrongDM.
Prerequisites
- You must have a Google super administrator account to complete the service account configuration.
- You must be familiar with Google group creation.
Create a Service Account
Follow the steps in this section to create a service account. The service account is used to connect to StrongDM. See additional steps in Google documentation.
Create a project
In the Google Cloud console, create a new project. After the project is created, make sure to select your project from the Select from dropdown list on the Dashboard page.
Activate Admin SDK API access
- In the Google Cloud console, go to Menu > APIs and Services > Library.
- Search the API library for and select the Admin SDK API.
- Enable the API for your project.
Create a new service account
- In the Google Cloud console, go to Menu > APIs and Services > OAuth consent screen.
- Select the Internal user type and click Create.
- Configure the remaining OAuth consent screen information, fill out all mandatory fields, and return to the dashboard.
- From the APIs and Services menu, select Credentials.
- Click Create credentials and select Service account.
- Fill out the service account details.
- Select the service account’s email address to configure the service account details. The user you are logged in as is the owner of the service account.
- From the Keys tab, add and then create a new JSON key; the key downloads to your computer. You may rename the key for easier identification.
- From the Details tab, copy the Unique ID; you use this in the following step.
Enable domain delegation
Navigate to
admin.google.com.Go to Menu > Security > Access and data control > API Controls.
Select Manage Domain Wide Delegation.
Click Add new and paste the Unique ID in the Client ID field.
In the OAuth Scopes fields, enter and authorize the following scopes:
https://www.googleapis.com/auth/admin.directory.user.readonly
https://www.googleapis.com/auth/admin.directory.group.readonly
https://www.googleapis.com/auth/admin.directory.group.member.readonly
Configure Provisioning in the Admin UI
Log in to the StrongDM Admin UI.
Go to Settings > User Management.
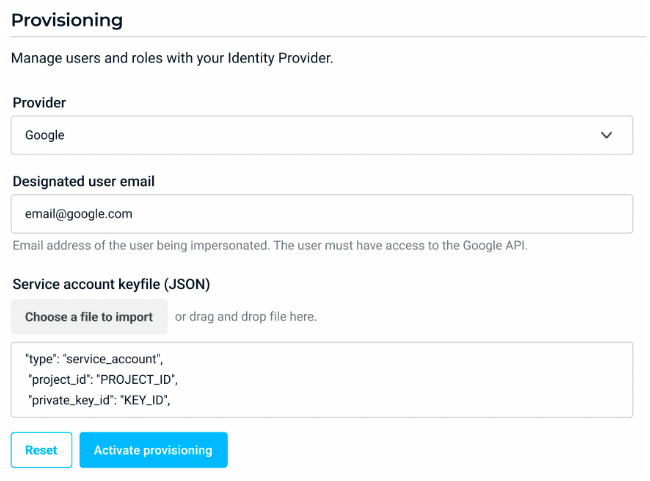
Under Provisioning, select Google as the provider.
Enter the Designated user email. This email address must have appropriate API resource access.
Import or manually enter the Service account keyfile (JSON); this is the service account JSON file that downloaded.
Click Activate provisioning.
Google Group Provisioning Select groups to import. Information about group creation and management is available in Google documentation.
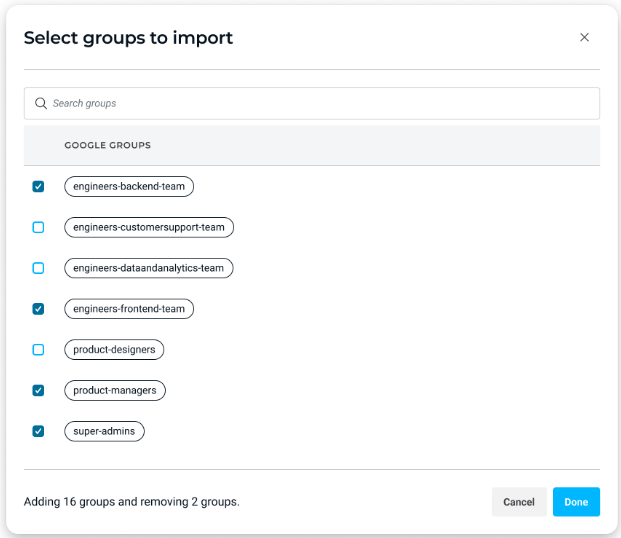
Select Groups for Google Cloud Provisioning
Provisioning setup is now complete.
Provisioning Management in the Admin UI
The Admin UI’s Provisioning section provides important information about your provisioning configuration.
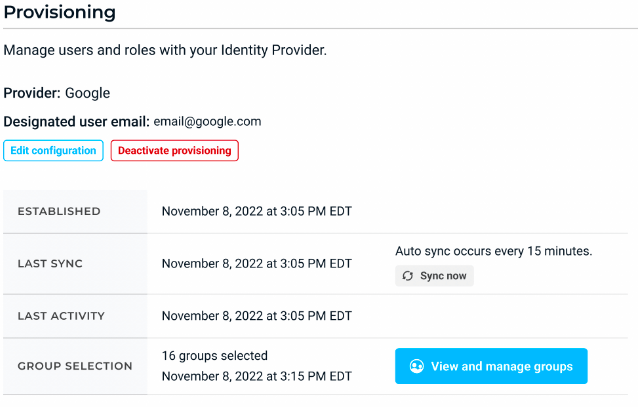
After you are done configuring Google Cloud provisioning, you can view and manage your setup using the following buttons.
- Edit configuration lets you make changes to your provisioning configuration.
- Sync now checks for changes in Google Cloud and synchronizes groups. Organizations configured with Google provisioning automatically sync every 15 minutes. That means that changes in Google group memberships may not be reflected immediately in StrongDM. Please be patient while waiting for the periodic sync to complete.
- View and manage groups displays all groups selected for provisioning and allows you to change your group selection.
- Deactivate provisioning disables provisioning and converts every Google Cloud-managed user and role into a StrongDM-managed user and role. Deactivation does not delete or suspend users or roles, and it does not change access. Deactivation simply means that Google Cloud can no longer provision accounts and roles in StrongDM.
Provisioning properties
The following table describes the properties shown in the Provisioning section. All properties are read-only.
| Property | Description |
|---|---|
| Designated user email | User’s Google email address |
| Established | When provisioning was activated |
| Group Selection | Number of groups currently selected and the last time groups were selected |
| Last Activity | Last time changes were found in Google Cloud and applied in StrongDM |
| Last Sync | Last time the sync ran to check for changes in Google Cloud |
| Provider | Name of identity provider (in this case, Google) |
Information about groups, roles, and users
Google groups correspond to StrongDM roles. When a Google group is selected for provisioning, a role with the same name is provisioned in StrongDM, and all members of that group are provisioned as users assigned to that role.
When configuring provisioning in the Admin UI, you must select groups for provisioning in order to get roles provisioned within StrongDM. If you don’t select groups, they are not provisioned. The same rule applies when a group has member groups within it—you must select every group and member group in order to get those roles provisioned within StrongDM. Examples 1 and 2 illustrate how selected groups are provisioned as roles and how users are assigned to the roles.
Example 1 group and role assignment
In the example shown, the Engineering group is selected for provisioning.
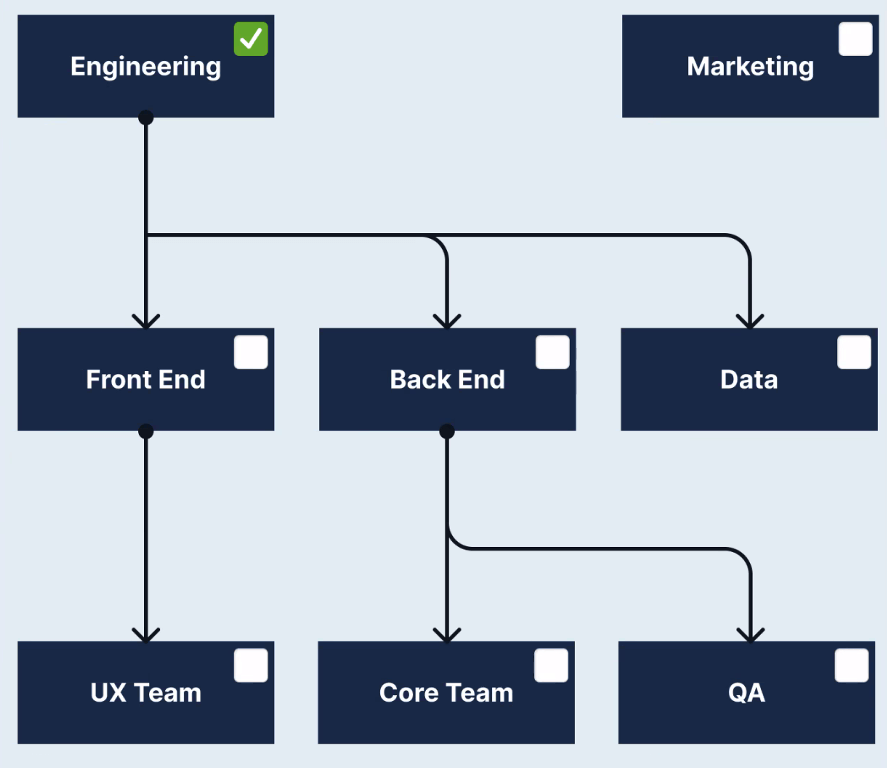
This selection causes only the Engineering role to be created. Only the members of Engineering are provisioned as users assigned to the Engineering role. No one from the Marketing group is provisioned.
| Users in | Have role(s) |
|---|---|
| Back End | Engineering |
| Core Team | Engineering |
| Data | Engineering |
| Engineering | Engineering |
| Front End | Engineering |
| Marketing | None |
| QA | Engineering |
| UX Team | Engineering |
Example 2 group and role assignment
In the example shown, the following groups are selected for provisioning:
- Engineering group
- Back End (a member group of Engineering)
- Core Team (a member group of Back End)
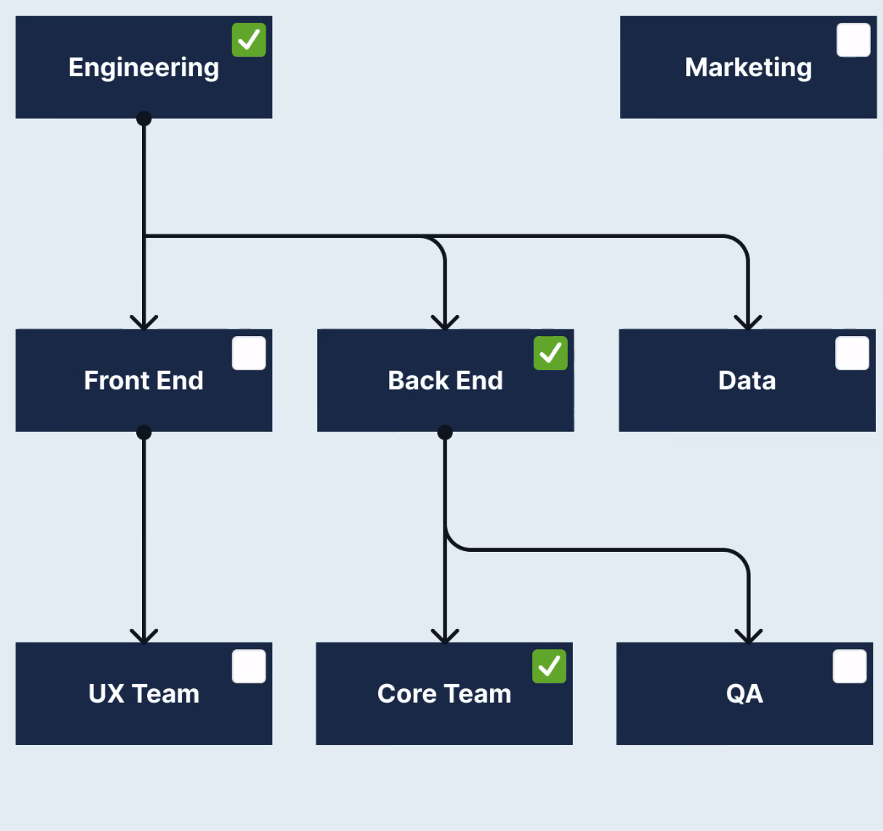
This selection causes three roles to be provisioned in StrongDM with the following users assigned to them:
| Users in | Have role(s) |
|---|---|
| Back End | Engineering, Back End |
| Core Team | Engineering, Back End, Core Team |
| Data | Engineering |
| Engineering | Engineering |
| Front End | Engineering |
| Marketing | None |
| QA | Engineering, Back End |
| UX Team | Engineering |
Troubleshooting and Tips
This section describes some common sync errors that may occur when Sync now is selected. These errors are expected behaviors. Please see our recommended solutions.
Error: A user email set up for Google provisioning exists in a separate StrongDM organization
Recommended solution: A user email that exists in one StrongDM organization may not be provisioned into another StrongDM organization. We recommend using different Google workspaces to provision multiple organizations within StrongDM.
Error: Google user email is changed to match an existing StrongDM user email
Recommended solution: Keep each user email unique between StrongDM and Google. If you want to provision a new user from Google that already exists in StrongDM, the Google user takes ownership of the existing StrongDM user (that is, manages it and adds additional Google-specific information).
Error: Google user group is updated to match an existing role in StrongDM
Recommended solution: Keep each group/role name unique between StrongDM and Google. If you want to provision a new group/role from Google that already exists in StrongDM, the Google group takes ownership of the existing StrongDM role (that is, manages it and adds additional Google-specific information).