Nodes
Last modified on July 16, 2025
Overview
Nodes are gateways and relays.
Gateways serve as the primary entry point to a StrongDM network. Gateways have an assigned IP address and optional DNS entry.
Relays, much like gateways, are how the StrongDM network connects with resources such as databases and servers. Unlike a gateway, the relay does not listen for client connections. When might this be helpful? For a secure network where you are not able to expose ports, the StrongDM relay is the answer. The relay dials out to connect to your gateways, preserving the egress-only nature of your firewall, but allowing your StrongDM clients to reach any configured resources in the network via those connections.
We recommend the following best practices when configuring nodes:
- Deploy nodes in pairs for redundancy.
- Offset node maintenance windows within any node pair for redundancy.
- Deploy gateways in regions that are closest to the largest amount of users.
- Deploy relays in regions as close as possible to the resources to which they send traffic.
- Do not place nodes behind a load balancer. If you must do so (such as with a cluster) there must be a 1:1 relationship between the port and the container. Deploying new nodes via autoscaling is all right, but failover and routing are handled by StrongDM.
- The hierarchy of gateways and relays is usually best with a limited number of gateways. Aim for 20 gateways maximum and have as many relays as necessary to enable the desired data flow or segregation. There is more flexibility in this regard when using explicit routing.
Gateways
Gateways serve as the primary entry point to a StrongDM network. Therefore, each gateway must be assigned an address that is accessible to your users. They can be deployed with a Domain Name System (DNS) entry or sit privately on the corporate network behind a Virtual Private Network (VPN). You can also assign an IP address directly if you prefer not to use DNS or a VPN. You need at least one gateway to connect to resources, but we recommend running them in pairs.
StrongDM gateways are usually exposed directly to the internet. In the case of a flat network, the gateway talks to the target systems on the corporate network. On a segmented network with no ingress, however, resources such as databases and servers may not be publicly accessible. If you wish to extend your StrongDM network into a more secure network or subnet, you may deploy a relay behind your firewall to route traffic and allow egress-only connections to secured resources.
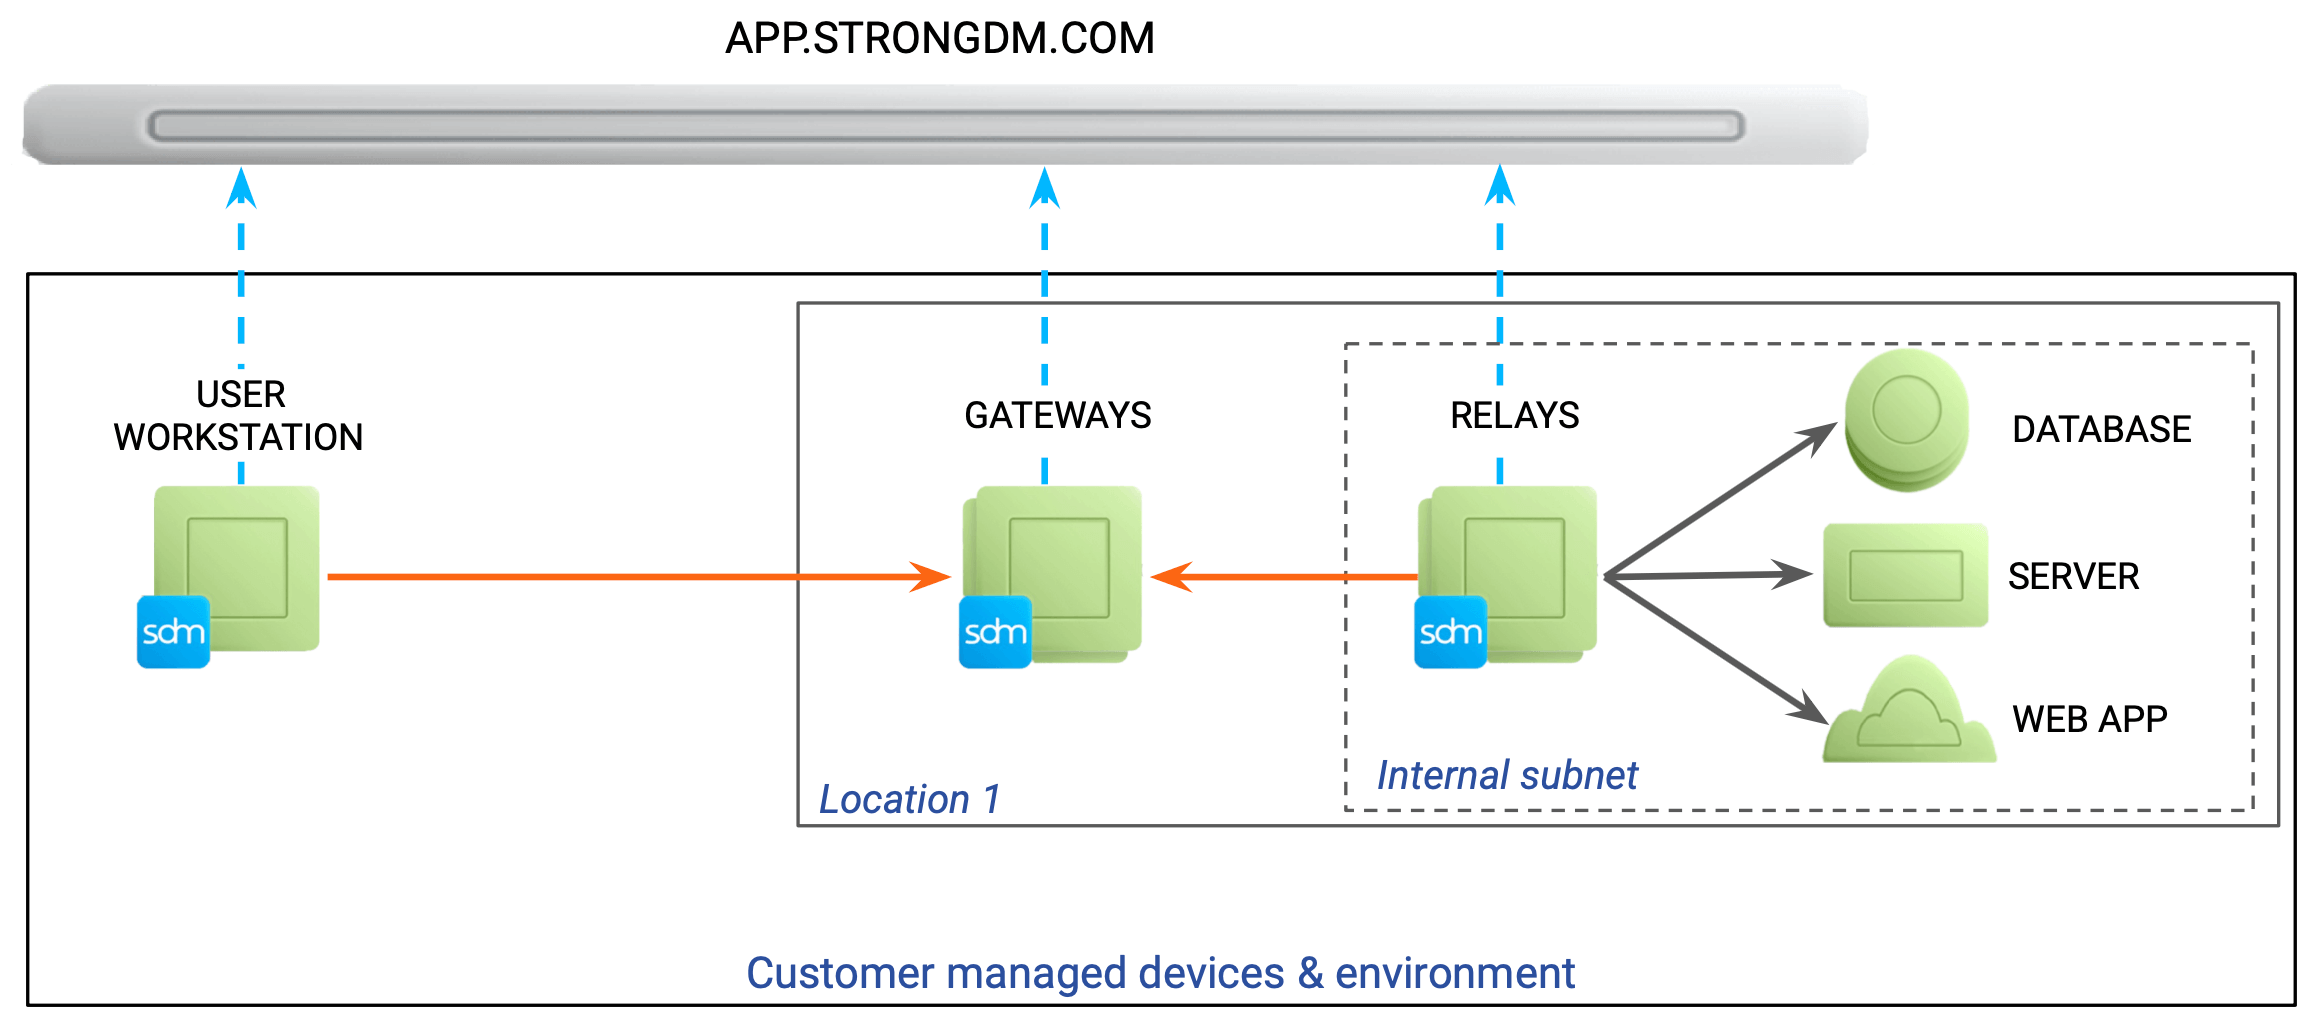
Gateways are essentially relays with an assigned IP address and optional DNS entry. Both gateways and relays also decrypt end-user credentials and deconstruct requests for auditing purposes.
When clients connect to the StrongDM network, they request a list of available gateways. StrongDM determines the most suitable route and sends all connections through one or more of these gateways. From the point of view of a resource, such as a database or server, all traffic originates from any relay or gateway with access to the resource.
Gateways can be deployed as a native Linux service, Docker container, or Kubernetes container. For more, check the Download & Install page in the Admin UI.
Gateway settings and configurations can be managed in the Admin UI from Networking > Gateways. On the Gateways page, you can add new gateways and view the status and details of existing gateways.
Add a gateway
Log in to the Admin UI.
Go to Networking > Gateways.
Click Add gateway. You can rename the gateway here or modify it later. Advertised host is the IP address or host that the gateway listens on. The Advertised port (default 5000) is the port that the service listens on.
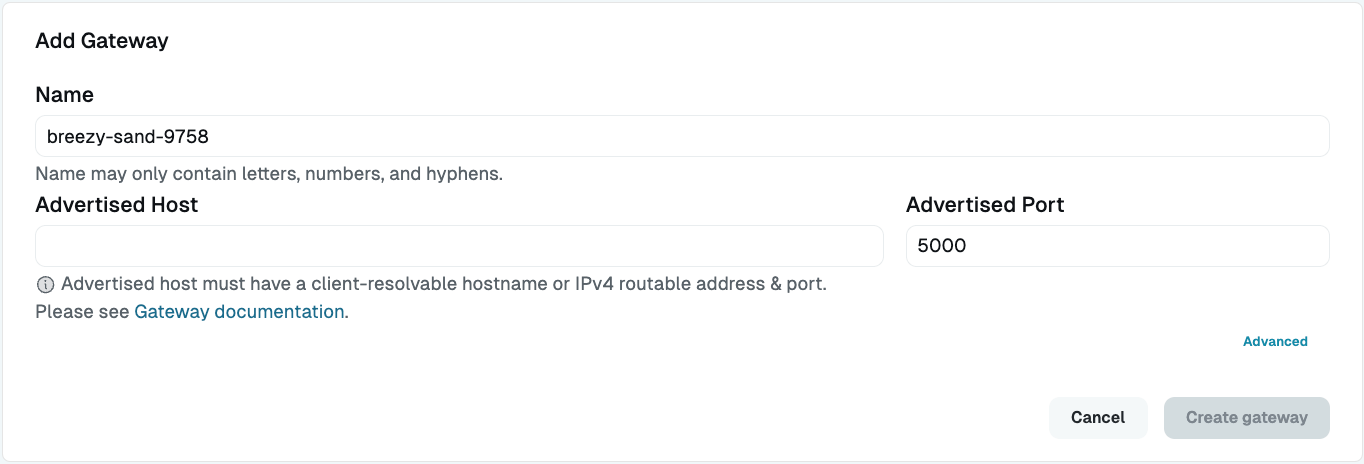
Add a New Gateway Click Advanced to add a Bind IP or a Bind Port.
Click Create gateway and the gateway token appears in a modal. Copy the gateway token and save it for use in a later step.
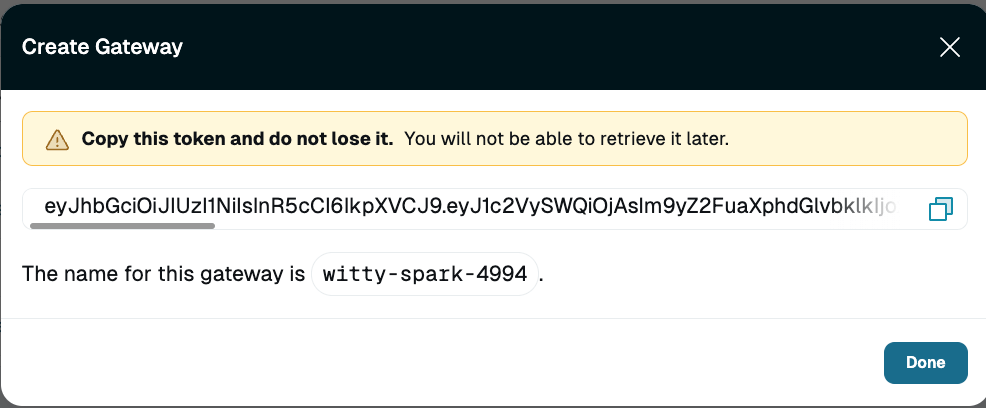
Gateway Token Set up a 64-bit Linux instance to run the gateway. Machines should have at least 2 CPUs and 4 GB of memory. If the instance is using SELinux, you need to disable SELinux to install the gateway.
If you are familiar with Terraform, and choose to set up a gateway in AWS, you can automate gateway setup!Log in to the gateway instance. Then download the StrongDM binary:
Unzip the binary:
unzip sdmcli_VERSION_NUMBER_linux_amd64.zipRun the installer:
The installer must be run by a user that exists in the /etc/passwd file. Any users remotely authenticated, such as with LDAP or an SSO service, will fail to complete the installation.
--node flag indicates to the software that you are installing a gateway or relay rather than a client. The flags --gateway and --relay alias to --node as well. The token that you paste in the next step, not the install flag used here, will dictate whether the software installs in “relay mode” or as a gateway.- When you are prompted for the gateway token you created in Step 5, paste it into the terminal. Press enter. For security purposes, the token does not display in the terminal.
- Log in to the Admin UI and go to Networking > Gateways. The gateway you created appears online and healthy. You may need to hard refresh the page.
- Confirm your gateway creation was successful by verifying that the LISTENADDR is accessible from the appropriate end user network, as in the following example.
telnet 10.0.50.17 5000
Trying 10.0.50.17...
Connected to 10.0.50.17
Escape character is '^]'
- Repeat this process to create a second gateway if you wish.We recommend deploying nodes in pairs for high availability.
Relays
As with gateways, StrongDM uses relays to connect with network resources such as databases and servers. However, relays do not listen for client connections. They can be deployed behind your firewall when internal subnets do not allow ingress, and you are not able to expose ports publicly.
Relays create a reverse tunnel to form connections to the gateway. With this action, they preserve the egress-only nature of your firewall and allow your users to reach any configured resources in the network via the desktop app.
When clients connect to the StrongDM network, they request a list of available gateways. StrongDM determines the most suitable route and sends all connections through one or more of these gateways. From the point of view of a resource, such as a database or server, all traffic originates from any relay or gateway with access to the resource.
The relay component can be deployed as a native Linux service, Docker container, or Kubernetes container. For more, check the Download & Install page in the Admin UI.
Relay settings and configurations can be managed in the Admin UI from Networking > Relays. On the Relays page, you can add new relays and view the status and details of existing relays.
Relay use cases
How do you know when to deploy a relay instead of a gateway? You may wish to use a relay if your organization has sensitive resources or if you want to isolate certain parts of the network in order to further protect them.
Relays are typically used if the organization has any of the following:
- Sensitive internal website resources (data science tools, CI/CD, internal repositories, and so forth)
- Sensitive databases with network compliance requirements
- Sensitive servers with network compliance requirements
- Segmented networks for Protected Health Information (PHI), Personally Identifiable Information (PII), or other sensitive data, with separate VPCs with additional compliance requirements
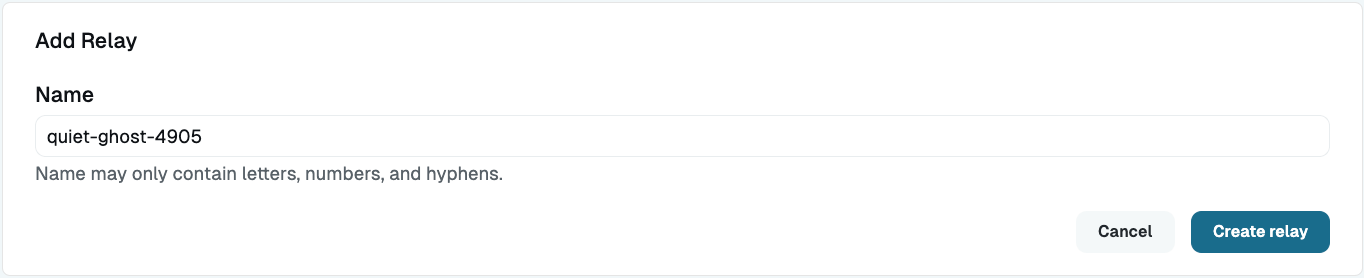
Add a relay
Add a relay to generate a relay token.
Log into the Admin UI.
Go to Networking > Relays.
Click the Add relay button.
In the modal that appears, you can rename the relay, or you can do it later.
Click Create relay and the relay token appears.
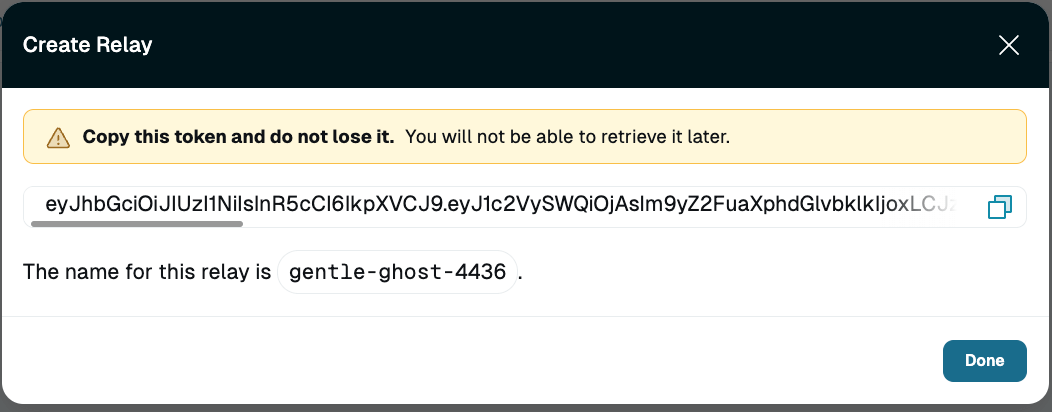
New Relay Copy the relay token and save it for use in a later step.
Set up a 64-bit Linux instance to run the relay. Machines should have at least 2 CPUs and 4 GB of memory. If the instance is using SELinux you need to disable SELinux to install the relay.
Log in to the relay instance and download the StrongDM binary:
Unzip it:
unzip sdmcli_*_linux_amd64.zipRun the installer:
The installer must be run by a user that exists in the/etc/passwdfile. Any users remotely authenticated, such as with LDAP or an SSO service, will fail to complete the installation.When prompted for the relay token you created in Step 5, paste it into the terminal and press enter. For security purposes you will not see the token on the screen.
Log in to the Admin UI and the relay you created should now appear as online, with a heartbeat. You may need to hard refresh the page.
Repeat this process to create a second relay if you wish. We recommend running them in pairs for high availability.
To allow access to and from resources and StrongDM, make sure that relay egress requirements are met.
Egress Requirements
Although relays do not allow ingress, both gateways and relays do have some egress requirements. Nodes must be able to successfully send traffic to several destinations in order to function correctly. Specifically, they must meet the following minimal egress requirements:
For more information, please see the Ports Guide.
Additionally, if your organization requires outbound traffic from your infrastructure to pass through your own corporate proxy, you must set either or both of the SDM_HTTP_PROXY/SDM_HTTPS_PROXY environment variables. Please see the Enviroment Variables for a list of available environment variables for use with StrongDM.
Node Management in the Admin UI
The Gateways and Relays pages of the Admin UI list the nodes that have been configured for your organization. On these pages, you may search and filter on nodes, view status, view the last heartbeat, and get more details about each node.
A list (in table format) of existing gateways or relays is displayed on the Gateways and Relays pages in the Admin UI. You can sort the table of gateways or relays in your organization by clicking on column headers. Clicking a column header sorts the table by the values in that column, in ascending order. Clicking again on the same header reverses the sorting direction.
Search filters
You can use search filters to search for specific nodes and display them according to their name, status, listen address, or bind address.
To use filters, type or copy/paste the following filters into the Search field, with or without other text. Do not use quotes or tick marks.
| Filter | Description | Example search |
|---|---|---|
bindaddr:<IP_ADDRESS> | Shows gateways or relays with the specified bind address | bindaddr:0.0.0.0:5000 finds gateways or relays that have a bind address of 0.0.0.0:5000. |
listenaddr:<IP_ADDRESS> | Shows gateways or relays with the specified listen address | listenaddr:10.0.0.021:5000 finds gateways or relays that have a listen address of 10.0.0.021:5000. |
name:<PARTIAL_STRING> or any free-form text | Shows gateways or relays with names that match the entered string; partial string OK | name:keen-coffee or coffee finds all gateways or relays whose names contain those characters. |
status:<BOOLEAN> | Shows gateways or relays that are online (true) or offline (false) | status:false finds all offline gateways or relays. |
View status
In addition to the node name and heartbeat, you can see a node’s current status (for example, “online”).
The possible statuses for nodes are shown in the following table.
| Status | Description | Node type |
|---|---|---|
| awaiting restart | Gateway or relay is waiting to enter a restart window to execute a planned restart | Gateway, relay |
| dead | Gateway or relay is offline or not able to reach the StrongDM API | Gateway, relay |
| isolated | Relay cannot dial or successfully handshake an authentication with any gateways; isolated relays may successfully healthcheck resources, but their routes will be unavailable for use by users, as there is no way for the user to hop from a gateway to an isolated relay | Relay |
| new gateway | Gateway has been created but has not been started or has never accessed the StrongDM API | Gateway |
| new relay | Relay has been created but has not been started or has never accessed the StrongDM API | Relay |
| online | Gateway or relay is able to reach out to both the StrongDM API and at least one gateway and can serve client connections | Gateway, relay |
| restarting | Gateway or relay has shut down for a planned restart | Gateway, relay |
| verifying restart | Gateway or relay has come online once and is awaiting coming back online after an initial restart | Gateway, relay |
Maintenance
See the Maintenance Windows for information about how to schedule a maintenance window for gateways and relays.
If a node has been active (had a heartbeat at least once) and then remains completely inactive (no heartbeat) for 30 days, the node is automatically removed from the StrongDM organization due to its inactivity.
Install Your Node
The first step to deploy StrongDM is to decide where to host your StrongDM nodes (gateways and relays). This is not a final decision; you can change your nodes or add additional nodes at any time. Check out the following guides to learn how to install a node on various tech stacks:
You can find resources and information about the following StrongDM topics in this section: