Quick Start Guide
Last modified on July 3, 2025
Overview
This guide is designed to help administrators with initial configuration of their StrongDM network. You will learn how to set up a gateway and resource in the Admin UI, set appropriate permissions and roles in order to access the resource, install and use the StrongDM client to connect to it, and review activity history in the logs. This quick start allows you to try using StrongDM before setting up access for your entire organization.
Prerequisites
Before you begin, the following requirements should be met:
- Server (to host the gateway): You can repurpose an existing bastion or jump host for testing purposes. For production-ready deployments, we recommend a server reserved exclusively for use as a gateway.
- Specifications: The StrongDM gateway can be installed on any Linux distribution. We recommend servers with 2 CPUs and 4 GB of memory.
- Network Settings: To get live quickly, the server hosting the gateway needs to be able to connect to the resource that you set up. This may require modifying the security group on the server or database itself. You also need SSH access to the server.
Create a Gateway
Gateways serve as the entry point to your StrongDM network. When users authenticate to StrongDM via their client, the client reaches out to a gateway, which checks the user’s permission level, role(s), and access grants before routing the client’s traffic and initiating a connection to the target resource. Every network must have at least one gateway in order for StrongDM to work.
Gateways are hosted on servers that live outside of StrongDM. The following steps show you how to define and connect to the host of a new gateway, using the Admin UI and your command line.
- Log in to the Admin UI.
- From the navigation menu, click Network and then click Gateways.
- On the Gateways page, click Add gateway.
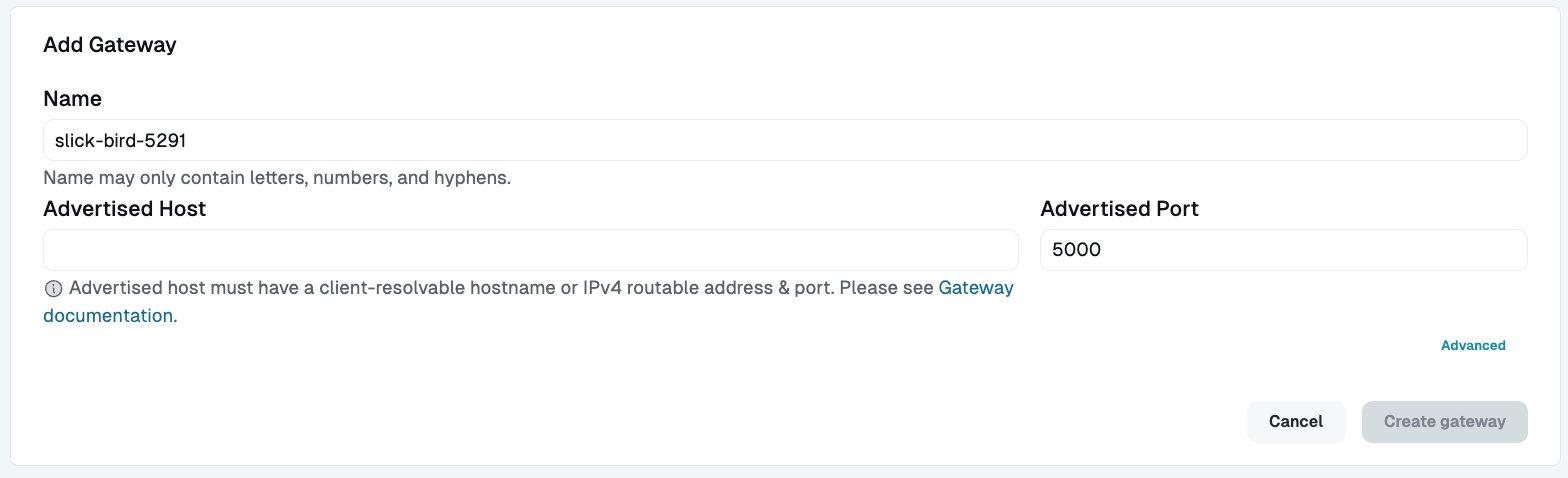
For Name, enter a unique, memorable name. Use only letters, numbers, and hyphens.
For Advertised Host, define the advertised host for the server (for example,
sdm-gw0.yourcompany.com,111.222.333.444, orec2-nn-nnn-nnn-nnn.us-east-2.compute.amazonaws.com). It must be an IP or hostname accessible to your StrongDM client(s).For Advertised Port, enter the port that you left open for the gateway to interact with StrongDM clients (by default,
5000). If you need to use another port, choose any port above 1024, as StrongDM runs as a non-privileged daemon.Click Create gateway to save your name, host, and port.
A token is generated that is shown only once. Carefully copy the token and save it for later use.
Establish an SSH connection to the server that will host the gateway.
Download the StrongDM binary:
Unzip it.
unzip sdmcli_VERSION_NUMBER_linux_amd64.zipRun the installer.
The installer must be run by a user that exists in the
/etc/passwdfile.If you typically set up servers with SELinux on, make sure it is turned off while installing the StrongDM binary.
When prompted for the token created earlier, paste it and hit enter. Note that the token does not echo back to you.
Return to the Admin UI. On the Gateways page, the gateway just created should have a status of online and a heartbeat.
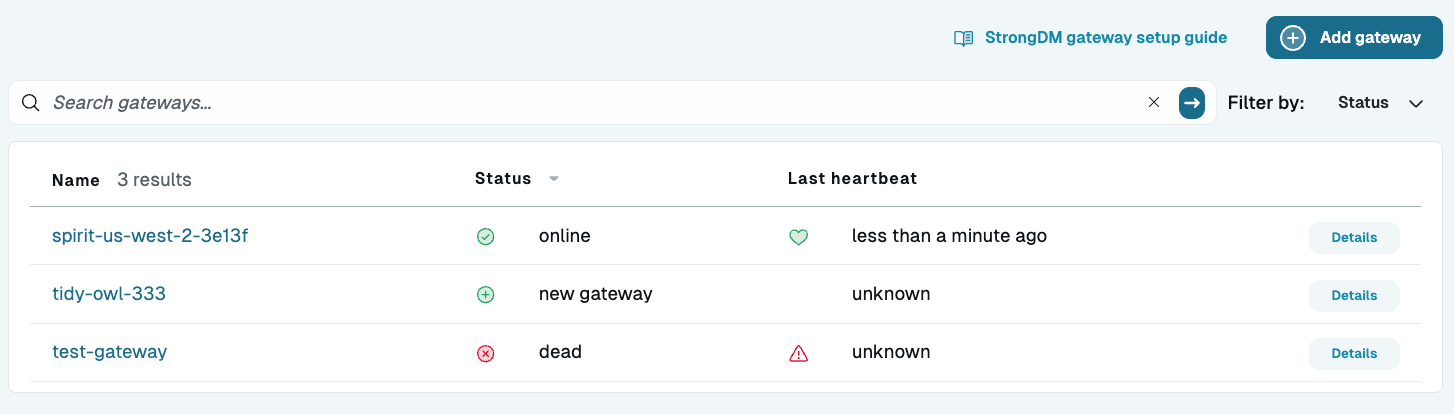
Example of Gateways Page Showing Online Gateways If the gateway does not appear to be online, it’s possible the webpage is cached. Please perform a hard refresh of your browser. If the gateway is still not online, verify that the StrongDM daemon is running by typingps aux|grep sdmon the server and looking for a line that sayssdm relay.
Add a Resource
A resource is any type of infrastructure—datasources, servers, clusters, clouds, and websites—that is added and configured for your organization. StrongDM users use the client to view and connect to the resources that they have permission to access.
You need to add at least one resource to your organization because if you don’t, users won’t be able to do anything in StrongDM other than log in. You can add any supported resource type; however, for the purposes of this procedure, we are adding a datasource.
In the Admin UI, select Resources from the navigation menu and choose a resource type to add to your organization. In this example, we select Datasources to add a database.
On the Datasources page, click Add datasource.
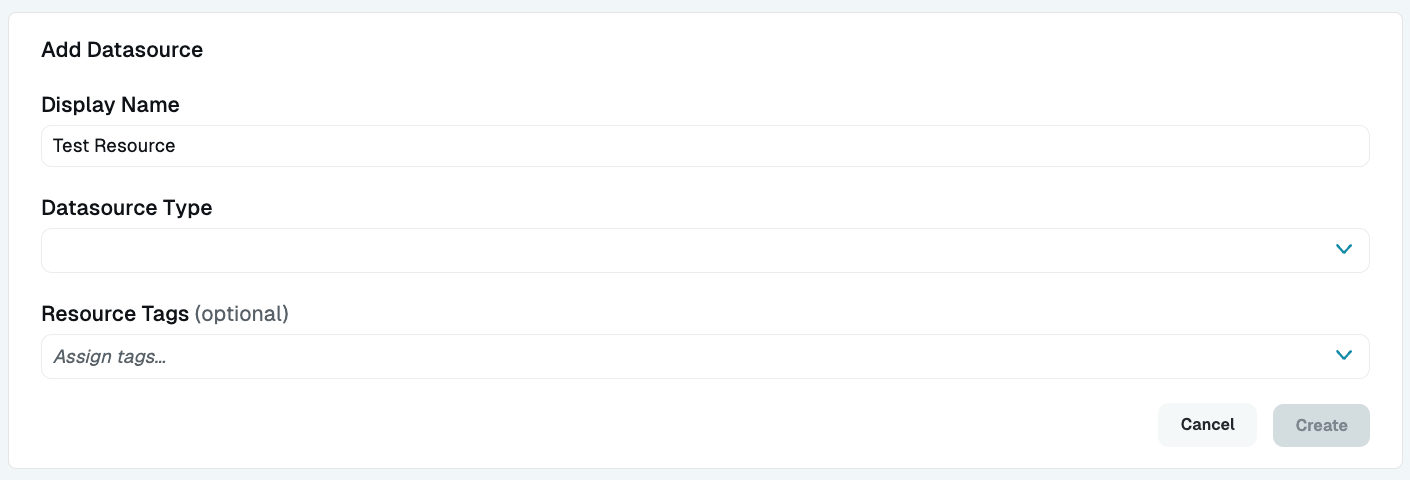
Add Datasource Enter a Display Name for the resource. This name appears throughout StrongDM for those who are granted access.
Select the Datasource Type from the dropdown.
Enter the Hostname. This address must be resolvable from the perspective of the gateway. One way to verify this is to use SSH to log in to the gateway and use netcat:
nc -zv <YOUR_HOSTNAME> <YOUR_PORT>(for example,nc -zv testdb-01.fancy.org 3306ornc -zv 111.222.333.444 3306).StrongDM prepopulates the Port field with a database default. You may change the port now on the resource configuration form, or later in Port Overrides settings if your database is set to listen on a different port.
Enter the username, password, and default database name to complete the connection. Complete any other required fields.
Click the Create button to save your new resource’s settings.
The Admin UI then updates and the added resource shows a positive, green health status momentarily. If the resource is not healthy, click its name to view the resource’s Diagnostics tab and check for errors. The Admin UI indicates if there is a network or credentialing error.
Assign Roles to Users
Set up Policies
If your organization has policies enabled via either the Enterprise plan or a StrongDM trial, a key decision to make early on in the configuration of your organization is whether you wish to use policies to control fine-grained access to resources. If your organization is currently in a trial but not going to use the Enterprise plan or if your organization does not intend to use policies, you should disable them by going in the Admin UI to Policies and toggling them off by disabling the Enable Policy toggle in the upper-right corner of the screen.
If policies are enabled, policies forbid connections to, and specific actions on, all resources by default. Thus, policies need to be configured to allow particular principals (users, roles, service accounts) to take particular actions on particular resources, and often with contextual limitations. Those limitations can include geographic location, device trust score, and others. If you intend to use policies in your organization, you should create a policy to allow your test user access to your test resource.
Create a policy to allow access
If you intend to use policies for access control, you should set one up now. Create a policy similar to the following, for the purposes of this quick start:
permit (
  principal in StrongDM::Role::"<ROLE_ID>"
  action,
  resource == StrongDM::Resource::"<RESOURCE_ID>"
);
In this example, when you write the principal line into the editor, if you do not know the role ID of the role, if you begin typing the name of the role here, the editor attempts to provide choices of your currently defined roles and fills the role ID for you. The same applies to the resource ID; when you begin typing the name of a resource, the editor suggests resources, and when one is chosen, fill its resource ID for you.
Now, your user should be able to connect to the resource!
Install the Client and Connect to a Resource
Users use the StrongDM client (which consists of the StrongDM Desktop application and/or the CLI) to connect to the resources that are available to them. The client is available for download from the Admin UI for Linux, macOS, and Windows. For macOS and Windows, you can download the desktop app and CLI packaged together, or you can download the CLI standalone.
This section describes how to use the desktop app and CLI to connect to the resource that you added in a previous step.
Go to the Admin UI’s Download & Install page.
Download and install StrongDM for macOS, Windows, or Linux. Follow the instructions in the installation guide for your particular operating system.
Open the desktop app and log in to StrongDM. The resource that you added should appear in the list of available resources.
Click the lightning bolt beside the resource name to connect. The lightning bolt turns green and you can see that you are connected. Being connected means that the local client is listening on that port.
Open your preferred SQL client (in this example, TablePlus), and create a new connection. Enter
127.0.0.1(for some clients, this needs to belocalhost) and the port that was assigned within the local client (in this example,5472). For most clients, the username and password may be left blank. Please read the Connect to Resources and Connect to Datasources guides for specific SQL connection requirements.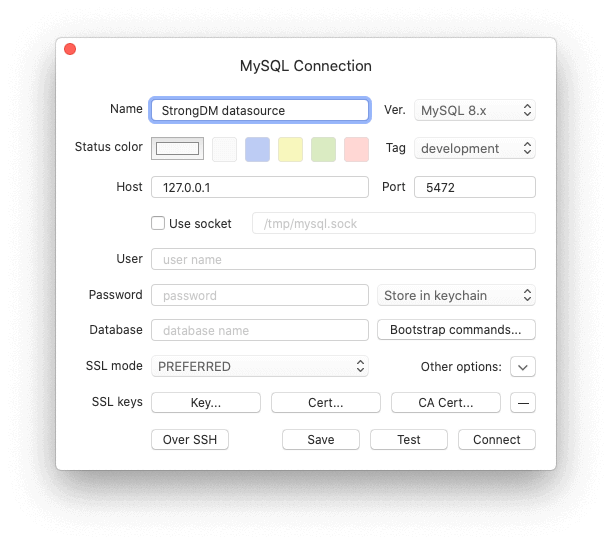
TablePlus Client Click connect, and start querying!
Next, verify that the CLI is set up in your system by opening your command line and typing
sdm --version. If it is set up properly, the response returns versioning information similar tosdm version 38.84.0 (8e913eb01d42fc1141bda2b0d0e967b70a89d5e6 #1045). If the output is not like this, you should revisit the installation guide for whichever operating system your local machine uses for details on installation and setup.Try executing some commands. You may wish to explore the
sdm admincommands first, as many of the administrative features of the Admin UI can be used in the CLI as well. You can, for example, view the resource that you already added by usingsdm admin resources list, or change its settings by usingsdm admin resources update <RESOURCE_NAME>.
sdm. To view a list of possible commands, enter sdm --help or sdm -h. Visit the CLI Reference documentation for the same help text returned by appending the --help or -h flag to commands, along with information about commonly used CLI commands and how to filter them.Review Logs
All actions, queries, sessions, and errors that occur when any user uses StrongDM are logged by StrongDM. In the Admin UI, you can see a record of what you just did by going to the Logs section and selecting the log type you wish you review (for example, Activities or Queries).
To change where and how logs are stored, go to Settings > Security and select the Log Encryption & Storage tab.
Recommended Reading
This quick start guide provides the basic setup information to begin using StrongDM. For even more detailed information about StrongDM deployment, usage, and configuration, please see the rest of the StrongDM documentation.
We recommend starting with the Admin documentation, which explains how to use and configure the administrative features found in the Admin UI and CLI.
In particular, as an admin, you may wish to explore topics in the following order:
- Gateway and relay setup
- Deployment
- Resource setup
- User management
- Identity provider configuration for SSO and provisioning
- Auditing
- Logging
- CLI Reference
- API Reference
For installation guides and resource connection information for users using the desktop app and/or CLI, please see StrongDM Desktop.