Add an EKS Cluster
Last modified on June 10, 2024
This guide describes how to manage access to an Amazon Elastic Kubernetes Service (EKS) cluster via the StrongDM Admin UI. Adding an EKS cluster takes place in both the Admin UI and in the AWS Management Console.
Prerequisites
Before you begin, ensure that the EKS endpoint you are connecting is accessible from one of your StrongDM gateways or relays. See our guide on nodes for more information.
Get the AWS Username and Access Credentials
- In the AWS Management Console, go to Identity and Access Management (IAM) > Users and create a new access key ID and secret access key for the IAM user who will be accessing the EKS cluster. It does not need any specific rights.
- Additionally, copy the User Amazon Resource Name (ARN) because you will need it later.
Grant That User the Ability to Interact With Your Cluster
While authenticated to the cluster using your existing connection method, run the following command to edit the
aws-authConfigMap (YML file) within Kubernetes:kubectl edit -n kube-system configmap/aws-authCopy the following snippet and paste it into the file under the
data:heading:mapUsers: | - userarn: <USER_ARN>/<USERNAME> username: <USERNAME> groups: - <GROUP>In that snippet, do the following:
- Replace
<USER_ARN>with the ARN of the IAM user you created. - Replace
<USERNAME>with the IAM username. - Under
groups:, specify the appropriate group for the permissions level you want this StrongDM connection to have (see Kubernetes Roles for more details).
Example:
  mapUsers: |
    - userarn: arn:aws:iam::123456789012:user/aliceglick
      username: aliceglick
      groups:
        - system:masters
The name under
groups:in themapUsersblock must match the subject name in the desired ClusterRoleBinding, not the name of the ClusterRoleBinding itself. For example, if a default EKS cluster has a ClusterRoleBinding calledcluster-admin, with a group namedsystem:masters, then the namesystem:mastersmust be input in themapUsersblock undergroups:.In the following example of the default ClusterRoleBinding for
cluster-adminon an unconfigured EKS cluster, you can see that the group name underSubjectsissystem:masters.Name: cluster-admin Labels: kubernetes.io/bootstrapping=rbac-defaults Annotations: rbac.authorization.kubernetes.io/autoupdate: true Role: Kind: ClusterRole Name: cluster-admin Subjects: Kind Name Namespace ---- ---- --------- Group system:mastersAlso note that in the YML file, the indentation is critically important. If the indentation is wrong, the Edit command does not trigger an error message, but the change fails. Note that
mapUsersshould be at the same indent level asmapRolesin that file.- Replace
Save the file and exit your text editor.
Add Your EKS Cluster in StrongDM
Log in to the Admin UI and go to Infrastructure > Clusters.
Click the Add cluster button.
Select EKS as the Server Type and set other resource properties to configure how the StrongDM relay connects.
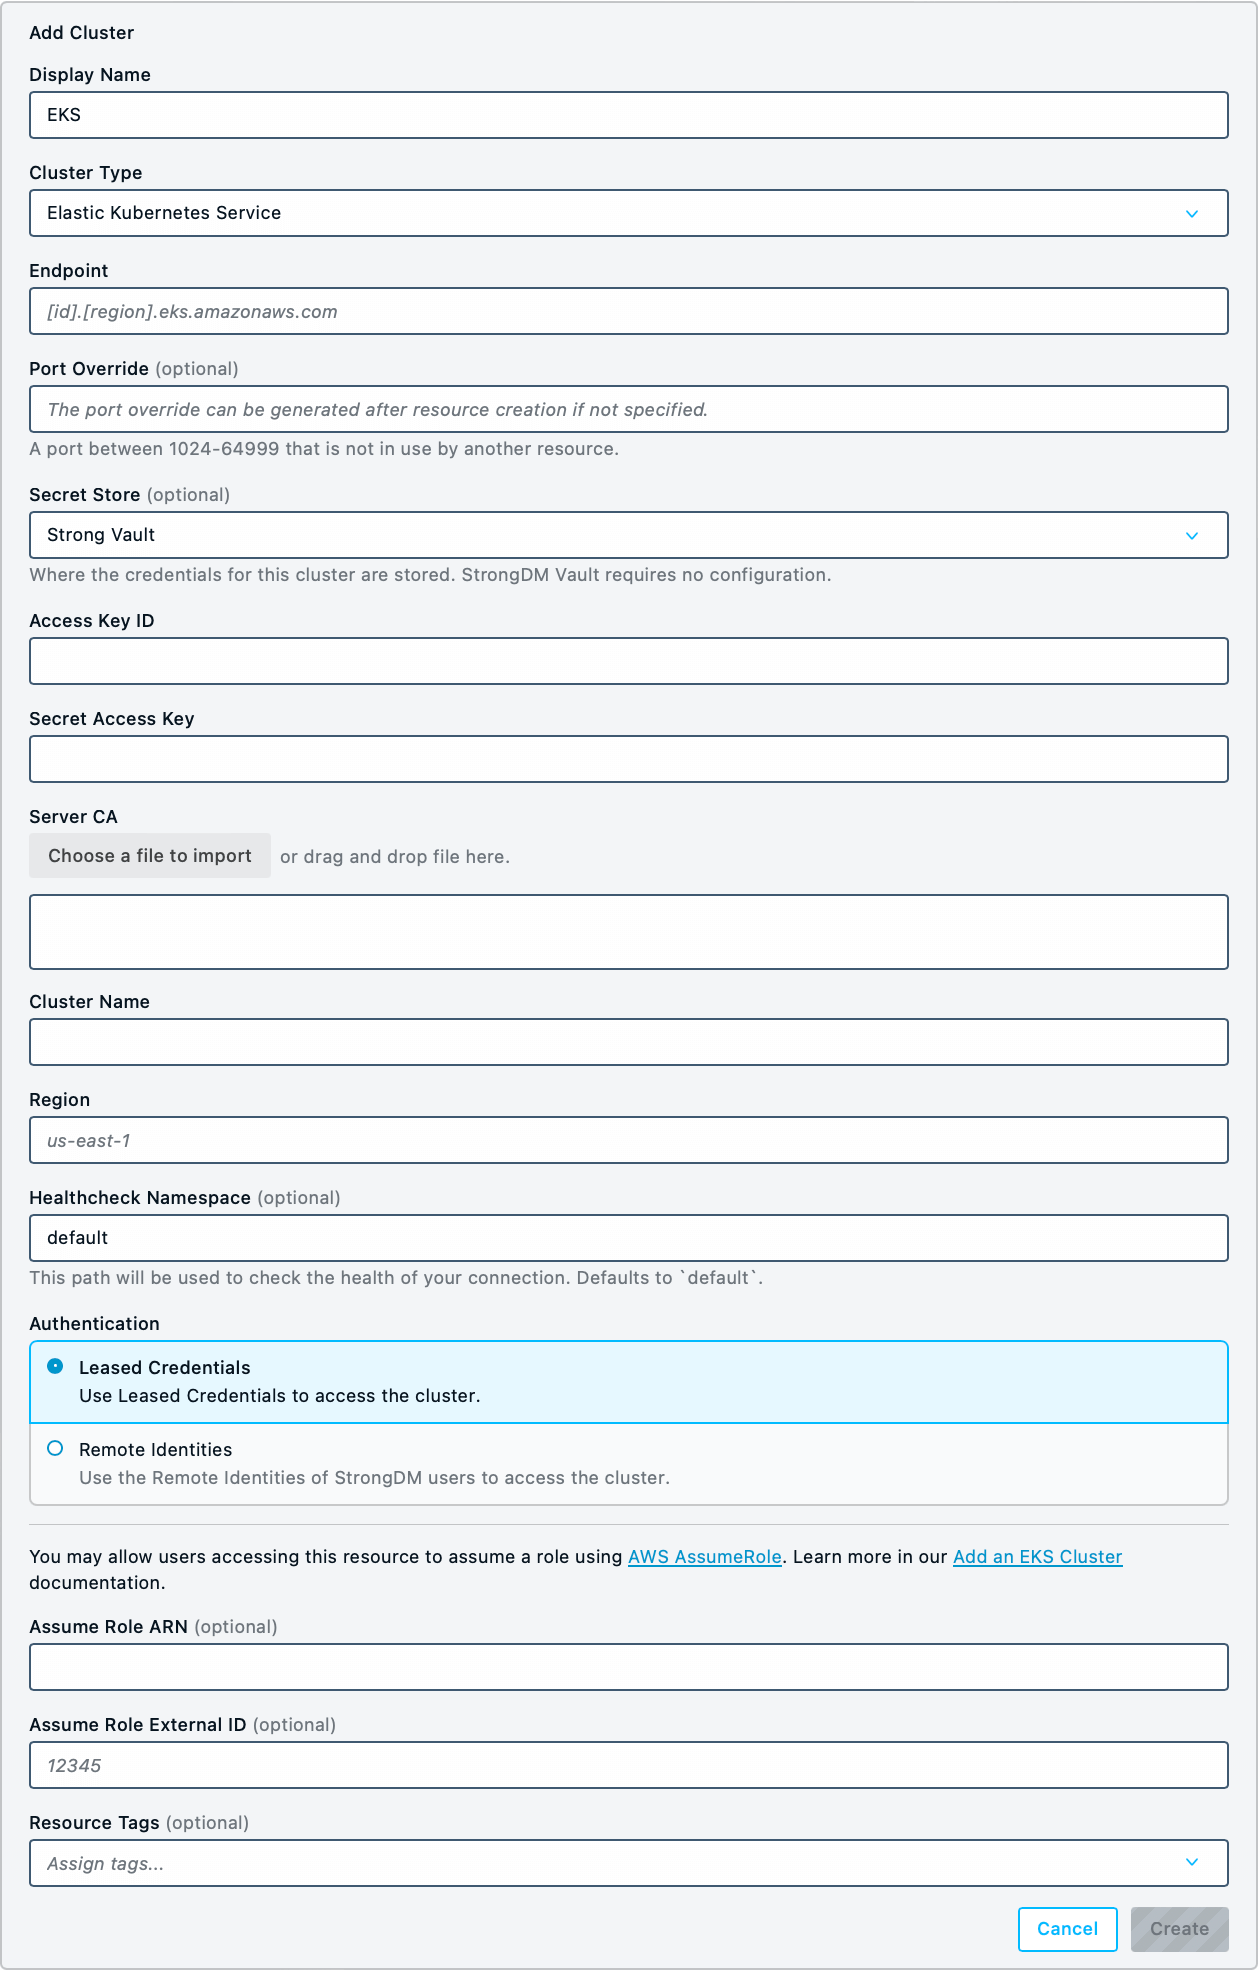
EKS Cluster Setup in Admin UI Click Create to save the resource.
The Admin UI updates and shows your new cluster in a green or yellow state. Green indicates a successful connection. If it is yellow, click the pencil icon to the right of the server to reopen the Connection Details screen. Then click Diagnostics to determine where the connection is failing.
Resource properties
Configuration properties are visible when you add a Cluster Type or when you click to view the cluster’s settings. The following table describes the settings available for your EKS cluster.
| Property | Requirement | Description |
|---|---|---|
| Display Name | Required | Meaningful name to display the resource throughout StrongDM; exclude special characters like quotes (") or angle brackets (< or >) |
| Server Type | Required | Select Elastic Kubernetes Service |
| Endpoint | Required | API server endpoint of the EKS cluster in the format <ID>.<REGION>.eks.amazonaws.com, such as A95FBC180B680B58A6468EF360D16E96.yl4.us-west-2.eks.amazonaws.com; relay server should be able to connect to your EKS endpoint |
| Bind Interface | Read only | Automatically generated IP address value in the 127.0.0.1 to 127.255.255.254 IP address range; default is 127.0.0.1; preferred bind interface value can be modified later under Settings > Port Overrides |
| Port Override | Read only | Automatically generated with a value between 1024 to 59999 as long as that port is not used by another resource; preferred port can be modified later under Settings > Port Overrides; after specifying the port override number, you must also update the kubectl configuration, which you can learn more about in section Port Overrides |
| Secret Store | Optional | Credential store location; defaults to Strong Vault; to learn more, see Secret Store options |
| Access Key ID | Required | Access key ID, such as AKIAIOSFODNN7EXAMPLE, from the AWS key pair that you created in Step 1 |
| Secret Access Key | Required | Secret access key, such as wJalrXUtnFEMI/K7MDENG/bPxRfiCYEXAMPLEKEY, from the AWS key pair that you created in Step 1 |
| Server CA | Required | Pasted server certificate (plaintext or Base64-encoded), or imported PEM file; you can either generate the server certificate on the API server or get it in Base64 format from your existing Kubernetes configuration (kubeconfig) file |
| Cluster Name | Required | Name of the EKS cluster |
| Region | Required | Region of the EKS cluster, such as us-west-1 |
| Healthcheck Namespace | Optional | If enabled for your organization, the namespace used for the resource healthcheck; defaults to default if empty; supplied credentials must have the rights to perform one of the following kubectl commands in the specified namespace: get pods, get deployments, or describe namespace |
| Authentication | Required | Authentication method to access the cluster; select either Leased Credential (default) or Identity Aliases (to use the Identity Aliases of StrongDM users to access the cluster) |
| Identity Set | Required | Displays if Authentication is set to Identity Aliases; select an Identity Set name from the list |
| Healthcheck Username | Required | If Authentication is set to Identity Aliases, the username that should be used to verify StrongDM’s connection to it; username must already exist on the target cluster |
| Assume Role ARN | Optional | Role ARN, such as arn:aws:iam::000000000000:role/RoleName, that allows users accessing this resource to assume a role using AWS AssumeRole functionality |
| Assume Role External ID | Optional | External ID if leveraging an external ID to users assuming a role from another account; if used, it must be used in conjunction with Assume Role ARN; see the AWS documentation on using external IDs for more information |
| Resource Tags | Optional | Resource tags consisting of key-value pairs <KEY>=<VALUE> (for example, env=dev) |
Management tips
You may find the following additional information useful:
- Some Kubernetes management interfaces, such as Visual Studio Code, do not function properly with cluster names containing spaces. If you run into problems, please choose a Display Name without spaces.
- When your users connect to this cluster, they have exactly the rights permitted by this AWS key pair. See AWS documentation for more information.
- You can find information about your cluster in the AWS Management Console on your EKS cluster’s General configuration page.
Secret Store options
By default, server credentials are stored in StrongDM. However, these credentials can also be saved in a secrets management tool.
Non-StrongDM options appear in the Secret Store dropdown menu if they are created under Network > Secret Stores. When you select another Secret Store type, its unique properties display. For more details, see Configure Secret Store Integrations.