Add an SSH Server With Certificate Auth and User Provisioning
Last modified on March 28, 2024
Overview
This guide describes how to add an SSH (Certificate Based with User Provisioning) resource in the Admin UI. This resource type uses certificates for authentication and uses Remote Identities to provision a local user with a home directory on the SSH server on each connection.
If you’d like to add a certificate-based SSH server without user provisioning, please see Add an SSH Server With Certificate Auth.
Prerequisites
Before you begin, ensure that the following requirements are met.
- The server you are attempting to add must be accessible from your StrongDM gateways or relays.You must have a properly functioning gateway or relay up and running, and it must be able to reach the target server before you can proceed. To verify, go to the gateway or relay server and from a command prompt, type
ping <SERVER_HOSTNAME>. If your gateway or relay can connect to this hostname, you can continue. For more information see nodes. - Remote Identities must be configured for users intending to connect.
Configure the Trusted CA
Review StrongDM CA public key
Every organization in StrongDM is automatically assigned a unique Certificate Authority (CA) for SSH, known as a Strong CA. The Strong CA is a cryptographic key pair in charge of issuing and validating certificates for every SSH session. You need to add the SSH CA public key as a trusted source on any hosts you want to access with this option.
How to view and copy the StrongDM SSH CA public key
- Log in to the StrongDM Admin UI.
- Go to Network > Certificate Authorities and select an SSH CA to use.
- From the SSH CA’s Settings tab, select one of the certificates shown, or create a new certificate.
- Click the i button beside the certificate’s fingerprint.
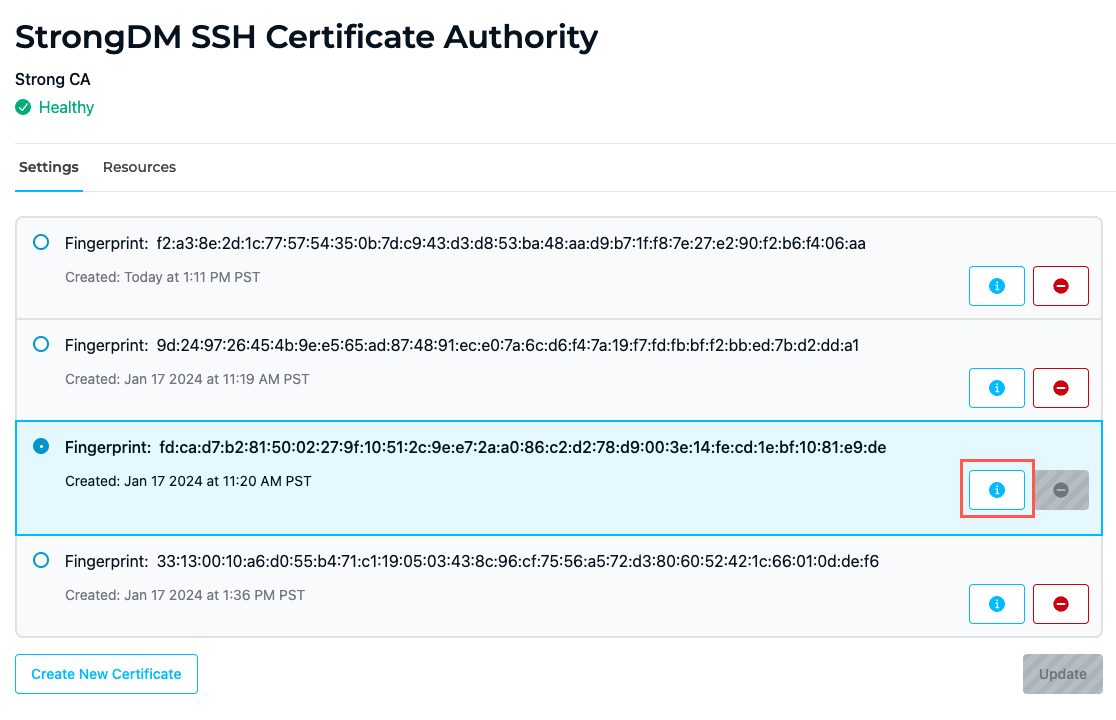
StrongDM SSH Certificate Authority Page Showing Copy Button - From the SSH Certificate dialog that displays, use the Copy button to copy the SSH CA public key to your clipboard.

Example SSH Certificate Dialog
Add the CA to your host
The next step is to tell your host to trust certificates issued by your organization’s CA. If you have not already, add your organization’s SSH CA public key to the targeted host.
Create a
/etc/ssh/sdm_ca.pubfile and add the SSH CA public key.SSH can sometimes be unpredictable if permissions are not set correctly. Therefore, update the file’s permissions:
sudo chmod 600 /etc/ssh/sdm_ca.pubWith your editor of choice, modify
/etc/ssh/sshd_configby appending the following lines:# StrongDM CA TrustedUserCAKeys /etc/ssh/sdm_ca.pubRestart the SSH service on this host for the changes to take effect. Note that the command you execute may differ based on your system configuration, and you may need to restart
sshdorssh, as in the following example:sudo systemctl restart ssh
Configure Privileged User
A privileged user called strongdm must be configured on the server to perform the provisioning. This privileged user is allowed to authenticate with the certificate authority (CA).
- On the target server, create a privileged user called
strongdm. - Configure that user to use a restricted bash with access to the following:
useraddusermoduserdel
Add a Certificate-Based SSH Server With User Provisioning in the Admin UI
To add your new SSH (Certificate Based with User Provisioning) server as a StrongDM resource, use the following steps.
- In the Admin UI, go to Infrastructure > Servers.
- Click Add server.
- For Server Type, select SSH (Certificate Based with User Provisioning).
- For Authentication, select Remote Identities and enter the healthcheck username, which is the username that will be utilized to verify StrongDM’s connection to the server.
- Set other required resource properties to configure how the StrongDM relay connects to the server via SSH.
- Click Create to save the resource.
Configuration is now complete.
After the server is created, the Admin UI displays that resource as unhealthy until the healthchecks run successfully. When the resource is ready, the Health icon indicates a positive, green status.
Resource properties
Configuration properties are visible when you add a Server Type or when you click to view the server’s settings. The following table describes the settings available for your SSH (Certificate Based with User Provisioning) server.
| Property | Requirement | Description |
|---|---|---|
| Display Name | Required | Meaningful name to display the resource throughout StrongDM; exclude special characters like quotes (") or angle brackets (< or >) |
| Server Type | Required | Select SSH (Certificate Based) |
| Hostname | Required | Hostname or IP address to which you are connecting, such as testserver-01.example.org; relay server should be able to connect to your target server or hostname |
| Port | Required | Port to connect to the resource; default port value 22 |
| Bind Interface | Read only | Automatically generated IP address value in the 127.0.0.1 to 127.255.255.254 IP address range; default is 127.0.0.1; preferred bind interface value can be modified later under Settings > Port Overrides |
| Port Override | Read only | Automatically generated with a value between 1024 to 59999 as long as that port is not used by another resource; preferred port can be modified later under Settings > Port Overrides |
| Certificate Authority | Required | Where the credentials for the server are stored; defaults to Strong CA; to learn more, see Certificate Authority options |
| Key Type | Required | Signing algorithm with default value set to RSA-2048; other options include RSA-4096, ECDSA-256, ECDSA-384, ECDSA-521, and ED25519; to learn more, see Key Type options |
| Authentication | Required | Select Leased Credentials (default) or Remote Identities |
| Username | Required | Displays if Authentication is set to Leased Credentials; enter the username the relay should utilize to connect to the server via SSH (for example, bob.belcher) |
| Healthcheck Username | Required | Displays if Authentication is set to Remote Identity; enter the username that will be utilized to verify StrongDM’s connection to the server; this username will be created on the server if it doesn’t already exist |
| Allow Port Forwarding | Optional | When enabled, allows SSH connections proxied by StrongDM for this server to accept local forwarding requests; this checkbox is shown when the Allow port forwarding through SSH? option is turned on in the Admin UI security settings; see Port Forwarding for more information |
| Resource Tags | Optional | Resource tags consisting of key-value pairs <KEY>=<VALUE> (for example, env=dev) |
Certificate Authority options
By default, server credentials are stored in Strong CA. If the Enterprise bundle is enabled for your organization, you may use a third-party CA, instead of the default Strong CA, to issue certificates for authentication to your certificate-based SSH resources.
For more information, please see Certificate Authorities.
Key type options
The following table describes the different key types StrongDM can use to encrypt and secure SSH connections.
| Key type | Description | Additional information |
|---|---|---|
| RSA-2048 | 2048-bit key generated with RSA algorithm | Lowest security guarantees, but has broad support across hosts |
| RSA-4096 | 4096-bit key generated with RSA algorithm | Slightly better than RSA-2048; still uses RSA, but larger keys can prolong the time to crack if an attacker gains access |
| ECDSA-256 | Key generated with 256-bit elliptic curve and ECDSA algorithm | Provides better security guarantees than RSA |
| ECDSA-384 | Key generated with 384-bit elliptic curve and ECDSA algorithm | Slightly better than ECSDA-256 |
| ECDSA-521 | Key generated with 521-bit elliptic curve and ECDSA algorithm | Serves as the best ECDSA choice from a security standpoint |
| ED25519 | Key generated with ED25519 algorithm | Provides the best performance and comparable security to ECDSA; much smaller keys, but not as widely supported as other options |
Connect to the Server
You can now connect to the server via SSH (for example, in the CLI, use sdm ssh <SERVER_DISPLAY_NAME>) and verify that a user is provisioned upon connection.
Once connected, you are logged in with the username that was set as the Remote Identity Username in your StrongDM user profile. That username did not exist previously—it was provisioned when the SSH session started. Moreover, if you specified a Remote Identity Role on your StrongDM user profile, your user is placed in a group with that same role name.
Additional Considerations
- You may have an existing CA key pair and certificate to perform direct SSH or other tasks. You can continue to use this key pair, but you cannot import this CA into StrongDM.
- You do not need to sign these keys, or any user keys. StrongDM handles that for you and for your users.
- Session-based certificates for users are automatically renewed every 3 minutes.