Configure AWS Secrets Manager Integration
Last modified on June 16, 2025
Secret store integrations allow you to use your existing third-party secret stores with StrongDM. Your credentials are stored in a tool that is controlled by you, and those credentials are never transmitted to StrongDM in any form. If you would like to learn more about how this integration works and why you might wish to use it, please read the Secret Stores Reference.
This guide will walk you through how to integrate AWS Secrets Manager with StrongDM and how to use it to connect to resources.
Set up AWS Secrets Manager
To get started with AWS Secrets Manager, store credentials to some of your resources in it and note the correct paths to those credentials. Then, set up your Relay server to be able to authorize to the Secrets Manager with an access key.
Set up your credentials
Set up your credentials in AWS Secrets Manager. This should be as simple as heading to Secrets Manager in the AWS Management Console and following the prompts to create your first secret.
postgres) or namespace/path (e.g., /credentials/databases/postgres). Either way, when asked for the path to your secret later, this name is that path.Authenticate with AWS
You can authenticate your gateway server with AWS in several ways.
Option 1: Access keys via environment variables
Get an access key for AWS and set the necessary environment variables on your Relay server (
AWS_ACCESS_KEY_IDandAWS_SECRET_ACCESS_KEY).Open the environment file for editing. The default location is
/etc/sysconfig/sdm-proxyfor gateways and relays, or/etc/sysconfig/sdm-workerfor proxy clusters.Add the following lines, substituting your ID and key:
AWS_ACCESS_KEY_ID=aswf234rt4rsag4t3g
AWS_SECRET_ACCESS_KEY=23452321h2893hf2ioufh2938229fh2oufgh23890fh29fh23bif2f0928hf02f3n2bf290fn9230f
Restart the service. If your system uses systemd, the command is
sudo systemctl restart sdm-proxyfor gateways and relays, orsudo systemctl restart sdm-workerfor proxy clusters.
Option 2: IAM via EC2 role
- In your AWS Management Console, navigate to IAM, click on Role, and click on Create Role.
- Select EC2 for Service.
- In the policy, select
SecretsManagerReadWrite, and click Next. - Add the role name and description, and then go to EC2 and click on Instances.
- Select the instance that houses the gateway, and click on Actions > Security > Modify IAM Role.
- Choose the name of the IAM role created earlier.
SDM_AWS_DEFAULT_PRIORITY=true.Option 3: ECS authentication
In the task definition for the ECS cluster, the Task Role must have a policy allowing access to Secrets Manager attached to it, as in the following example:
{
    "Version": "2012-10-17",
    "Statement": [
        {
            "Effect": "Allow",
            "Action": [
                "secretsmanager:GetSecretValue"
            ],
            "Resource": [
                "arn:aws:secretsmanager:us-east-1:12345678910:secret:*"
            ]
        }
    ]
}
If Resource Permissions is configured for Secrets Manager, the policy statement also needs to allow the Task Role to access that particular Secrets Manager.
Credential reading order
During authentication with Secrets Manager, the system looks for credentials in the following places in this order:
- Environment variables
- EC2 role
- ECS authentication or other remote authentication methods (set via
AWS_CONTAINER_CREDENTIALS_FULL_URIorAWS_CONTAINER_CREDENTIALS_RELATIVE_URI) - Shared credentials file
As soon as the relay or gateway finds credentials, it stops searching and uses them. Due to this behavior, we recommend that all similar AWS resources with these authentication options use the same method when added to StrongDM.
For example, if you are using environment variables for AWS Management Console and using EC2 role authentication for an EKS cluster, when users attempt to connect to the EKS cluster through the gateway or relay, the environment variables are found and used in an attempt to authenticate with the EKS cluster, which then fails. We recommend using the same type for all such resources to avoid this problem at the gateway or relay level. Alternatively, you can segment your network by creating subnets with their own relays and sets of resources, so that the relays can be configured to work correctly with just those resources.
This behavior was changed in CLI version 39.51.0. If you experience unexpected errors when upgrading to this version or above, you can set the environment variable SDM_AWS_LEGACY_PRIORITY to a truthy value such as 1 or true, to temporarily revert to the old behavior. In a future release, this option will go away.
SDM_AWS_DEFAULT_PRIORITY to a truthy value such as 1 or true.Configure the Secret Store with the Admin UI
Once you have AWS Secrets Manager set up, credentials stored, and your Relay server able to access said credentials, it’s time to integrate the secret store with StrongDM.
In the Admin UI, go to Settings > Secrets Management and to the Secret Stores tab.
Click the add secret store button.
On the Add Secret Store form, set the following:
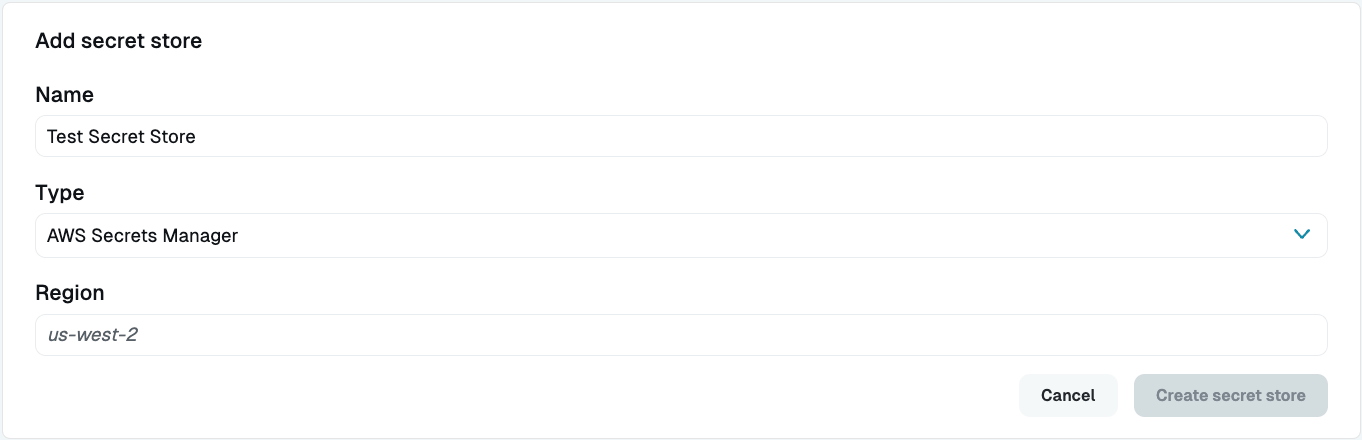
Secret Stores Settings - Display Name: Enter a name. This name will show up in the Admin UI.
- Secret Store Type: Select AWS Secrets Manager.
- Region: Fill the AWS region (e.g.,
us-west-2) for your AWS Secrets Manager.
If you’ve configured the Relay server correctly for secret store access and authorization, you will see the green online indicator.
Now, create a resource that uses the secret store, assign it to a Role that is assigned to a User, and verify that you can connect.
- In the Admin UI, add a new resource such as a Server or Datasource and choose the AWS Secrets Manager Secret Store type.
- Fill out the information for a resource whose credentials you have stored in your secret store.
- Select the AWS Secrets Store you created for the Secret Store field, and then fill in the ARN to the secrets that you’ve stored in your secret store.
- AWS accepts plaintext secrets, which you would use to store one credential field per secret, or you can write out JSON secrets in the field, which could include many credential values with different keys. If using JSON, add the key along with the path to the credential, (e.g.,
arn:aws:secretsmanager:us-west-2:111122223333:?key=username). - It is preferred that certificates be Base64-encoded. If the secret you are storing is a certificate, you should Base64-encode it, and then enter the path as follows when setting up a resource to use it:
arn:aws:secretsmanager:us-west-2:111122223333:example-secret?key=certificate&encoding=base64.
- AWS accepts plaintext secrets, which you would use to store one credential field per secret, or you can write out JSON secrets in the field, which could include many credential values with different keys. If using JSON, add the key along with the path to the credential, (e.g.,
- Submit the form.
- Go to Roles, create a Role with an access rule that grants access to the resource, and assign the Role to the User.
- Log in as that User in your local GUI (or have the User do so, if not yours) and verify that the resource exists, test a connection, and execute a query.
Congratulations, you’ve connected to a resource using secret stores.