Configure GCP Secret Manager Integration
Last modified on June 16, 2025
Secret Store integrations allow you to use your existing third-party secret stores with StrongDM. Your credentials are stored in a tool that is controlled by you, and those credentials are never transmitted to StrongDM in any form. If you would like to learn more about how this integration works and why you might wish to use it, please read the Secret Stores Reference.
This guide will walk you through how to integrate Google Cloud Platform (GCP) Secret Manager with StrongDM and how to use it to connect to Resources.
Steps
Set up GCP Secret Manager
To get started with GCP Secret Manager, store credentials to some of your resources in it and note the correct paths to those credentials. Then, set up your Relay server to be able to authorize to the Secret Manager.
- Set up your credentials in GCP Secret Manager (if you have not already). You can store your credentials as plaintext, one value per secret (e.g., username as one secret, key as one secret, etc.) or you can store them as a JSON object, with multiple items in one secret, arranged as key-value pairs.
- Get application credentials for GCP, save them to your Relay server, and set the necessary environment variable that points to those credentials on your Relay server (
GOOGLE_APPLICATION_CREDENTIALS). - Open the environment file for editing. The default location is
/etc/sysconfig/sdm-proxyfor gateways and relays, or/etc/sysconfig/sdm-workerfor proxy clusters. - Add the following lines, substituting your ID and key:
GOOGLE_APPLICATION_CREDENTIALS="/home/service/keys/gcp-key.json" - Restart the service. If your system uses systemd, the command is
sudo systemctl restart sdm-proxyfor gateways and relays, orsudo systemctl restart sdm-workerfor proxy clusters.
Configure the Secret Store in the Admin UI
Once you have GCP Secret Manager set up, credentials stored, and your Relay server able to access said credentials, it’s time to integrate the Secret Store with StrongDM.
Add a Secret Store
- In the Admin UI, go to Settings > Secrets Management and to the Secret Stores tab.
- Click the add secret store button.
- On the Add Secret Store form, set the following:
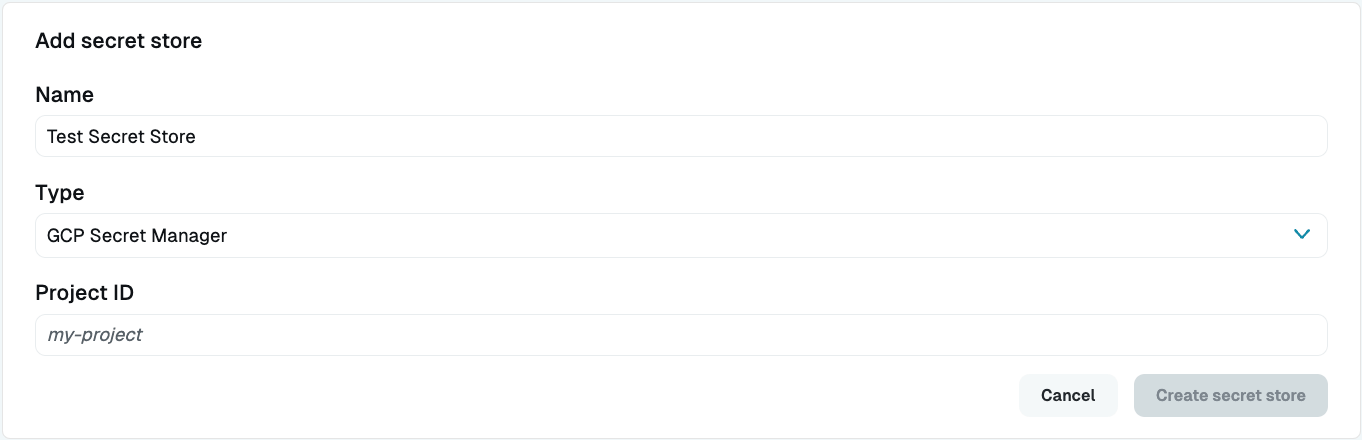
- Display Name: Enter a name. This name will show up in the Admin UI.
- Secret Store Type: Select GCP Secret Manager.
- Project ID: Add your GCP project ID.
The project ID is a value generated by GCP when you create a new project. You can find your project ID in the GCP Console by clicking your project name in the top left of the screen, which opens a project selection window:
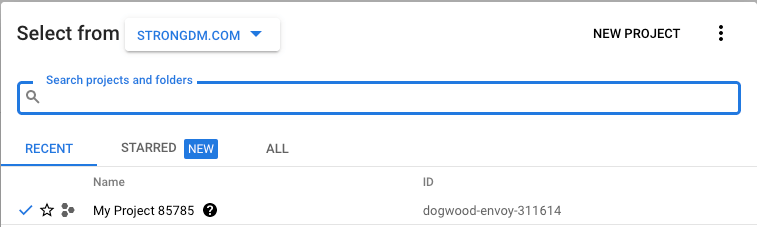
In this example, the project ID to fill in to the Admin UI field is dogwood-envoy-311614.
Now that you have set up your Secret Store integration, if you’ve configured your Gateway/Relay server correctly to use this secret store for access and authorization, the green online indicator should display. If it does not, you can set up a Gateway/Relay now and tell it to use GCP for its secret storage.
Create a Resource
Create a Resource that uses the secret store, assign it to a Role that is assigned to a User, and verify that you can connect.
In the Admin UI, add a new Resource such as a Server or Datasource.
On the configuration dialog for that Resource, fill out the information for a Resource whose credentials you have stored in your secret store, paying particular attention to the following properties:
- Secret Store: Select GCP Secret Manager.
- Username (path): Enter the path to the secret in GCP Secret Manager (e.g.,
path/to/credential?key=optionalKeyName) The key argument is optional. - Password (path): Enter the path to the secret in GCP Secret Manager (e.g.,
path/to/credential?key=optionalKeyName). The key argument is optional.
Please note the following about your GCP secret paths:
- Your secret path, when copied from GCP, will look similar to this:
projects/111222333444/secrets/demo-postgres?key=username. Note that StrongDM will automatically prepend your project ID, versioning, andsecrets/to the path when interpreting it, so the value needed here is simplydemo-postgres?key=username. - If your secret is stored as plaintext, with each credential in a different secret, you may just reference the secret’s path. The secret input does accept JSON, so you can store a username/password or key id/key value pair using JSON within a single secret if you desire.
- If you store your credentials as a JSON object rather than as individual plaintext secrets, you will need to also append
?key=credentialname(e.g.,?key=username) to fetch the specific item you are looking for. - To reference a Base64-encoded certificate, you will need to append a
?encoding=base64to your path. If the certificate is in a text field, the path looks likeexample-secret?encoding=base64. If the certificate was stored as part of a JSON object, the path looks likeexample-secret?key=certificate&encoding=base64.
Click create to submit the form.
Grant access and test
- In the Admin UI, go to Resources > Roles.
- Create a Role with an access rule that grants access to the Resource.
- Assign the Role to the User.
- Log in as that User in your local GUI (or have the User do so, if not yours).
- Verify that the Resource exists, test a connection, and execute a query.
Congratulations! You have connected to a Resource using Secret Store integration.