Users
Last modified on June 11, 2025
This article describes how to manage your organization’s users and service accounts from the Admin UI Users page.
A user is an entity that has the ability to log in to your StrongDM organization using the desktop app, the CLI, or the Admin UI. Users are managed by either StrongDM or an identity provider, such as Okta, if provisioning is configured for your organization. All users are displayed with their name and email address.
A service account is a slightly different type of entity that allows for programmatic access to StrongDM resources. Unlike a user account, a service account requires only a display name (not a full name and email address) because service accounts are for machines, programs, and applications—not people. Instead of username and password, service accounts authenticate to StrongDM with admin tokens in order to conduct automated administrative processes or perform any automated function that needs resource access. See Service Accounts to learn how to create and use service accounts.
On the Users page of the Admin UI, users and service accounts may be displayed with one or more of the following labels and special indicators:
- A lock icon indicates that the user is locked out of StrongDM.
- An eye icon indicates a high-traffic user whose queries are not visible in the Admin UI logs but are available via the command line.
- A (non-SSO) label indicates that Single Sign-on (SSO) is configured for your organization, but the user was manually invited and logs in with a password. This also requires the Allow non-SSO users option to be selected for the organization.
- A Service Account label distinguishes service accounts from user accounts.
In the users list, the Name, Email, and Permission Level columns can be clicked to sort the list by that column, in many cases allowing you to quickly find what you are looking for without needing to use more filters. The URL in your address bar changes to reflect these column sorts, in case you wish to bookmark the page with it sorted.
If you need to, you can also text search or filter the results further.
The CLI can also be used to list users, using the command sdm admin users list. The response displays their User ID, First Name, Last Name, Email, Tags, Manager ID, and SCIM information.
Invite a User
You can invite a user to join your StrongDM organization. All you need to know is their name and email address.
- In the Admin UI, go to Principals > Users.
- Click Add user.
- Enter the email address, first name, and last name. To invite multiple users, click Add row.
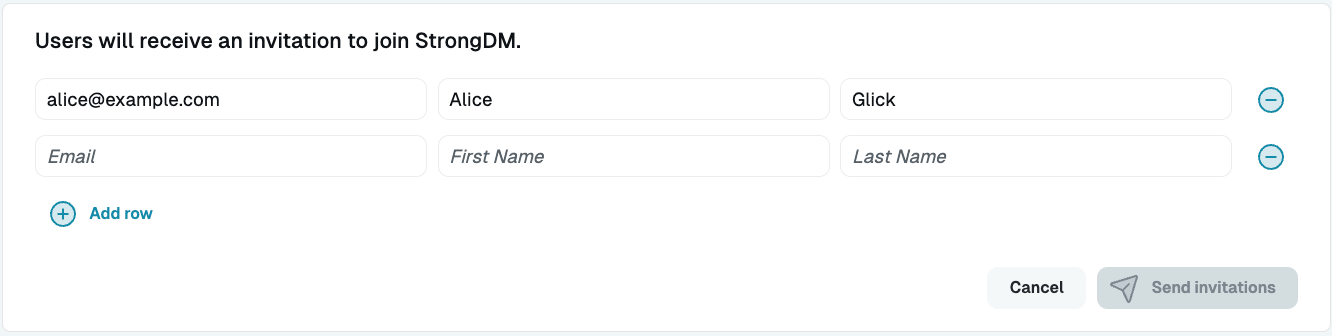
Provide information to invite users - Click Send invitations to send an email with instructions on how to join StrongDM.
Note that there is a limit to the number of emails that may be sent by your organization each day. For more information, please see Limits.
Reset a User’s Password
Users may occasionally need to change their password, for a variety of reasons. In the Admin UI, administrators may initiate a password reset for a user by following these steps:
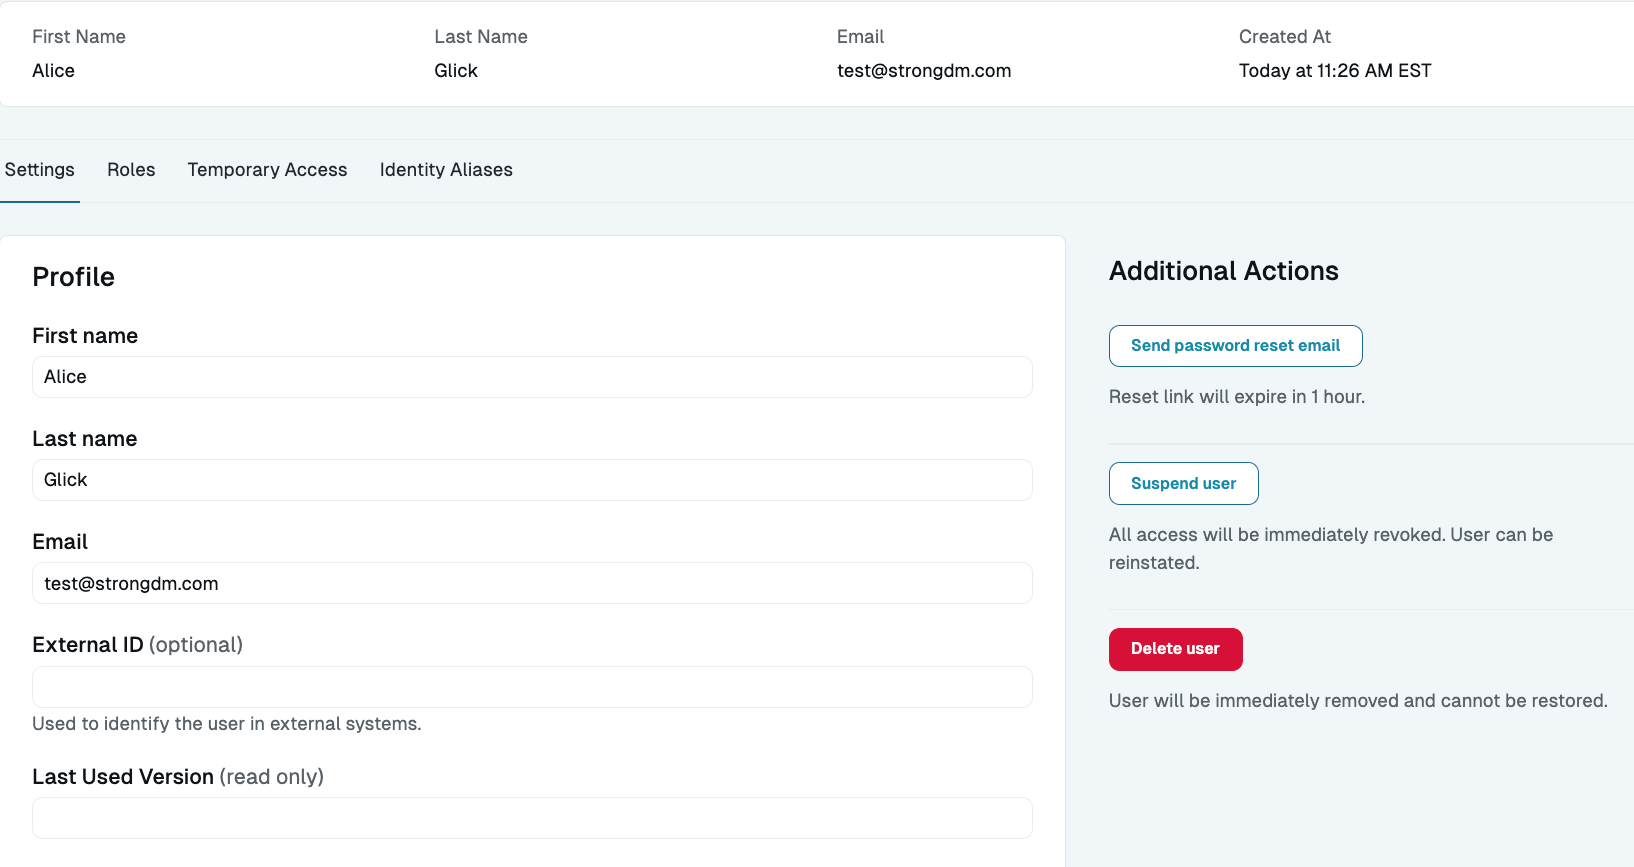
- Go to Principals > Users and select the user’s name.
- On the user’s Settings tab, click the Send password reset email button. An email is then sent to the user with a link to reset their password (for example, “Alice Glick has initiated a password reset for your account. Please set a password to access your account. This reset code will expire in 1 hour.”). The reset link expires one hour from the time the email is sent. If the user does not click the link within the specified time, the Send password reset email button must be used again. Note that there is a limit to the number of emails that may be sent by your organization each day. For more information, please see Limits.
Reset Your Own Password
All users may change their own password from the Admin UI’s Account Settings.
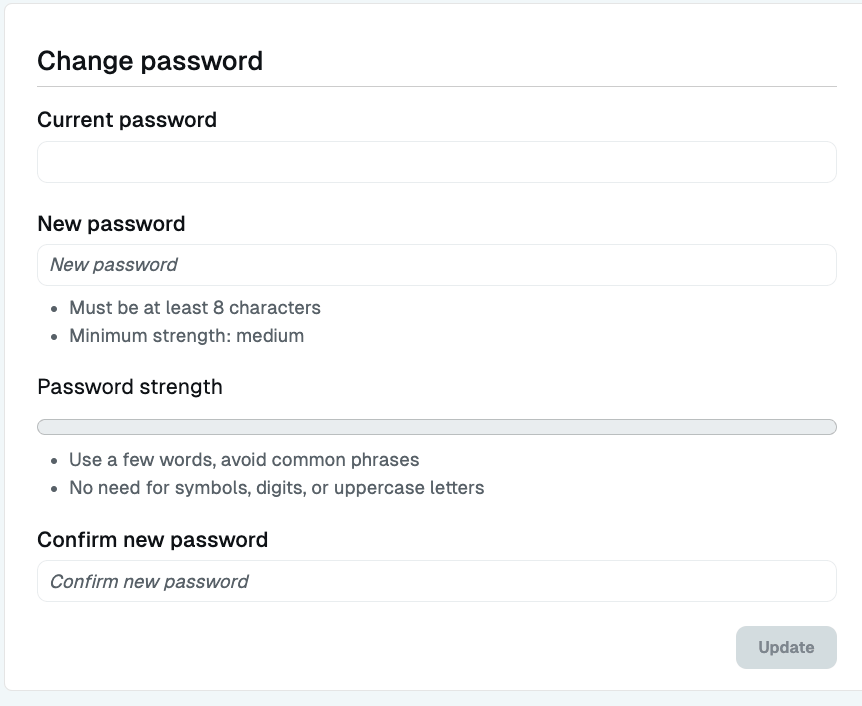
- From the top right corner of any page of the Admin UI, click your name.
- Select Account Settings.
- On the page that displays, enter your current password. If you don’t know it, you won’t be able to proceed; ask your StrongDM administrator to initiate a password reset for you.
- Enter a new password that meets your organization’s strength requirements.
- Confirm by typing it again.
- Click Update.
Add Identity Aliases
Identity Aliases allow users to authenticate to RDP, SSH, and Kubernetes resources using the username of the StrongDM user connecting to it rather than the standard leased credential method.
For RDP and SSH resources, the Identity Alias is a single username specified in the user’s settings. For Kubernetes resources only, the Identity Alias is a username and optionally, one or more roles.
Use the following steps to set Identity Aliases in the Admin UI:
- Go to the Identity Aliases tab of the user or service account.
- Click Add Alias.
- For Identity Alias, enter the user’s username, which can be any string that is not already in use. This field is required.
- For Identity Set, enter the name of the Identity Set that the Identity Alias will be used for. This field is required. A user can only have one alias per set.
After adding it, the user’s Identity Aliases tab updates with the details of the new Identity Alias. You have the option to update or delete it by clicking Actions.
The Identity Alias is the name to be used to authenticate to RDP CA, SSH CA, and Kubernetes resources that are configured to use Identity Aliases. Identity Alias roles correspond to the RBAC groups configured on the Kubernetes resource.
Each Identity Alias must be unique, and the identity must already exist and be configured on the resource in order for a connection to be made.
Set External ID
The External ID field can be used to map users in various integrated services to their corresponding StrongDM users. The field is editable by administrators and is read-only for managed users (similar to First Name, Last Name, and Email). Some SCIM integrations use this field.
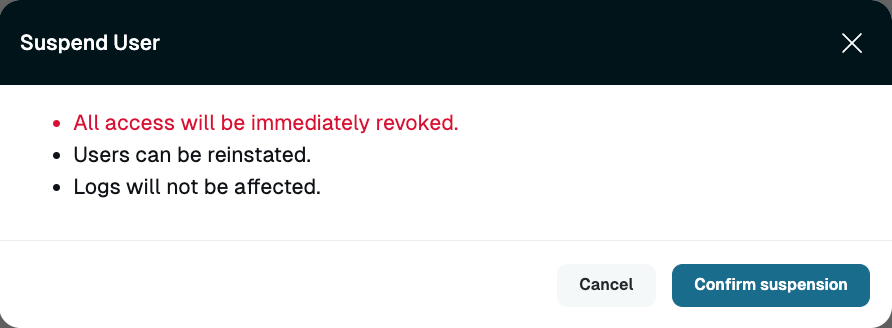
Suspend a User
You can revoke a user’s access to infrastructure by suspending their account. In the Admin UI, there are two ways to suspend a user: use the quick Actions button on the Users page, or update the user’s settings.
To suspend a user from the Users page, follow these steps:
- On the Users page, click the Actions button beside the user’s name. This button lets you take quick action on a user without having to go into the user’s details.
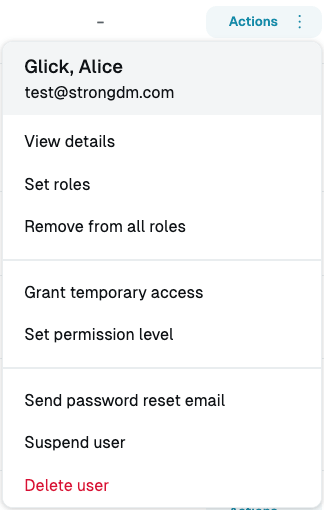
User Actions Menu - Suspend User Button - Select Suspend user and then click Confirm suspension.
User Actions Menu - Suspend User
To suspend a user from the user’s Settings tab, follow these steps:
- On the Users page, click the name of the user.
User Details Page - Profile Section - Go to the Settings tab and click Suspend user.
- Click Confirm suspension.
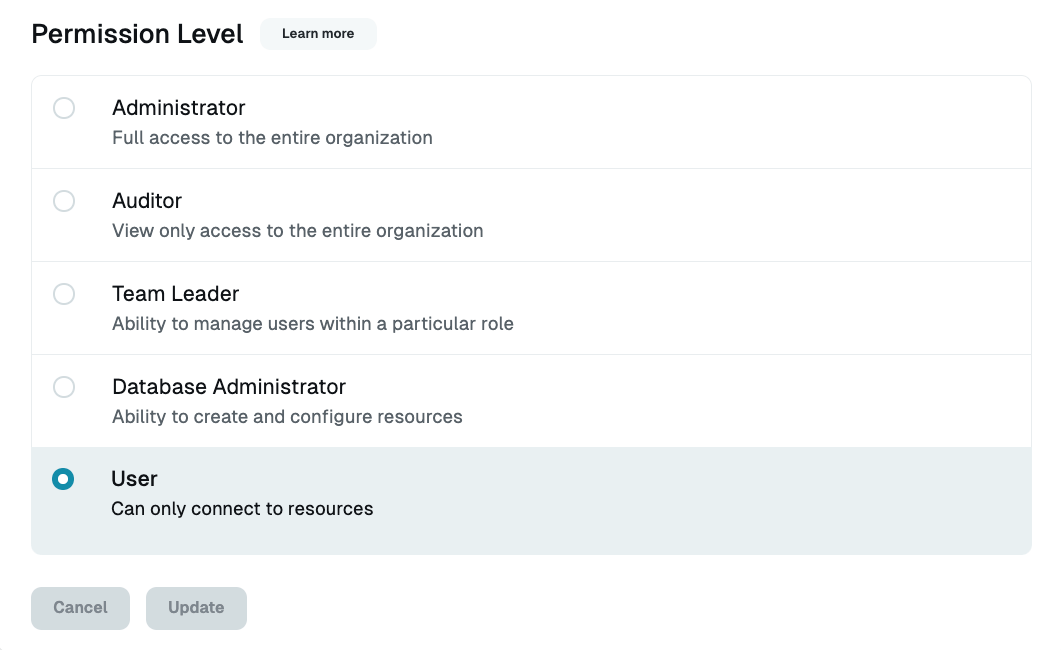
Assign Permission Level
Permission level determines what administrative actions are available to the user, including the ability to add resources to the organization, edit those resources, or manage other users. For more information, see the Permission Level section.
There are several ways to assign permission level in the Admin UI:
- Click the Actions button beside the user’s name and select Set permission level.
- Click into the user’s name to view their details, and set the desired permission level on the Settings tab.
User Details Page - Permission Level Section - Use bulk operations to set permission level for multiple users. Select the checkbox beside each user’s name, and click the Set permission level button in the dialog.
Allow Password Login
In the Allow Password Login section of a user’s profile, you can specify how the user is able to log in to StrongDM, either with SSO or a username and password. Select Disable to force the user to log in with only SSO, or select Allow to allow the user to log in with a username and password in addition to SSO.
Set User’s Manager
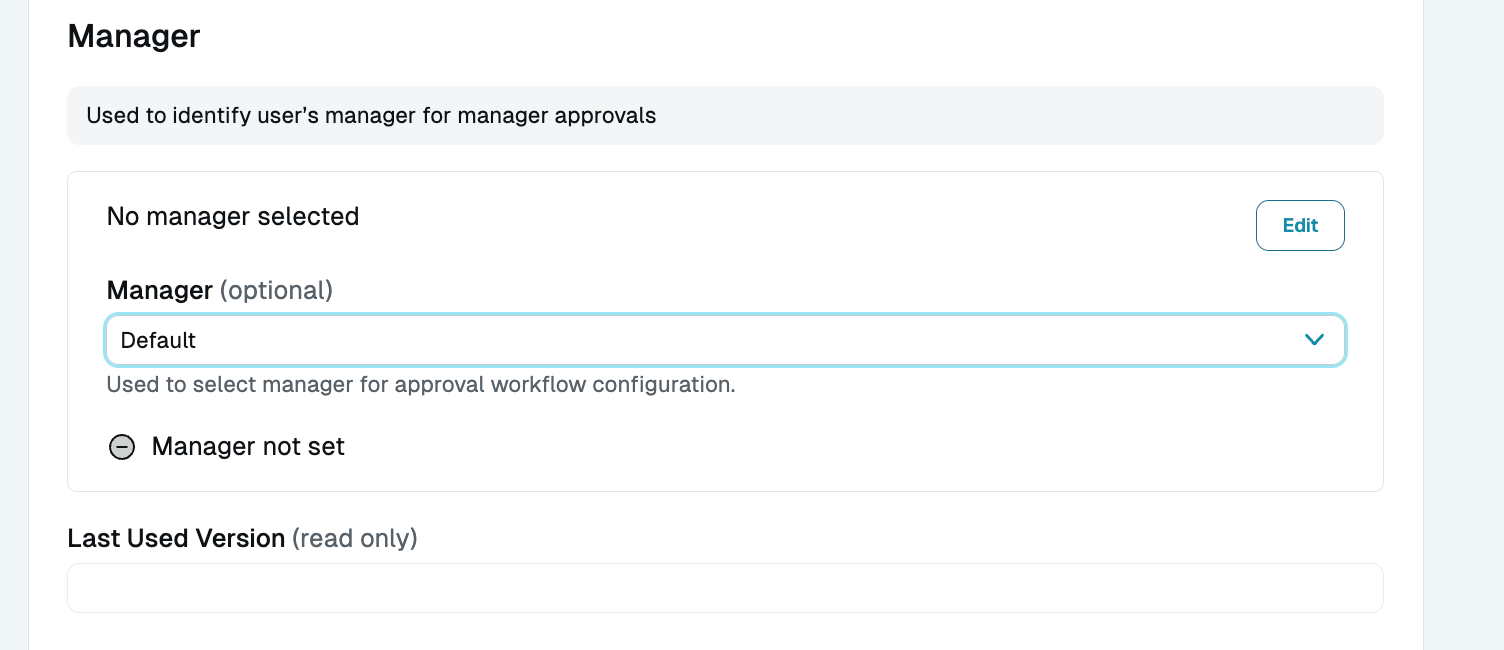
In the Manager section of a user’s profile, you can specify another StrongDM user as this user’s manager. This can then be used as criteria in Approval Workflows. Access workflows that allow users to make requests for resources and/or policies that require approval for particular actions can then use the manager approval workflow to require a user’s manager to authorize different types of access.
This can also be done at the CLI when either creating a new StrongDM user account or updating an existing user account. To create a new account with a manager ID, use sdm admin users add with the --manager <ACCOUNT_ID> option, where <ACCOUNT_ID> is the ID of the manager’s user account. The manager’s ID can be found in the Admin UI web browser address bar when the manager user’s profile is open, or in the response from the CLI command sdm admin users list, in the format a-0000a11a2222b3c4.
To update an existing account with a manager ID, use sdm admin users update --id <ACCOUNT_ID_OF_USER> --manager <ACCOUNT_ID_OF_MANAGER>. To unset the manager ID, use sdm admin users update --id <ACCOUNT_ID_OF_USER> --unset-manager <ACCOUNT_ID_OF_MANAGER>.
If SCIM is used to provision users in StrongDM, the output of sdm admin users list may include the following fields for a user’s manager:
- Manager ID: Manual override that StrongDM admins can set on a StrongDM user in case they want something different than the resolved manager ID value or if they don’t want to sync data from SCIM.
- Resolved Manager ID: Manager information that is automatically passed from SCIM data. If the user already set up SCIM syncing that maps from an identity provider to StrongDM users, the manager for a user set on the identity provider side will match this field. If only one StrongDM account matches the information passed from SCIM, then the Resolved Manager ID is used as the manager value.
- SCIM: SCIM information automatically passed from SCIM data and used for resolution, including the manager field, which is either the employee number, external ID (SCIM ID), or email of the manager
Set Roles
Roles determine what resources a user can access. Each user may be added to one or more roles, up to a maximum of 20.
On the Users page, the Roles column displays the name of any role(s) that have been assigned to the user. If no roles have been assigned to the user, the column shows no roles.
There are several ways to assign roles to users in the Admin UI:
- Click the Actions button beside the user’s name, and select Set roles.
User Actions Menu - Set Roles - Click into the user’s name and set the desired role(s) on the Roles tab.
- If assigning the same role(s) to multiple users, select the checkbox for each user and click the Set Roles button in the dialog. Select the role(s) you want to assign and click Apply roles.
Remove Users From Roles
You can remove users from roles by following these steps:
- Select the checkbox beside each user’s name.
- Click the Remove from all roles button in the dialog.
- Click Confirm remove.
Note that if provisioning is enabled for your organization, and users and roles are managed by an IdP such as Okta or Microsoft Entra ID (formerly Azure AD), you cannot remove IdP-managed users from IdP-managed roles from within the Admin UI. The Admin UI does not show IdP-managed roles. You must remove users from such roles from the IdP’s portal. You can, however, remove IdP-managed users from StrongDM-managed roles.
Grant Temporary Access
Temporary access allows users to gain access to certain resources for a limited amount of time. For example, if Bob needs 30 minutes of read-only access to the production Redis replica to diagnose a customer issue, Alice can grant temporary access to Bob, which automatically closes any active connections the moment the grant expires.
Temporary access grants occur at the user level rather than role level and are the only way to grant access directly to users.
You can grant temporary access to a user in one of the following ways:
- Click the Actions button beside the user’s name and select Grant temporary access.
- Click into the user’s name and use the dialog on the Temporary Access tab to select which resources the user can access and when access expires.
Use the Actions Button
The Actions button for a user shows all the actions you can take on a selected user, without having to go into the user’s details:
- View details
- Set roles
- Remove from all roles
- Grant temporary access
- Set permission level
- Send password reset email
- Suspend user
- Delete user
Search for Users
A list (in table format) of existing users is displayed on the Users page in the Admin UI. You can sort the table of users in your organization by clicking on column headers. Clicking a column header sorts the table by the values in that column, in ascending order. Clicking again on the same header reverses the sorting direction.
The Search field allows you to find users and service accounts in your organization according to name, email, role, permission level, status, provisioning type, and tags. You can either type into the Search field or use the Role and Permission Level filter drop-down menus to narrow your search. The table header displays the number of results returned by the active search and filter query.
Free-text search
You can enter any text or string into the Search field, such as name, email address, or parts of a name or email. The Admin UI checks against all first names, last names, and emails in your organization.
User search filters
User filters display users according to their status (active or suspended), access (locked out or not), provisioning type (managed by StrongDM or by an identity provider), or tag.
You can type or copy/paste the following filters into the Search field, with or without other text. Do not use quotes or tick marks.
| Filter | Description | Example Search |
|---|---|---|
active:false | Shows inactive users (users who have not triggered any event in StrongDM in the last 90 days) | active:false finds all users who have not used StrongDM in the last 90 days. |
active:true | Shows active users (users who have triggered any event in StrongDM in the last 90 days) | active:true finds all users who have actively used StrongDM in the last 90 days. |
locked:false | Shows users who are not locked out | locked:false service finds all service accounts that are not locked out. |
locked:true | Shows all locked out users | locked:true finds all locked out users. |
managed:false | Shows users managed and provisioned by StrongDM | managed:false finds all user accounts managed by StrongDM instead of the configured IdP. |
managed:true | Shows users managed and provisioned by a third-party identity provider (for example, Okta) | managed:true Okta finds all Okta-managed user accounts. |
suspended:false | Shows all non-suspended users | suspended:false John finds all non-suspended users named John. |
suspended:true | Shows all suspended users | suspended:true @StrongDM finds all suspended users whose email address includes “@StrongDM.” |
tags:title=value | Shows users with the specified tag; supports wildcards (*) | tags:env=prod or tags:env=pr* finds all Users with the env=prod tag. Tag values containing commas must be inside quotes (for example, tags:region="useast,uswest") |
By default, the Users page filters out suspended users. The suspended:false filter is applied automatically when you visit the Users page.
Role, Permission Level, Managed by, and Activity filters
Additionally, you may narrow the search results by selecting a filter from the Role, Permission Level, Managed by, and Activity drop-down menus located to the right of the Search field.
- Select Role to automatically populate filters based on role assignment.
- Select Permission level to automatically populate filters based on permission level.
- If provisioning is enabled for your organization, select Managed by to automatically populate filters based on provisioning type (managed by either StrongDM or an identity provider).
- Select Activity to automatically populate filters based on user activity. Active users are users who have triggered any event in StrongDM in the last 90 days. Inactive users are users who have not triggered any event in StrongDM in the last 90 days.
Save your favorite search and filter queries
The parameters of your search and filter queries are reflected in the page URL, allowing you to bookmark your favorite searches and filters in your web browser.
For example, when filtering users based on the Administrator permission level, the URL becomes https://app.strongdm.com/app/admin?permissionLevel=admin.
Note that when filtering users by role, the URL includes the role ID parameter, rather than the role name (for example, https://app.strongdm.com/app/admin?roleID=r-603258af61aab3c1).
You can find resources and information about the following StrongDM topics in this section: