Oracle User Guide
Last modified on July 23, 2025
Overview
This guide describes how to connect to an Oracle database using StrongDM and any supported client. See the Oracle resource administration guide for additional information on setting up an Oracle resource or for a list of supported client versions.
Prerequisites
To establish a successful connection using this guide, note the following prerequisites:
- StrongDM Desktop or the CLI must be installed and set up on your machine. See our macOS, Windows, and Linux installation guides.
- Make sure you know the credentials for your StrongDM account.
- The Oracle database must be added and configured by an administrator in the StrongDM Admin UI. It must be healthy and online.
- You must be granted access to the database resource in the StrongDM Admin UI.
- Download and install the correct client for your use case. This guide will use the example of the DBeaver SQL client.
Connect to the Resource in StrongDM
You can use either the StrongDM Desktop application or the CLI to connect to your Oracle resource.
Use the Desktop App
Before you add the database connection in your SQL client, connect to the StrongDM resource first. After you establish this connection, all database access is proxied through StrongDM. To connect to your Oracle database using StrongDM Desktop, use the following steps.
- Launch StrongDM Desktop on your computer.
- Log in with the credentials used during StrongDM account setup.
- After login, accessible resources display in the desktop app, and you can see that you are connected. If you are disconnected, click the lightning icon beside the resource to connect.
- Note the port and name listed next to your connected resource.
- Continue with the Add a Database Connection in DBeaver section.
Use via the CLI
Before you add the database connection in your SQL client, connect to the StrongDM resource first. After you establish this connection, all database access is proxied through StrongDM. To connect to your Oracle database using the StrongDM CLI, use the following steps.
Open your command line or terminal.
Use sdm login to authenticate.
Run
sdm statusto view available resources and connection status. Note the port and name for your Oracle datasource.Connect to the datasource using the StrongDM CLI. Make sure to update the placeholder text with the name of your actual resource.
sdm connect <RESOURCE_NAME>Continue with the Add a Database Connection in DBeaver section.
Connect to Oracle
Launch your client (such as DBeaver SQL).
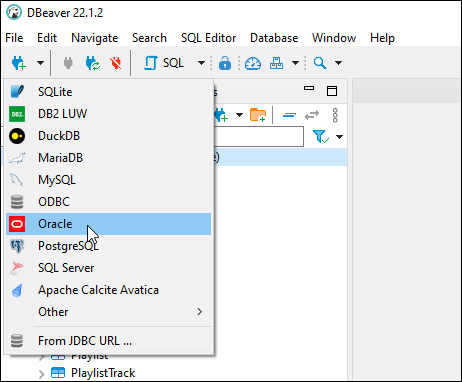
In your client, create a new connection/database for the Oracle type. In DBeaver, create a new connection and select Oracle.
DBeaver Connect Oracle Database Fill out the connection settings. Remember that the connection settings are not actual credentials. Credentials are injected by StrongDM at the time of connection to the resource and don’t have to be input here. In DBeaver, the connection settings are under Oracle Connections Settings. Use the following table to assist:
| Client | Hostname | Username | Password |
|---|---|---|---|
| DBeaver | localhost | any string | password |
| SQL Developer | localhost | any string | password |
| SQLPlus | localhost | any string | password |
| Toad | localhost | any string | any string |
If asked for a value for database, enter your database’s existing service name.
If asked for a port, enter the port that was assigned by StrongDM, visible in the desktop app or CLI.
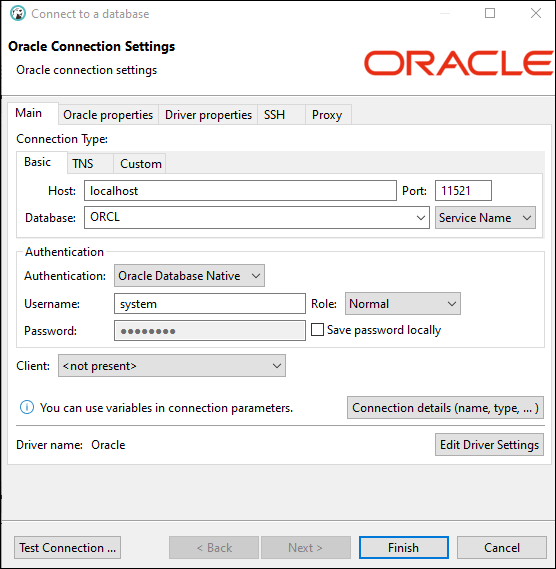
DBeaver Oracle Connection Settings
Click to test the connection and see if it is successful.
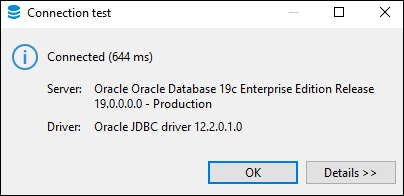
DBeaver Test Connection Save your connection configuration (in DBeaver, click OK then Finish). You can now run queries against Oracle through StrongDM, as far as your permissions allow.