Virtual Networking Mode
Last modified on August 27, 2025
This feature is part of the Enterprise plan. If it is not enabled for your organization, please contact StrongDM at the StrongDM Help Center.
Overview
This article introduces Virtual Networking Mode as a connectivity mode for StrongDM, explains the differences between Virtual Networking Mode and Loopback Mode, and provides guidance on how to transition your organization’s resources to operate in Virtual Networking Mode.
Dual Connectivity Modes
The resources in your StrongDM network can operate in one of two connectivity modes: Virtual Networking Mode or Loopback Mode.
What is Virtual Networking Mode?
Virtual Networking Mode is a mode of operation that enables client applications to connect to many resources concurrently through a software-defined, IP-based network exposed by the StrongDM client. Virtual Networking Mode uses a virtual point-to-point network device for local IP tunneling from client applications to the StrongDM client.
You can configure Virtual Networking Mode to use a RFC 1918-compliant private IP address space or the Carrier-Grade Network Address Translation (CGNAT) IP address space, 100.64.0.0/10, which includes IP addresses from 100.64.0.0 to 100.127.255.255. Each IP address space offers a size in terms of maximum allocatable IP addresses, giving you the flexibility to choose the appropriate space for the number of resources you wish to connect. The configured IP address space may be a subnet of these IP address spaces (that is, StrongDM does not require the entire IP address space to be dedicated to Virtual Networking Mode, and some portion of that space may be used for other applications).
Configuring your network to utilize Virtual Networking Mode provides your organization with many benefits, including the following:
- Resources are accessible by both a user-friendly, human-readable DNS name and IP address.
- Resources may be configured to listen on standard service ports (for example, port 22 for SSH).
- Clients can connect to resources without needing to explicitly “connect” the resource in the StrongDM CLI or desktop app.
- Clients can connect to a significantly higher number of resources simultaneously for increased scalability.
Network configuration is done on the StrongDM Admin UI’s Networking page.
What is Loopback Mode?
Loopback Mode, StrongDM’s classic mode of operation, allows the client to connect to resources using the local loopback adapter in the user’s operating system. When in Loopback Mode, the client can use ports on all 127.0.0.1 addresses (that is, localhost or loopback addresses) to support connections to resources. Operating system file descriptor limits, however, may restrict the number of resources that users can connect to simultaneously.
Use both connectivity modes
To ease the process of transitioning resources from using Loopback Mode to Virtual Networking Mode, your organization has the option to use both, where some resources are configured for Virtual Networking Mode and some are configured for Loopback Mode.
Each resource can operate in only one mode at a time, and each resource must be configured with one of the two connectivity modes.
Resources created through the Admin UI default to use Loopback Mode, and resources created through the CLI, SDKs, or Terraform default to use Virtual Networking Mode (where an available IP address will be allocated from the configured Virtual Networking Mode subnet unless a loopback IP address is explicitly specified).
StrongDM Client and Virtual Networking Mode
The client comprises up to three main components: the StrongDM Desktop application (macOS and Windows only), the StrongDM CLI/listener (sdm), and the StrongDM System Service (macOS and Windows only). When using Virtual Networking Mode, the StrongDM System Service creates a virtual network tunnel interface that allows resources to be accessed via a local software-defined network utilizing carrier-grade network (CGNAT) or private IP addresses.
Virtual Networking Mode requires the StrongDM System Service to be installed on the user’s local machine (for macOS and Windows). The service performs the privileged task of activating Virtual Networking Mode on the user’s workstation and allowing the user to connect to Virtual Networking Mode resources. The StrongDM System Service runs in the background as a privileged OS service in order to create and manage a virtual network tunnel interface, and thus needs admin privilege to be installed.
On macOS, the StrongDM System Service is installed via the PKG installer and runs as a privileged (root) launchd service.
On Windows, the StrongDM System Service is installed via the EXE installer when the installer is run as administrator; it runs as a privileged (administrator) Windows service.
On Linux, there is no separate system service, as it is built into the StrongDM CLI.
Some of the benefits of using the StrongDM System Service with the client include the following:
- Users gain connect-on-knock functionality. Instead of clicking on a resource’s lightning icon to initiate a connection, the connection happens the first time that the user attempts to use the resource (that is, when the user connects a client application to the resource). Note that if the user explicitly disconnects from the resource (through the lightning icon in the desktop app or
sdm disconnecton the CLI), that automatic reconnection does not happen and the user must explicitly connect through the desktop or CLI. - Resources can be accessed with either their bind address (for example,
100.64.100.100:12345) or a human-readable DNS name (for example,mysql-dev.my-organization.sdm.network). The DNS name is in the format<RESOURCE-SUBDOMAIN>.<ORGANIZATION-SUBDOMAIN>.<CONTROL-PLANE-SUFFIX>, where<CONTROL-PLANE-SUFFIX>is eithersdm.network,eu.sdm.network, oruk.sdm.network.
Connectivity Mode Comparison
| Virtual Networking Mode | Loopback Mode | |
|---|---|---|
| Network | Uses CGNAT IP address space 100.64.0.0/10 (IP addresses from 100.64.0.0 to 100.127.255.255), Class A (10.x.x.x), Class B (172.x.x.x), or Class C (192.168.x.x); can be subnet of those IP address spaces | Uses a range of loopback IP addresses (such as 127.0.0.1 to 127.0.0.34) |
| Client connection to resources | All resources auto-connect | Supported resource types (SSH, Kubernetes, HTTP) are always connected and do not require clicking “connect” |
| Local port overrides | Not supported with Virtual Networking mode-configured resources | Local Ports Management supported |
| Number of resources that can be connected | No maximum | Limited |
| Resource bind address | DNS or IP address | IP address only |
| Resource port override | 1 to 65535 | 1024 to 64999 |
Admin UI Networking Settings
You may configure your organization’s network settings from the Admin UI’s Networking page. Networking settings determine the number of resources that your organization can potentially connect to via StrongDM, as well as the way that users access resources via their StrongDM client. You need to choose a Virtual Networking Mode network subnet that does not conflict with the end user’s local network address ranges or any VPN network address ranges in your organization. We generally recommend choosing CGNAT for the network class, as it is less likely to have conflicts.
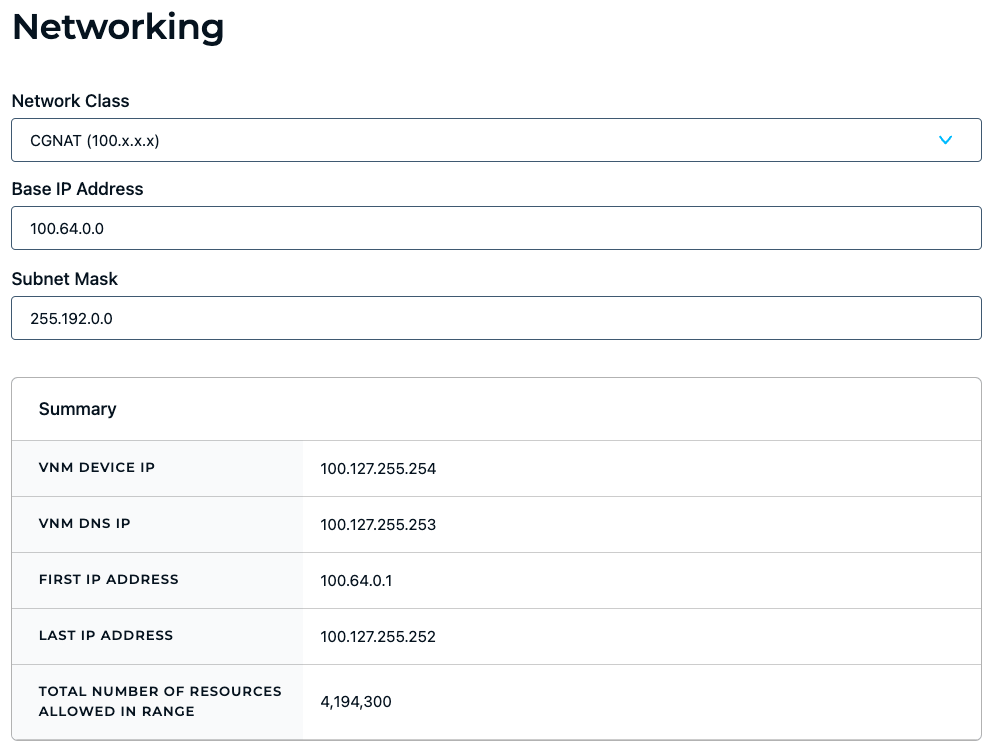
Your selected network class (Class A, Class B, Class C, or CGNAT) sets the Base IP Address and Subnet Mask default values.

Network class defaults
See the following table for default values for each class. You can change the default values, as long as the IP address value is in a valid range and the subnet mask is in a valid format.
| Field | Description | Class A default | Class B default | Class C default | CGNAT default |
|---|---|---|---|---|---|
| Base IP Address | IP address used to transmit data to all of the hosts on the subnet; the highest, or last, number in its class | 10.0.0.0 | 172.16.0.0 | 192.168.0.0 | 100.64.0.0 |
| Subnet Mask | Number that distinguishes the host address from the network address within the IP address; automatically populated if you entered a starting IP address that specifies / | 255.0.0.0 | 255.240.0.0 | 255.255.0.0 | 255.192.0.0 |
Summary fields
The Summary tells you what to expect if you save the settings with the current selections. Alert messages display when you choose a private network or when you change networks from one class to another.
The following table shows the fields provided in the summary.
| Field | Description | Class A example | Class B example | Class C example | CGNAT example |
|---|---|---|---|---|---|
| VNM Device IP | IP address of the StrongDM virtual network tunnel interface | 10.255.255.254 | 172.31.255.254 | 192.168.255.254 | 100.127.255.254 |
| VNM DNS IP | IP address of the Domain Name System (DNS) server for resolving DNS names assigned to Virtual Networking Mode resources | 10.255.255.253 | 172.31.255.253 | 192.168.255.253 | 100.127.255.253 |
| First IP Address | Starting IP address of the network; allows for /bits or a /subnet mask | 10.0.0.1 | 172.16.0.1 | 192.168.0.1 | 100.64.0.1 |
| Last IP Address | Ending IP address of the network; allows for /bits or a /subnet mask | 10.255.255.252 | 172.31.255.252 | 192.168.255.252 | 100.127.255.252 |
| Total Number of Resources Allowed in Range | Maximum number of resources that can be created for the selected network class IP address range; if the range is too small for the total number of resources, the Admin UI prompts you to change your networking settings to use a more appropriate network class | 16,777,212 | 1,048,572 | 65,532 | 4,194,300 |
How to configure network settings
To configure your network settings for Virtual Networking Mode, follow these steps.
- Log in to the Admin UI.
- Go to Settings > Networking.
- On the Networking page, select your preferred defaults based on network class. Select Class A, Class B, Class C, or CGNAT to populate Base IP Address and Subnet Mask with default values.
- Optionally edit Base IP Address. If changed, the IP address value must be in a valid range.
- Optionally edit Subnet Mask. The subnet mask must be in a valid format.Any changes you make to the network class, base IP address, and subnet mask settings cause the summary to refresh. In some cases, a message may warn of potential network class conflicts. To avoid such collisions within your own network, you may wish to reserve some networking space just for StrongDM. Make sure you review carefully before updating the settings.
- If you’d like to have new resources allocated IPs in the VNM subnet by default, toggle the Use VNM for resource IP address allocation by default? option to Yes. Additionally, with this setting enabled, update commands explicitly changing the bind-interface of a resource to
defaultwill move the resource to an unused IP in the VNM subnet. - Review the summary. The summary shows the VNM Device IP address, VNM DNS IP address, IP address range, and how many resources are allowed in that range, if you save your networking settings right now.
- Click Update to save your changes.
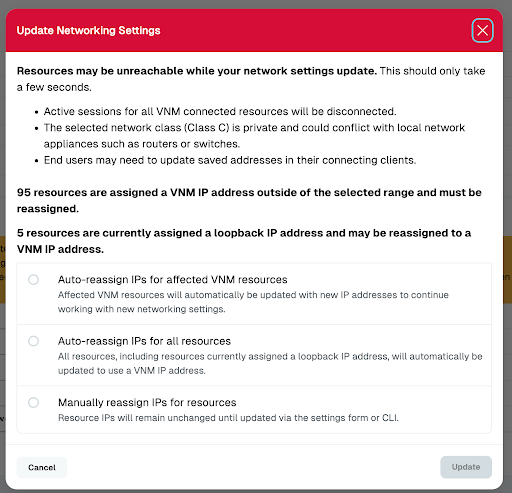
After clicking Update, you will be prompted for confirmation and given the option to choose to reassign existing resources with IP addresses in the newly configured range, or to leave existing resources unmodified and require manual reassignment if desired, as shown in the following example.
Resource settings
Admin UI resource configuration forms now include the option to set the connectivity mode (Virtual Networking Mode or Loopback Mode). Loopback Mode is the default and changing the mode changes the related subproperties.
For all resource form properties, please see the documentation for the particular resource you wish to configure.
| Property | Requirement | Description |
|---|---|---|
| Connectivity Mode | Required | Select either Virtual Networking Mode, which lets users connect to the resource with a software-defined, IP-based network; or Loopback Mode, which allows users to connect to the resource using the local loopback adapter in their operating system; this field is shown if Virtual Networking Mode and/or multi-loopback mode is enabled for your organization |
| IP Address | Optional | If Virtual Networking Mode is the selected connectivity mode, an IP address value in the configured Virtual Networking Mode subnet in the organization network settings; if Loopback Mode is the selected connectivity mode, an IP address value in the configured Loopback IP range in the organization network settings (by default, 127.0.0.1); if not specified, an available IP address in the configured IP address space for the selected connectivity mode will be automatically assigned; this field is shown if Virtual Networking Mode and/or multi-loopback mode is enabled for your organization |
| Port Override | Optional | If Virtual Networking Mode is the selected connectivity mode, a port value between 1 and 65535 that is not already in use by another resource with the same IP address; if Loopback Mode is the selected connectivity mode, a port value between 1024 to 64999 that is not already in use by another resource with the same IP address; when left empty with Virtual Networking Mode, the system assigns the default port to this resource; when left empty for Loopback Mode, an available port that is not already in use by another resource is assigned; preferred port also can be modified later from the Port Overrides settings |
| DNS | Optional | If Virtual Networking Mode is the selected connectivity mode, a unique hostname alias for this resource; when set, causes the desktop app to display this resource’s full DNS name (for example, k8s.my-organization-name.sdm.network) and IP address (for example, 100.64.100.100); if a value is not specified, a random DNS name is assigned to the resource |
Activities
New activities that might be logged on the Admin UI Activities page include the following:
- Organization resource addresses reassigned within VNM subnet
- Organization VNM subnet updated
Desktop App
Every user who can access Virtual Networking Mode resources must have the StrongDM System Service installed on their machine, in addition to the desktop app and/or CLI. The StrongDM System Service is installed via the PKG installer on macOS and via the EXE installer on Windows.
If the StrongDM System Service is not installed (because the PKG or EXE installer was not used), it can be installed (or reinstalled) from the desktop app through the desktop app’s Actions menu.
StrongDM System Service installation
Installation instructions for macOS and Windows include information about how the StrongDM System Service is installed. For Linux, there is no separate installation of the StrongDM System Service.
macOS
For macOS, The StrongDM System Service is installed on the user’s machine when the PKG installer is used.
The macOS Installation Guide remains the same but adds sudo sdm listen --install to install the StrongDM System Service at the command line and sudo sdm listen --uninstall to uninstall it.
Windows
For Windows clients, Virtual Networking Mode supports Windows 10/11 Enterprise/Professional and corresponding Windows Server versions.
The StrongDM System Service is installed on the user’s machine when the EXE (full version) is run as administrator. The Windows Installation Guide remains the same but adds sdm listen --install to install the StrongDM System Service at the Command Prompt and sdm listen --uninstall to uninstall it. These commands must be run as an administrator.
Additionally, the StrongDM System Service depends on the Windows PowerShell. This is typically part of the default Windows installation on all modern versions of Windows.
Linux
On Linux, Virtual Networking Mode does not install a separate StrongDM System Service. The StrongDM listener service (sdm) itself manages the creation of the virtual network device. The listener service requires CAP_NET_ADMIN privileges do so. The default Linux client installation configures the service to run with these privileges automatically.
Additionally, connecting to Virtual Networking Mode resources through DNS requires the systemd-resolved package to be installed in the Linux environment and for the user account under which the StrongDM listener service is running to have passwordless sudo privileges to run the resolvectl command. If not available, Virtual Networking Mode resources are accessible by IP address only.
Resource display
If configured to use Virtual Networking Mode, resources connect automatically—instead of clicking on a resource’s lightning icon to initiate a connection, the connection happens the first time the user attempts to use the resource. In addition, resources are displayed with both their bind address (for example, 100.64.100.100:12345) and DNS name (for example, k8s.my-organization-name.sdm.network).
No limit to the number of resource connections
In addition, users can connect to all Virtual Networking Mode-enabled resources available to them without being limited by their operating system’s file descriptor limit.
CLI
sdm admin ports subnet
You can use the sdm admin ports subnet command to enable Virtual Networking Mode via the CLI instead of the Admin UI. Run the command with the desired subnet for your organization to enable the virtual network of the private IP address to be used for a particular resource for your entire organization.
Example:
sdm admin ports subnet 100.64.0.0/10
If successful, the output provides device and network configuration settings similar to the following:
Device Configuration:
- VNM Device IP:       100.127.255.254
- VNM Device Netmask:  255.192.0.0
- VNM Virtual DNS:     100.127.255.253:53

Network Configuration:
- Subnet:               100.64.0.0/10
- Subnet Broadcast IP:  100.127.255.255
- First Available IP:   100.64.0.1
- Last Available IP:    100.127.255.252
- Total Available IPs:  4194300
- Default to VNM:       true
See the following help text for usage and options.
NAME:
   sdm admin ports subnet - define a subnet for the VNM devices. WARNING: Updating the organization's subnet or reassigning IPs will disconnect all sessions affected by the update.

USAGE:
   sdm admin ports subnet [command options] <address/bits>

DESCRIPTION:

    This tool sets or clears the VNM subnet for the organization. It must be within the scope of private IP classes (A, B, or C) and Shared IP Space (CGNAT).


OPTIONS:
   --dry                       allows to see how the network will look like before applying the change
   --shuffle                   reassigns all resources of the organization to an IP and port within the organization's subnet. It is a non-reversible operation.
   --shuffle-exclude-loopback  excludes resources currently assigned a loopback IP from being reassigned a VNM IP when used with --shuffle. Ignored with --clear
   --default-to-vnm            defaults IP allocation for new resources to use VNM rather than loopback. Ignored with --clear
   --clear                     clears the organization's VNM subnet (this flag cannot be used with a subnet but can be used with --shuffle to reassign resources with a VNM IP to a loopback IP and port)
   --timeout value             set time limit for command
This command’s --shuffle option allows admins to change the assigned IPs and ports for all of the organization’s resources at once. This will require changing existing client configurations to point to the new addresses and ports, including for clients and resources that are actively in use. In environments where the resulting downtime cannot be tolerated, we recommend manually changing resource configurations instead.
This operation is irreversible, so be sure of your intentions before invoking it.
This command’s --clear option allows admins to clear the organization’s configured VNM subnet, thus disabling Virtual Networking Mode.
Moreover, --shuffle can be used in conjunction with --clear to update resources when disabling Virtual Networking Mode (the Admin UI also supports this when disabling Virtual Networking Mode through the Admin UI).
Clearing the VNM subnet causes any resources assigned VNM IP addresses to become inaccessible to clients. Before disabling VNM, administrators should first update any affected resources to use loopback IP addresses to avoid clients losing access to those resources.
Command options
All CLI commands that interact with resources (for example, sdm admin datasources add <RESOURCE>) include the following options:
--bind-interface--subdomain--port-override
Please see the CLI Reference for copies of the help text for each CLI command.
How Do I Use Virtual Networking Mode?
Now that you’ve learned what Virtual Networking Mode is, you can use the following quick start guide to set up and use it.
Quick start for admins
- Configure your organization’s networking settings. Choose the network class that supports the number of resources you need.
- For new or existing resources that you want to operate in Virtual Networking Mode, set the Connectivity Mode to Virtual Networking Mode. Optionally add a port override and DNS. Repeat this step for every resource that you want to operate in Virtual Networking Mode.
- Download and install the appropriate StrongDM package for your operating system, or update the one you already have.
Now you and everyone in your organization can use StrongDM to connect to different resources.
Quick start for users
- Download and install the appropriate StrongDM package for your operating system, or update the one you already have.
The StrongDM Desktop application will display a banner if you have access to resources configured to use Virtual Networking Mode but the required StrongDM System Service is not installed and requires manual installation through the desktop app or CLI.
Website Resource Access With VNM
VNM-based HTTP resources may be accessed by DNS name either by Proxy Auto-Configuration (PAC) configured in your browser (as described in the Connect to Websites page) or through VNM DNS resolution. When using VNM to connect to an HTTP resource, it is not strictly required to have the PAC configured to access those resources.
From the perspective of an end user, there should be no visible difference.