Configure CyberArk Conjur Integration
Last modified on March 24, 2025
This feature is part of the Enterprise plan. If it is not enabled for your organization, please contact StrongDM at the StrongDM Help Center.
Overview
Conjur is a secrets management platform that integrates with popular tools to provide data encryption, identity-based authorizations for humans and machines, and role-based access control for secrets like passwords, SSH keys, and web services. This guide walks you through the steps to integrate Conjur with StrongDM.
Secret store integrations allow you to use your existing third-party secret stores with StrongDM. Your credentials are saved in a tool you control. Those credentials are never transmitted to StrongDM in any form. To learn more about secret store integrations and their usage, read the Secret Stores Reference.
Prerequisites
The following items are required to successfully integrate Conjur with StrongDM:
You must be an account administrator in StrongDM.
You should have a healthy gateway or relay to allow authentication with the secret store.
You have access to install the self-hosted Conjur software in your Conjur instance.
- The official Conjur containers are available on DockerHub.
- For AWS deployments, see the Conjur Amazon Machine Image (AMI) documentation.
- For Kubernetes deployments using Helm, see the Conjur OSS Helm Chart repository.
Configure Conjure
Complete these steps to configure your Conjur instance and to set up your integrations with StrongDM:
- Install Conjure, set up an account, and initialize an admin user.
- Define a policy that determines your Conjur entities and describes relationships between them. An entity can be a policy, a host, an application (such as StrongDM), a user, a layer, a group, or a variable.
- Add secret stores for specific applications, such as StrongDM, to be able to authenticate to Conjur.
Step 1: Install your environment
For help setting up your Conjur environment, follow Conjur’s Quick Start guide or check the conjur-quickstart repository. During this setup, you can use Docker to install and start Conjur, generate a master key to encrypt the database, and create an admin account for your Conjur instance.
Step 2: Define a policy
After you set up your Conjur environment, define a policy that determines what users or applications have access to certain credentials. For example, when creating your StrongDM resources, you can define a Postgres policy similar to the following sample YAML file. To learn more about policy statements, read the Conjur Policy documentation.
- !policy
  id: Postgres
  body:
    # Define a non-human identity that represents an application, as well as username/password secrets
  - !host StrongDM
  - !variable dbUser
  - !variable dbPass
  - !permit
    # Give permissions to the non-human identity to read, update, and fetch the password
    role: !host StrongDM
    privileges: [read, update, execute]
    resource: !variable dbPass
  - !permit
    # Give permissions to the non-human identity to read, update, and fetch the username
    role: !host StrongDM
    privileges: [read, update, execute]
    resource: !variable dbUser
When you submit the policy, Conjur generates API keys and stores them in the location you specified. You receive a JSON response containing information about created roles, such as account IDs, API keys, and other metadata. In our example, the policy defines an API key for an application like StrongDM. Use the generated API keys to configure your gateway or relay and to authenticate the application to Conjur.
Loaded policy 'root'
{
  "created_roles": {
    "myConjurAccount:host:Postgres/StrongDM": {
      "id": "myConjurAccount:host:Postgres/StrongDM",
      "api_key": "30vdp11zbq1622anzsea2aws45d3kzmtfy1jxg2y4jdy078fvb0a1"
    }
  },
  "version": 1
}
Step 3: Store a secret
Once you define a policy, generate and store values for your application’s secrets. This action gives your application access to Conjur. In the following steps, we continue with the sample policy defined earlier.
Log in to your Conjur instance with the API key for your host account. Make sure to replace the colon with
/:docker-compose exec client conjur authn login -u host/Postgres/StrongDMGenerate a 12-hex character value and store it in a variable:
secretVal=$(openssl rand -hex 12 | tr -d '\r\n')Store secret values for the
dbUseranddbPassvariables in our sample policy. FordbUser, add the value of the username instead of a random value:docker-compose exec client conjur variable values add Postgres/dbUser <USERNAME>Then set a policy predefined variable named
Postgres/dbPasswith a randomly generated secret:docker-compose exec client conjur variable values add Postgres/dbPass ${secretVal}Paths to these credentials provide values when connnecting a StrongDM resource to work with Conjur. In our example, we can later set the Username (path) value to
Postgres/dbUserand the Password (path) value toPostgres/dbPass.For more information about storing secrets in variables, see the Store a Secret in Conjur reference.
Configure Your Gateway or Relay
To allow communication with your Conjur instance, StrongDM needs to know what credentials to use. For this information, refer to the JSON response you received when defining your Conjur policy.
Loaded policy 'root'
{
  "created_roles": {
    "myConjurAccount:host:Postgres/StrongDM": {
      "id": "myConjurAccount:host:Postgres/StrongDM",
      "api_key": "30vdp11zbq1622anzsea2aws45d3kzmtfy1jxg2y4jdy078fvb0a1"
    }
  },
  "version": 1
}
Use this metadata to configure your gateway or relay environment. Add the following properties as environment variables on your relay or gateway.
| Property | Description |
|---|---|
CONJUR_ACCOUNT | The Conjur account the secrets are registered to (for example, myConjurAccount in our JSON sample) |
CONJUR_AUTHN_LOGIN | The individual role accessing this secret (for example, host/Postgres/StrongDM in our JSON sample); note that the colon is replaced with / |
CONJUR_AUTHN_API_KEY | The API key for the given username (for example, 30vdp11zbq1622anzs... in our JSON sample) |
Create the Secret Store in StrongDM
After completing the steps in the previous sections, create the Conjur secret store in the StrongDM Admin UI.
Log in to the StrongDM Admin UI.
Go to Settings > Secrets Management and to the Secret Stores tab.
Click Add secret store.
Add a Name and select CyberArk Conjur from the Type dropdown. Both fields are required.
When the Application URL field appears, add the root URL for your Conjur instance. This value serves as the base URL for the Username (path) and Password (path) fields when you connect a resource.
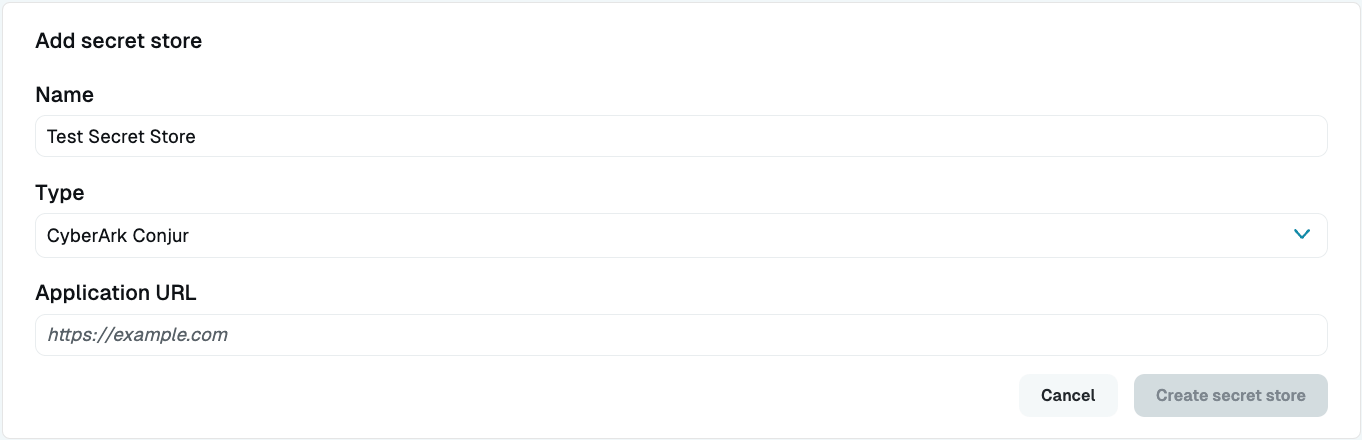
Add a CyberArk Conjur Secret Store Click Create secret store to save. If you have configured the relay or gateway server correctly for Conjur secret store access and authorization, you can see the green online indicator.
Connect to a StrongDM Resource
You can now use the CyberArk Conjur secret store when connecting to different StrongDM resources.
- From the Admin UI, go to Infrastructure > Datasources.
- Click Add datasource.
- Enter the different properties for your database resource.
- From the Secret Store drop-down, select the Conjur secret store option you created in the previous section.
- In the Username (path) field, add the path to retrieve the username and authenticate the application with Conjur. In our example, the path is
Postgres/dbUser. - In the Password (path) field, add the path to retrieve the password and authenticate the application with Conjur. In our example, the path is
Postgres/dbPass. - When all required fields are complete, click Create. When the resource is ready, the Health icon indicates a positive, green status.