SSO With OneLogin (SAML)
Last modified on July 3, 2025
Overview
This guide provides instructions to set up single sign-on (SSO) with OneLogin using the SAML 2.0 (Security Assertion Markup Language) login standard. In this scenario, OneLogin serves as your identity provider (IdP), authenticating users accessing StrongDM as the service provider (SP).
Features
Basic features
- Users must authenticate using SSO every time they log in to StrongDM. Authentications from previous sessions cannot be reused.
Advanced features
- The current SAML integration uses SHA-256 with RSA signature encryption. See the configuration steps.
- Email address serves as the default user ID in the SAML assertion.
- A RelayState HTTP parameter cannot be included as part of the SAML request and response.
- IdP-initiated authentication is supported. If the setting is enabled, a user may initiate a login from the SSO provider.
Unsupported features
- The direct upload of an SSO provider’s metadata file is not available.
Prerequisites
To get started, make sure the following conditions are met:
- In OneLogin, you must be an administrator with the ability to manage application settings.
- In StrongDM, your permission level must be set to Administrator.
- Ensure you have a unique identifier for users. Only email address is currently supported.
Configure StrongDM
Use the following steps to configure StrongDM to work with your IdP. Once the SAML feature is enabled in StrongDM, these values can be copied to the configuration settings used in OneLogin.
- In the StrongDM Admin UI, go to Settings > User Management.
- Click the Lock icon to make changes.
- Click Yes to enable single sign-on.
- Select OneLogin (SAML) from the Provider drop-down menu. With this setting, users log in to StrongDM using OneLogin and the SAML protocol.
- Copy your organization’s StrongDM domain name as it is needed for OneLogin.
- Leave the StrongDM browser window open and continue with the OneLogin configuration.
Configure OneLogin
Use the following steps to add the recommended SAML settings in OneLogin. These settings have been tested and confirmed. However, other configuration options may apply.
Log in to the OneLogin admin dashboard using your company name.
Click Applications > Applications and then click Add App.
Search for StrongDM and select the SAML 2.0 , provisioning application type.

Select the Appropriate App Type Name the application StrongDM and click Save.
Once the application is created, go to the Configuration tab. Under section Application details, paste your StrongDM organization domain (copied when setting up the integration in StrongDM) in the StrongDM Account ID field.
In the Login URL field, enter the URL you use to access StrongDM’s Admin UI, without a trailing slash. The default is
Enter the StrongDM Domain name https://app.strongdm.com, and can vary if your organization is hosted in a different regional control plane.Go to the SSO section. For the SAML Signature Algorithm setting, set the value to SHA-256.
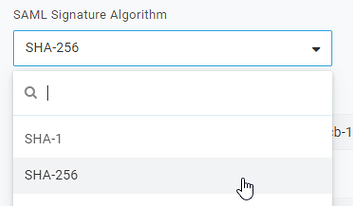
Change the Value to SHA-256 Click Save to finish the SSO configuration in OneLogin.
Add SAML Metadata
SPs and IdPs swap XML metadata to share configurations, establish trust, and communicate with each other. For this purpose, you can copy the SAML metadata from OneLogin to the SSO section in the StrongDM Admin UI. After you have configured the application settings in OneLogin, use these steps to add the IdP metadata URL to StrongDM. This value is required for your SSO configuration to work correctly.
From the admin dashboard in OneLogin, click Applications > Applications.
Click to select the StrongDM application.
Select SSO from the side navigation.
Copy the value in the Issuer URL field.

OneLogin Issuer URL Go to the StrongDM browser window you left open while configuring the OneLogin (SAML) settings.
In the Add SAML Metadata section, paste the copied Issuer URL value from OneLogin into the Metadata URL field in StrongDM.
In the Configure Common SAML Settings section, you may enable Allow IDP Initiated Authentication if you wish to allow users to log in via a link from OneLogin.
Click Save to complete the setup.
The SAML metadata is currently cached for three hours. If any configuration changes are made, they may not appear immediately.
Troubleshooting
When troubleshooting your SAML integration, note that the following can prevent successful user logins:
- The correct SAML metadata URL must be added in StrongDM. If this URL is incorrect, you may get errors that the XML is invalid during login attempts.
- If the application is misconfigured or the field values are wrong in OneLogin, you can get a permission denied error in StrongDM. This error also displays if the user is not added to the app in OneLogin.