Azure VM Nodes
Last modified on October 30, 2024
Overview
This guide describes how to create and configure a Microsoft Azure virtual machine (VM) to host a StrongDM node (gateway or relay), as well as how to create and install the node.
Prerequisites
Ensure that you are an account administrator in StrongDM.
Steps
Create an Azure VM
If you already have an Azure VM up and running, check that its properties match those described in this section and in Configure Networking settings. Then proceed to Add a node in StrongDM.
- In Azure, go to Home > Virtual Machines, click Create, and then click Virtual Machine.
- On the Virtual Machine page, underneath Ubuntu Server, click Create.
- On the Create a virtual machine page that opens, set the following properties on the Basics tab:
- Subscription: Select your subscription type.
- Resource group: Select the appropriate resource group for your account.
- Virtual machine name: Give the VM a memorable name (for example, “strongdm-gw01”).
- Region: Select the appropriate region for the VM.
- Availability options: Choose your availability.
- Security type: Set as per your organization standard.
- Image: Make sure the selected image is still Ubuntu and the latest Gen available (for example, “Ubuntu Server 20.04 LTS”).
- Azure Spot instance: Optional
- Size: Choose the appropriate size for your needs.
- Authentication type:
- If you select Password, as we did for this example, also set the Username and Password for the VM.
- If you select SSH public key, also set the SSH public key source and Key pair name.
- Public inbound ports: Select Allow selected ports.
- Select inbound ports: Select SSH (22) to allow port 22.
- Click Next to set the remaining properties on the Disks tab, Networking tab, Management tab, Advanced tab, and Tags tab. You can set all the standard options or whatever works for your organization.
- On the Review + create tab, check that the VM’s properties are correct, take care of business, and click Create.
Configure Networking settings
- Once your VM is deployed, click into its resource name to view its Networking area.
- Go to Inbound Port Rules, click Add inbound port rule, and set the following:
- Source: Select Any.
- Source port ranges: Set *.
- Destination: Set IP Addresses.
- Destination IP addresses/CIDR ranges: Enter the public IP of the VM you just deployed with /32 to specify the specific machine (for example, 10.0.0.021/32). You can find the public IP address under Networking, where it is displayed at the top of the page.
- Service: Set Custom.
- Destination port ranges: Set 5000.
- Protocol: Set TCP.
- Action: Set Allow.
- Priority: Enter 100 so it has the highest priority.
- Name: Change the name to StrongDM.
- Click Add to save your changes.
Connect to the VM
Once your Azure VM is up and running, you should be able to connect to it.
- Click into the name of your VM to get to its Overview blade.
- Click Connect and then select your connection method. In this example, we selected SSH and went through the setup process to connect via SSH with client.
Add a Node in StrongDM
The following instructions are for creating a gateway and generating a token in the Admin UI. To do the same via the CLI instead of the Admin UI, see sdm admin relay create-gateway.
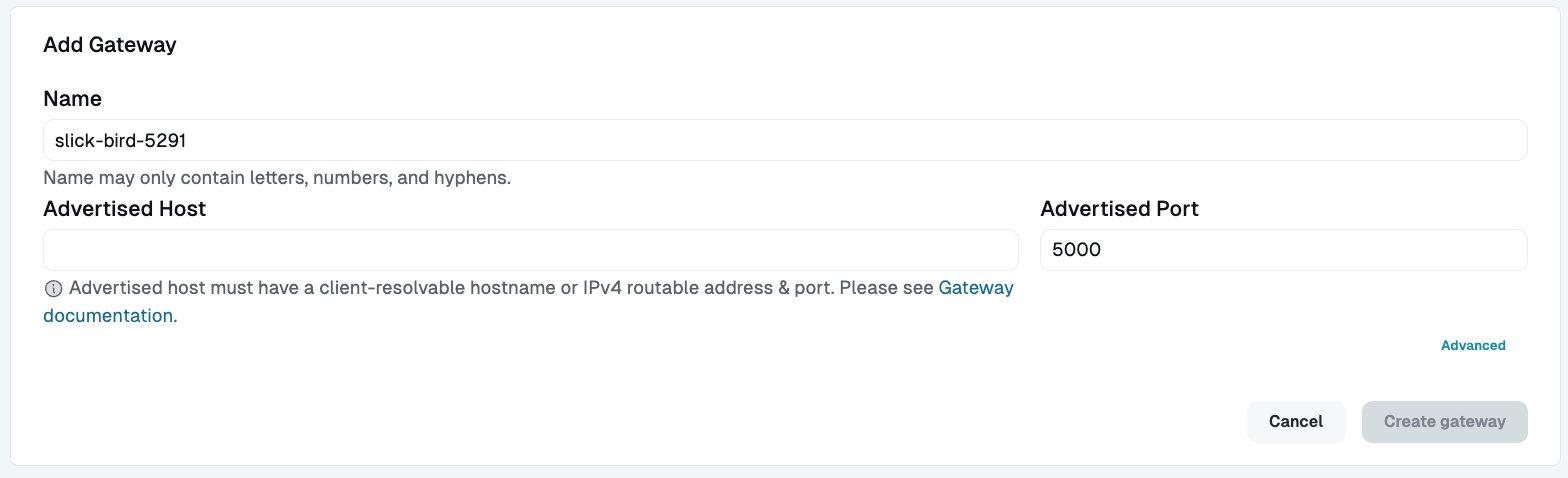
To add a gateway, follow these steps.
- Log in to the Admin UI at app.strongdm.com.
- Go to Networking > Gateways.
- Click Add gateway.
- For Name, enter a memorable name (for example, “azure-vm”). This name will be displayed in the Admin UI. You can edit the name later.
- For Advertised Host, enter the public IP address of your Azure VM (for example, “10.0.0.021”). The gateway will be listening on this address.
- For Advertised Port, set the TCP port for the service to listen on (default: 5000).
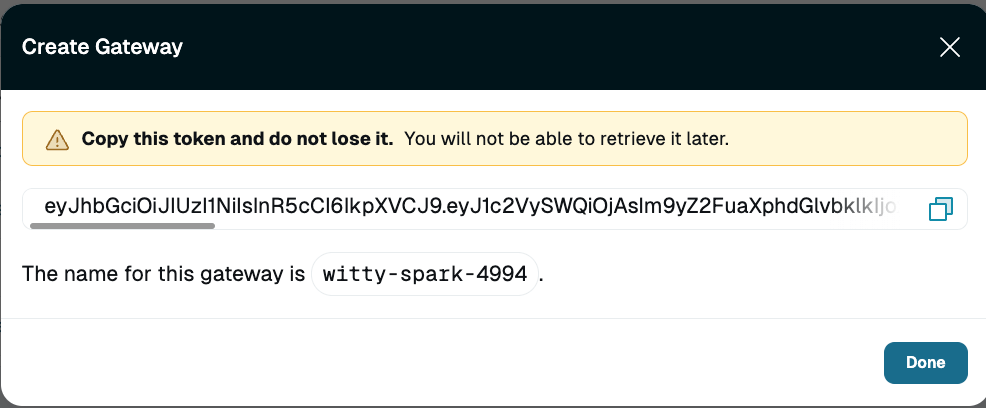
Add Gateway - Click Create gateway to generate a token that you’ll need later in the installation process. The token is only shown to you one time. Carefully copy the token and save it somewhere safe for later use.
Create Gateway Token
To add a relay, follow these steps.
- Log in to the Admin UI at app.strongdm.com.
- Go to Networking > Relays.
- Click Add relay.
- For Name, enter a name for the relay.
- Click Create relay.
- Copy the token and keep it in a secure place.
Node Installation
Log in to the Azure VM you created to host your gateway or relay.
Download the StrongDM binary:
curl -J -O -L https://app.strongdm.com/releases/cli/linuxUnzip it (if this is a new server, you may need to install a package to unzip archives, such as with
sudo apt-get install unzipon Ubuntu distributions):unzip sdmcli_VERSION_NUMBER_linux_amd64.zipInstall the node:
You will be prompted for the token you generated when creating a gateway or relay; paste it in and hit Enter. Note that the token won’t show in the terminal for security purposes, similar to the masking of a password.
The installer must be run by a user who exists in the/etc/passwdfile. Any users remotely authenticated, such as with LDAP or an SSO service, may fail to complete the installation.Log in to the StrongDM Admin UI. In Networking > Gateways or Networking > Relays, the node you created should appear to be online and have a heartbeat. If it doesn’t appear online, perform a hard refresh of your browser. Within a couple of minutes, if it is still not online, verify that the StrongDM daemon is running by running
ps aux|grep sdmon the server and looking for a line that sayssdm relay.