macOS Installation Guide
Last modified on April 8, 2024
Overview
This guide provides information to download and install StrongDM on macOS. The primary download package includes the StrongDM Desktop application and a command-line interface (CLI). You can optionally download the CLI independently from the Admin UI.
Download StrongDM
Use the following steps to download the desktop app and CLI on macOS. To bypass the desktop app, you can download the CLI independently.
Open the invitation email you received for your StrongDM account and follow the directions to set up your account.
Log in to StrongDM and go to the Download & Install page in the Admin UI.
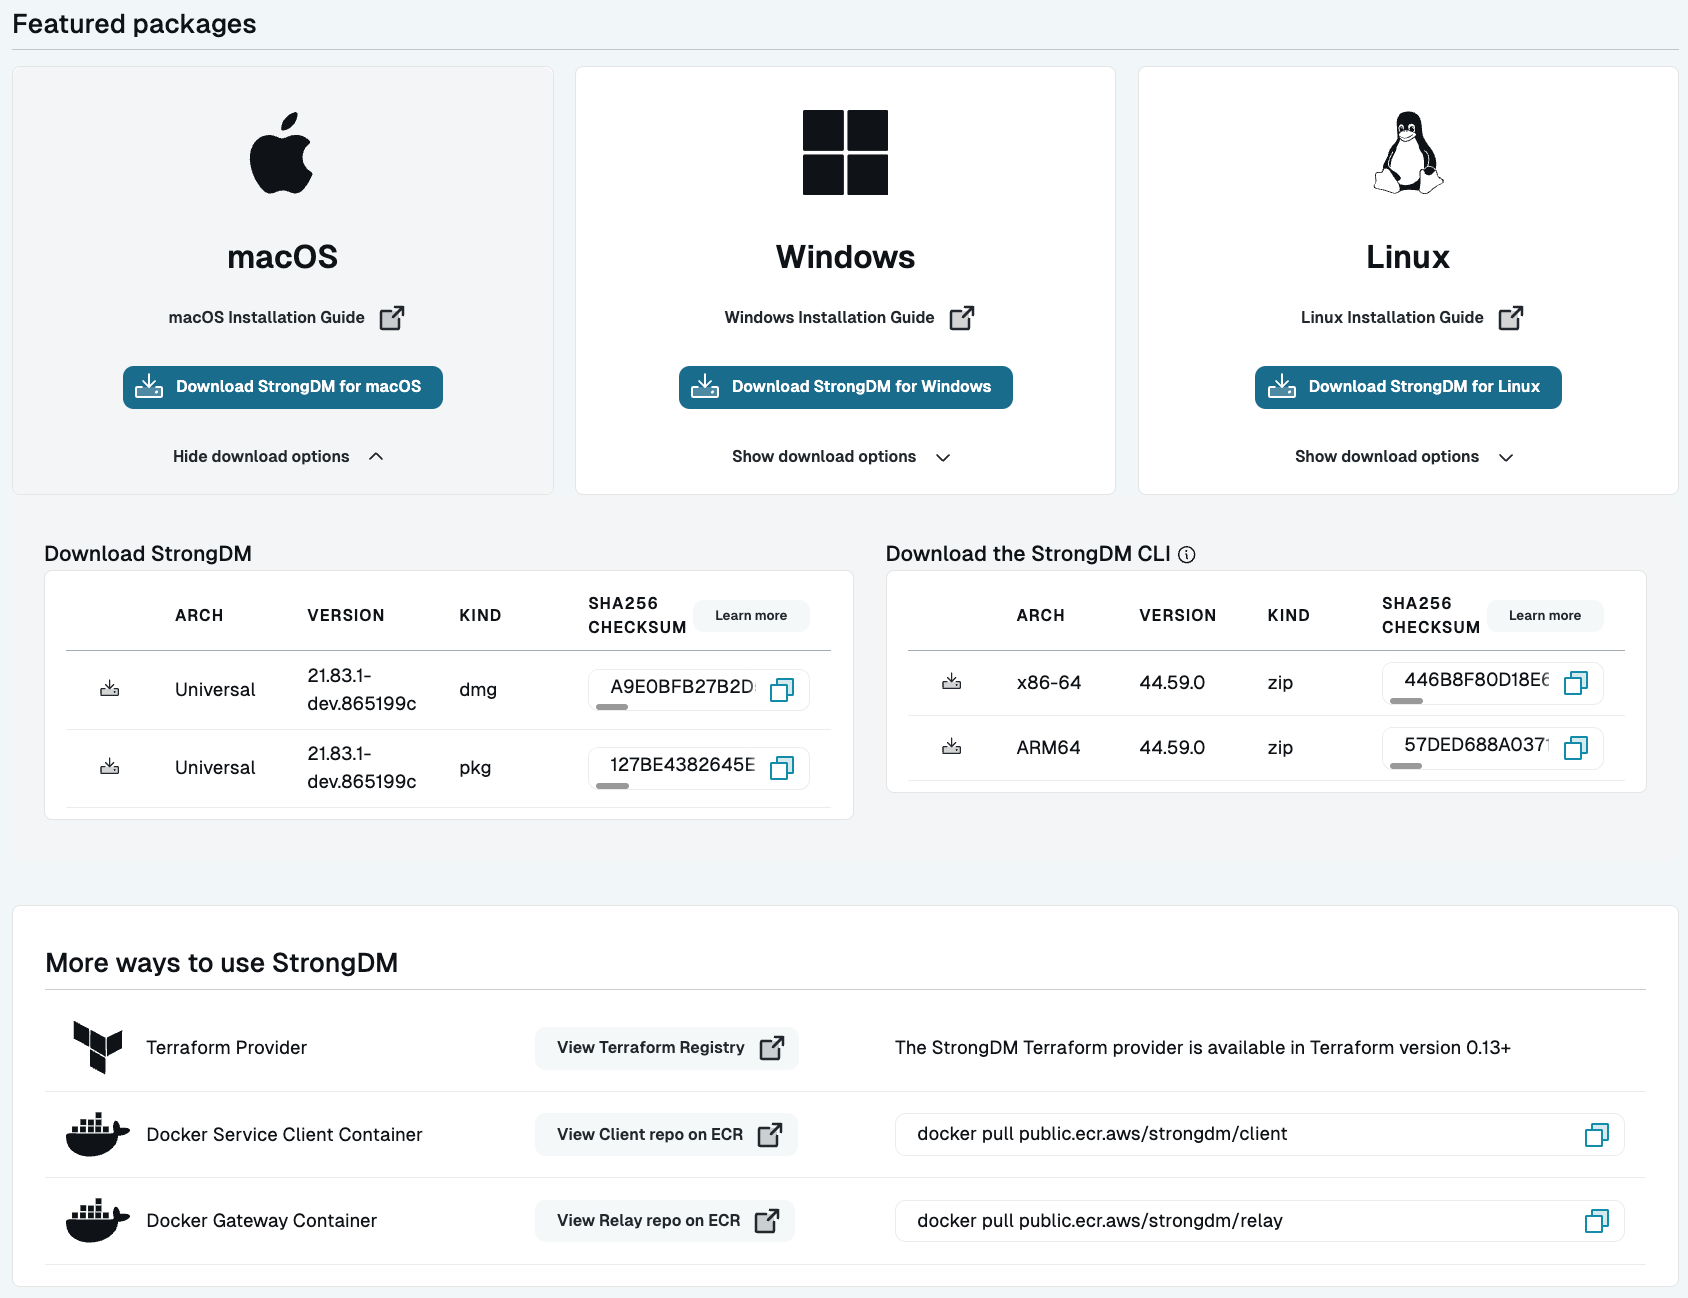
Example of Admin UI Download & Install Page Under macOS, click Download StrongDM for macOS to download the desktop app and CLI immediately, or click Show download options for other options.
- PKG: This universal installer version includes the desktop app and CLI together and provides easy prompts that guide you through the installation process. If used with admin privilege, the PKG installer installs StrongDM and the StrongDM Virtual Network Adapter (which enables you to access Virtual Networking Mode resources that may be available to you). If used without admin privilege, the PKG installer installs StrongDM but not the adapter. StrongDM is installed in the home directory (
/Users/<USERNAME>/Applications). - DMG: This universal full version includes the desktop app and CLI together and is installed manually. The DMG version does not install the StrongDM Virtual Network Adapter. Choose DMG if you want to install the desktop app without the adapter.
- CLI: The StrongDM CLI option includes only the CLI (not the desktop app) for x86-64 or ARM64 architectures. Download and install the CLI only if you don’t want to install the desktop app.
Once the download is successful, the file name appears as SDM-<VERSION_NUMBER>.dmg or SDM-<VERSION_NUMBER>.universal.pkg, depending on the selected kind.
- PKG: This universal installer version includes the desktop app and CLI together and provides easy prompts that guide you through the installation process. If used with admin privilege, the PKG installer installs StrongDM and the StrongDM Virtual Network Adapter (which enables you to access Virtual Networking Mode resources that may be available to you). If used without admin privilege, the PKG installer installs StrongDM but not the adapter. StrongDM is installed in the home directory (
Optionally check that the downloaded binary is legitimate and verify the checksum, as in the following example:
$ sha256sum SDM-21.54.0.dmg
9436778e0c922f621e0456b2694e0ad7dd50de8501632ee784b8add38bac5c5a SDM-21.54.0.dmg
The checksum should match the value in the SHA256 Checksum section of the Admin UI.
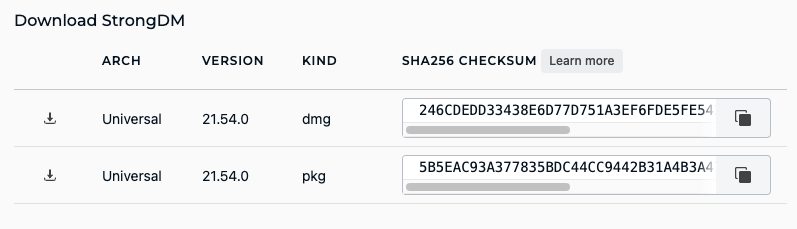
Example of StrongDM SHA256 Checksums on the Admin UI Download & Install Page
Install StrongDM
PKG
To install StrongDM with the installer version (PKG), follow these steps.
- Double-click the downloaded PKG file (SDM-<VERSION_NUMBER>.universal.pkg). A dialog opens with guided prompts.
- On the introduction screen, read the information given and click Continue.
- Click Install.
- After installation is complete, view the success message and click Close.
To install StrongDM as an admin, use the built-in command-line program called installer. Use sudo and enter the PKG file as an argument (using the correct PKG file name), as in the following example:
sudo installer -pkg SDM-21.58.0.universal.pkg -target /
DMG
To install StrongDM with the DMG, follow these steps.
Double-click the downloaded DMG file (SDM-<VERSION_NUMBER>.dmg).
Drag the SDM app to the Applications folder using the provided shortcut. If you do not have admin rights on your computer, you can copy the SDM app to the Applications folder in your home directory or the desktop, where it runs and updates normally without requiring admin privileges.
Do not run SDM directly from the DMG file. This results in degraded functionality.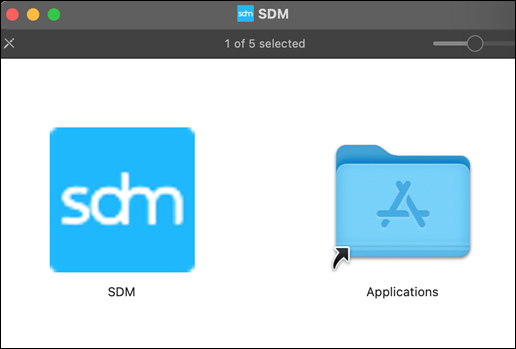
StrongDM Installation Shortcut
Launch StrongDM
Use these steps to launch the desktop app on macOS. When connected to resources via the desktop app, all resource access gets routed through StrongDM.
To launch the desktop app, double-click the SDM icon in your list of applications.
The sdm icon appears in the menu bar. Click this icon to log in.
Enter the email and password for your StrongDM account. If your company uses single sign-on (SSO), you may also be redirected to your SSO provider.
After logging in, go to the Resource Center to view a list of resources you have permission to access.
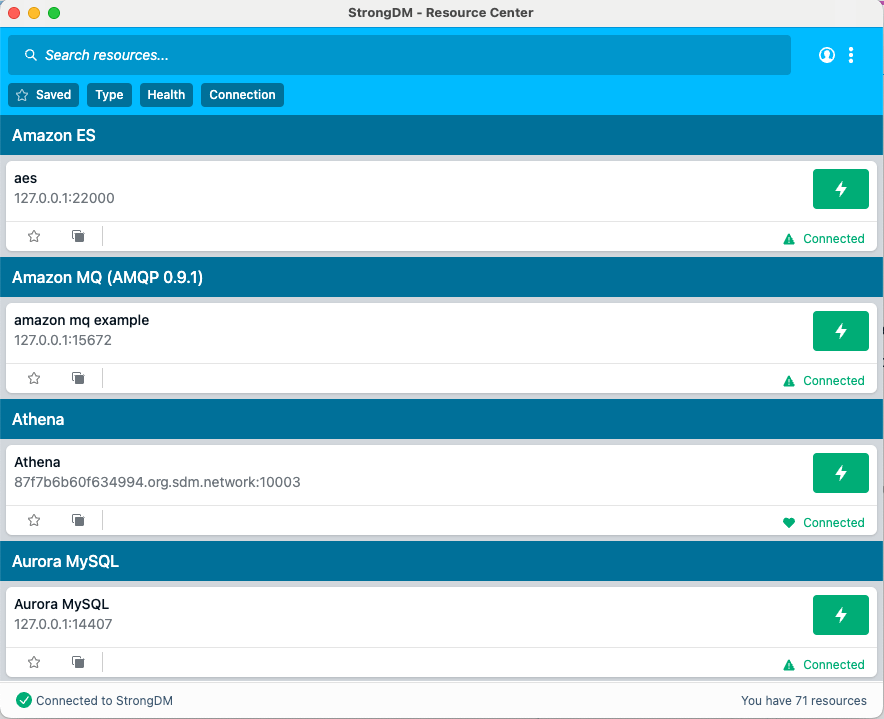
Example Resource Center Click one of these resources to enable a connection and gain access. A green lightning bolt icon appears next to the connected resource.
You can now connect to the resource on your machine using your preferred tool. When prompted for connection information, you can typically use localhost for the hostname/IP, leave the username and password blank, and specify the port listed next to the resource in StrongDM Desktop. If the connection fails using these defaults, check the Connect to Resources section for more information.
If you click a website resource, it launches in your default browser. To disconnect from any resource, click the named instance in the desktop app and the green connection icon disappears. Any existing connections from your local machine to the resource are immediately disabled.
Set up the StrongDM CLI
To set up the CLI that is included with the desktop app, you can use the following steps.
After installing the SDM application, click the sdm icon in the menu bar. Make sure you are logged in by checking that the SDM application is online and your available resources display.
Open the Account menu and select install sdm in PATH.
You can also open a terminal and type
sudo ln -s /Applications/SDM.app/Contents/Resources/sdm.darwin /usr/local/bin/sdm. Either of these options adds the sdm command line application to your PATH.Verify that the CLI is working properly by running
sdm --version, which should return a version number similar to the following$ sdm --version sdm version 35.3.0 (99a5d1a71d4eccaf171449e33bc0826132b05165 #503)If instead you see something like
-bash: sdm: command not found, it may mean that the path/usr/local/bin/is not included in your system search path. Edit the shell configuration file your system is using. For macOS, that is sometimes.bash_profile, but since macOS Catalina, zsh is the default shell. Open the shell configuration file and appendexport PATH=/usr/local/bin/:$PATHto it. Then run:$ source ~/.zshrc $ sdm --version sdm version 35.3.0 (99a5d1a71d4eccaf171449e33bc0826132b05165 #503)
Download the StrongDM CLI Only
On macOS, you can bypass the desktop application and download the CLI independently. Use the following steps to install the CLI only.
Open the invitation email you received for your StrongDM account.
Click the link included in the email to set your password.
Log in to StrongDM and go to the Download & Install page in the Admin UI.
Under macOS, click Show download options.
From the Download the StrongDM CLI section, download the StrongDM CLI for your architecture. The files are downloaded to a zipped folder on your computer. This depends on your architecture, but the folder name appears as sdmcli_<VERSION_NUMBER>_darwin_amd64.zip.
Unzip the file:
unzip sdmcli_<VERSION-NUMBER>_darwin_amd64.zipMove the unzipped file to your
usr/local/bin/directory. We suggest this location since it is usually part of the PATH variable, ensuring you can runsdmcommands from any folder in the terminal.To connect to resources with the standalone binary, you must run a listener manually. Use
sdm listento run the listener in the background.
Recommended Reading
For detailed information on how to use the desktop app and CLI, please see the documentation: