A tar file is like a digital box—it bundles files and folders into a single archive while keeping their structure and permissions intact. Originally built for tape backups, it’s still widely used today because it’s simple, reliable, and plays well with compression tools like gzip and bzip2.
Whether you're backing up systems, transferring files, or prepping for deployment, tar keeps things clean and organized.
In this guide, you'll learn how to create, compress, and extract tar files—plus how to secure access to the systems and data inside them with centralized controls, real-time audit trails, and seamless permission management.
What is a Tar File, and Why Use It?
A tar file serves as a container that bundles multiple files and directories into a single archive. The name "tar" stands for Tape Archive, reflecting its original purpose of backing up data to tape drives. Think of it as a digital box where you can neatly pack your files while preserving their structure, permissions, and attributes.
Why do people still use tar files? Because they:
- Keep things organized: Your directory structure, file permissions, and attributes stay intact.
- Play well with others: They're great for transferring files between systems or backing up projects.
- Work with compression tools like
gzip and bzip2 to save space while keeping everything safe.
System administrators and developers particularly value tar files because they streamline package deployment and system backups. By combining multiple files into one archive, you reduce the complexity of file transfers and ensure all components stay together during distribution.
Understanding Tar Command Syntax and Options
The tar command follows a simple formula:
tar [options] [archive-name] [files or directories]
The most commonly used options include:
-c: Create a new archive-x: Extract from an archive-f: Specify the archive file name-v: Show progress (verbose)-z or -j: Add compression (gzip or bzip2)
For example, if you wanted to compress a folder into a .tar.gz file:
tar -czvf backup.tar.gz /home/user/documents
This says: “Create a compressed archive of my documents folder, show me what’s happening, and name it backup.tar.gz.”
How to Create Your First Tar Archive
Ready to make your first tar archive? Here’s how:
- Open your terminal
- Navigate to the folder with the files you want to include
- Note: the most straightforward command uses -cvf options: c creates the archive, v shows the progress, and f specifies the archive name.
- Run this command:
tar -cvf backup.tar file1.txt file2.txt
The command preserves your file permissions and directory structure while creating the archive.
Want to verify the contents before sharing? Use tar -tvf backup.tar to preview the archived files without extracting them.
Compressing Files with Gzip and Bzip2
Linux offers two powerful compression tools with distinct advantages. Gzip provides quick compression through the DEFLATE algorithm, making it perfect for routine tasks and immediate file transfers. The command preserves the original filename while adding a .gz extension.
- Gzip (
.gz): Fast, efficient, perfect for day-to-day file transfers.
gzip file.txt
- Bzip2 (
.bz2): Slower but squeezes files down even smaller—great for archiving.
bzip2 file.txt
Both commands replace the original file by default, but you can preserve it using the -k option.
gzip -k file.txt
For multiple files, use wildcards like *.txt to compress all text files in a directory, streamlining your workflow while maintaining organization.
gzip *.log
Working with Directories and Multiple Files
Managing multiple files and directories becomes straightforward when you understand the right tar command options. To archive several directories at once, specify their paths after the archive name: tar -cvf project.tar docs/ images/ config/. The command preserves the directory structure, making it perfect for project backups.
Need to exclude certain files from your archive? The --exclude option handles this elegantly: tar -cvf backup.tar --exclude='*.log' /home/user/. This command archives everything except log files, helping you maintain clean backups.
For working across different locations, the -C option changes the working directory: tar -cvf archive.tar -C /path/to/first dir1 -C /path/to/second dir2. This approach maintains relative paths while combining content from multiple sources.
Extracting and Unzipping Tar Archives
Extracting contents from tar archives requires understanding a few essential command options that unlock the full potential of your archived files. The -x flag serves as your primary extraction tool, while -v provides verbose output to track the process.
For basic tar file extraction, use tar -xf archive.tar to quickly access your files. When working with compressed archives, the command automatically detects the compression type - whether gzip or bzip2 - eliminating the need for manual specification.
Need to extract files to a specific location? The -C option directs your extracted contents to any directory: tar -xf archive.tar -C /target/directory. For selective extraction, specify individual filenames after the archive name: tar -xf archive.tar file1.txt file2.txt.
Advanced Tar Command Examples
When working with tar archives in production environments, you can leverage powerful options to handle complex scenarios. The --newer flag helps maintain incremental backups by archiving only files modified after a specific date: tar --newer="2024-01-01" -czf recent_changes.tar.gz /project/.
For better control over large archives, combine the --wildcards option with pattern matching to extract specific file types: tar -xf archive.tar.gz --wildcards '*.json' --no-recursion. This technique proves invaluable when managing extensive data sets.
Need to verify archive integrity? The --diff flag compares archive contents against existing files: tar --diff -f backup.tar.gz -C /project/. This verification ensures your backups remain reliable and accurate, protecting critical data during system maintenance or migrations.
Troubleshooting Common Tar Issues
When working with tar archives, permission errors often present the first challenge. Running tar -xf archive.tar with insufficient privileges yields a "Permission denied" message. Resolve this by verifying file ownership with ls -l and using appropriate permissions.
File corruption during transfer can compromise archive integrity. The command tar -tvf archive.tar helps verify archive contents before extraction. For archives refusing to extract due to format errors, the --ignore-failed-read option bypasses minor inconsistencies while maintaining data safety.
Encountering "file changed as we read it" messages? This occurs when files update during archiving. Use the --exclude pattern to skip frequently changing files like logs and temporary data, ensuring stable archive creation without interruption.
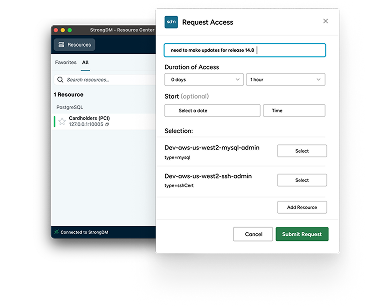
Securing Tar Archives with StrongDM
Creating archives is just one part of the story—controlling access to the data inside matters just as much. With StrongDM, you can:
- Centralize access to systems and servers that store your tar files
- Enforce least-privilege access through just-in-time permissions
- Monitor access to backup directories in real time with complete audit trails
Instead of worrying about who has shell access to archived data, StrongDM gives you full visibility and control—so you can manage the contents of your tar archives without managing users on every host.
Use tar to keep your systems clean. Use StrongDM to keep your data secure.