Kubernetes authentication presents a unique challenge. While Kubernetes defines the concepts of both user accounts and service accounts natively, it doesn’t provide us with a single, built-in method for authenticating those accounts.
Instead, we must choose from a variety of techniques involving third-party tools or resources to perform Kubernetes cluster authentication.
Here we’ll look at the most common Kubernetes authentication techniques and which methods are best to use in which circumstances. We’ll also offer some examples of how each authentication method works and its pros and cons.
4 Kubernetes Authentication Methods
Every Kubernetes authentication technique serves the same basic goal: Validating the identity of the user or service who issues the authentication request to determine whether access should be granted. After authentication, a user’s actions must be authorized, typically via a role-based access granting process.
The specific approaches employed to issue authentication requests may vary widely, as the following examples demonstrate.
Method 1: X.509 Certificates
One of the simplest authentication methods in Kubernetes is to use an X.509 certificate to verify the identity of the user issuing a request.
To use X.509 authentication, you must first create a private key and a Certificate Signing Request, or CSR, for the user account you want to authenticate. You can do this in a Unix-like operating system environment using these commands:
openssl genrsa -out example.key 2048
openssl req -out example.csr -newkey rsa:2048 -new -nodes -keyout privateKey.key
Then, create a self-signed certificate using the CSR you generated and the certificate authority associated with your Kubernetes cluster:
openssl x509 -req -in example.csr -CA /etc/kubernetes/pki/ca.crt -CAkey /etc/kubernetes/pki/ca.key -CAcreateserial -out example.crt -days 30
Next, using kubectl, configure your cluster to use the key and certificate you have created:
kubectl config set-credentials example --client-key=example.key --client-certificate=example.crt
Finally, define a context for the certificate:
kubectl config set-context example-context --cluster=kubernetes --namespace=your_namespace --user=example
While X.509 authentication is straightforward to set up, the major drawback is that it requires you to manage certificates manually. When certificates expire, you’ll need to regenerate them in order to prevent disruptions to authentication. You will also need to remember to revoke certificates for users whose access you want to disable.
In short, while this authentication method is simple to configure, it entails a lot of manual effort to manage at scale. It may be appropriate for small-scale clusters where there are only a few users to authenticate, but it will not work well for production environments.
Method 2: OpenID Connect Tokens & Identity Provider
A second method is to use OpenID Connect (OIDC) tokens. You can use one of many public OIDC providers, like Google or Okta, or you can set up one of your own, like dex or OpenUnison. You may also use a Single Sign-On (SSO) service that supports OIDC, which most do, although in that case you would need an intermediary to support authentication.
The exact implementation steps for OIDC vary depending on which OIDC provider you use; however, the key steps are as follows.
First, generate an access_token, id_token and refresh_token from your OIDC provider.
Second, edit your kubeconfig file with the OIDC configuration details. For example, if you are using a Keycloak server for your OIDC provider, your configuration would look something like the following:
oidc:

enabled: true

issuerURL: https://keycloak.example.com/auth/realms/example

clientID: kubernetes

groupsClaim: groups
The issuerURL and clientID fields are required. Other fields can be defined optionally; see the Kubernetes documentation for details.
OIDC’s major advantage as a Kubernetes authentication method is that, once configured, it will work indefinitely. However, it is relatively complex to set up because it requires generating access tokens using whichever process your OIDC provider supports, then manually writing configuration files that are tailored to those tokens and your provider.
In addition, the implementation steps vary depending on which OIDC provider you use. OIDC may be more than what is necessary for small-scale Kubernetes clusters, such as those that consist of only a handful of nodes or host just a single workload, but it is worth the effort to configure if you have a large-scale cluster.
Method 3: Service account authentication token
Service account token authentication uses signed bearer tokens to validate authentication requests.
To use this method, first create a service account:
kubectl create serviceaccount service_name
In addition to creating the service account, this command will generate a Kubernetes secret file containing a bearer token you can use for authentication. To get the secret file, use a command such as:
kubectl get secret example-token-config -o yaml
You can then use the bearer token in HTTP headers to issue requests.
This method is relatively simple to implement and does not require much ongoing maintenance. However, because you have to create service accounts and associated tokens manually, the initial setup effort is high. In addition, the tokens are short-lived (typically, twenty-four hours or fewer) and must be refreshed in order to keep access working.
Method 4: Static password files
The simplest, but also least secure, authentication method for Kubernetes is to use static password files.
To use this method, first generate a password file. Each line of the file should specify the password, username and userID, respectively, for the users you want to authenticate. Separate each value by commands, and create a new line for each new user. For example:
password1,joe_user,joe_userID

password2,jane_user,jane_userID
Once you create the file, simply identify it on the kube-apiserver command line using the flag --basic-auth-file=filename
This method requires very little effort to configure. But because it is based on a static, plaintext password file, anyone who gains access to the file can easily modify it to gain unauthorized access to your Kubernetes cluster. In addition, this method requires manual configuration to maintain, as you would need to update the password file manually whenever user access information changes.
That said, static password files can be useful as an authentication solution if you are new to Kubernetes and want a simple authentication method for use with a test cluster.
Additional Kubernetes Authentication Methods
There are two other Kubernetes authentication methods worth noting: authentication proxy and Webhook Token Authentication.
Authentication Proxy
The Kubernetes API server can identify users based on request value headers. These values are set by an authenticating proxy. Authentication information, such as usernames and namespaces, can be pulled from these headers in order to determine whether a request is valid.
This method is useful if you want to authenticate based on data that is stored in an external service; by configuring the service to export authentication information in HTTP headers, you can perform Kubernetes authentications without having to set up any additional services.
You can find detailed examples in the Kubernetes documentation.
Webhook Token Authentication
Using Webhook token authentication, users authenticate through the Kubernetes API server using tokens that they generate from an external service, such as GitHub. This approach can be convenient if you have authentication services that you use for other workloads and want to use the same process to authenticate with Kubernetes, too. For a detailed example, check out the Kubernetes authentication documentation.
Challenges with Kubernetes Authentication Methods
All of the Kubernetes authentication methods described above are challenging to implement if you rely on a manual approach. They require extensive scripting by hand, and they don’t integrate directly with directory systems or cloud providers’ access-control frameworks. The processes can also vary depending on factors such as whether you are running a Kubernetes cluster on-premises or in the cloud, or whether you run vanilla Kubernetes or a distribution like EKS or AKS.
Adding to this complexity is the fact that in some situations, you may want to use more than one authentication method for the same cluster. This could happen if, for example, you start using one authentication method when you first build your cluster, then switch to another as your strategy evolves.
Until you have time to update all of your configurations, you’ll be stuck using the original authentication method for some components and the newer method for others. And even if you have a consistent authentication method, you will likely need to maintain multiple secrets (whether they are password files, tokens or certificates) for each user or service you want to authenticate. Juggling multiple authentication methods and/or secrets by hand is not feasible or practical as your environment grows.
How to Effectively Manage Kubernetes Authentication
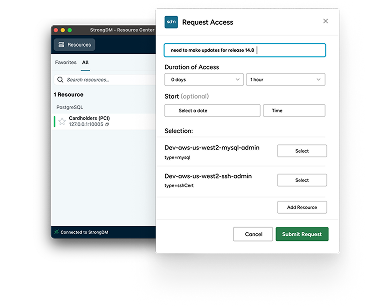
A control plane allows Kubernetes admins to manage authentication with less manual effort. Instead of managing VPNs, bastion hosts, and subnets to provision access to resources that don’t talk to one another, StrongDM enables authentication by establishing a one-to-one connection from your identity provider to Kubernetes or any other firewalled resource.
From a single interface, you can enroll new Kubernetes clusters, manage authentication data, and view and modify permissions for all of your users, including contractors and vendors. Least privileged access to any resource can be granted and revoked from the StrongDM admin rather than from individual applications.
With StrongDM, you can streamline your Kubernetes authentication management process no matter which methods, resources or third-party providers they involve.
See for yourself with a free, 14-day StrongDM trial.