

Passwords alone don’t stop breaches anymore. Context-aware authentication changes the game by using real-time signals like device, location, time, and behavior to decide whether access should be granted.

Contents
Secure Access Made Simple
- Full Access to All Features
- Trusted by the Fortune 100, early startups, and everyone in between
SSH is one of the best ways to handle tasks such as automated backups, file synchronization, and remote server access and management. SSH passwordless login is an SSH authentication method that employs a pair of public and private keys for asymmetric encryption. The public key resides on the server, and only a client that presents the private key can connect.
SSH does have its pain points, with or without SSH keys, including:
- As employees come and go, new credentials (whether passwords or keys) must be created and old ones destroyed.
- Credentials need to be rotated, a time-consuming and often overlooked process.
- Auditing access can be a challenge. Wrapping communication in an SSH tunnel makes it more secure but also more difficult to track and control.
Fortunately, there’s an alternative to managing all of these things by hand, which we’ll go into later.
This tutorial will walk you step by step through how to manually set up SSH passwordless login to a Linux server. These commands should work on the majority of Linux distributions, and instructions are included for modern client machines of the macOS, Windows, and Linux varieties.
Step 1: Generate a key pair
Use ssh-keygen to generate a key pair consisting of a public key and a private key on the client computer. This command can be run on any modern Linux client distribution, the Terminal in macOS, or in the Command Prompt in Windows 10/11.
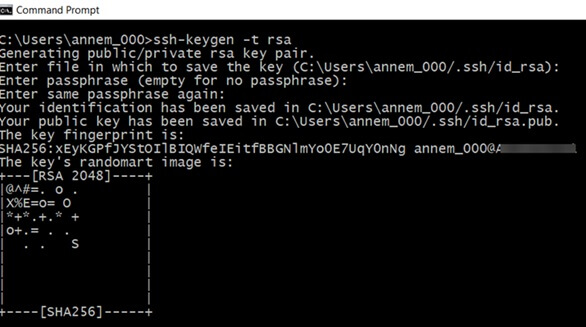
ssh-keygen -t rsa
The -t rsa option specifies that the type of the key should be RSA. Other choices include DSA, ECDSA, and ED25519. Select the protocol your SSH connection will use.
When prompted, enter a filename for the key.
Enter file in which to save the key. (C:\Users\annem_000\.ssh\id_rsa):The default (id_rsa in the .ssh directory under the user’s home directory) works perfectly in most cases (and if this is to be your primary key, or only key, it is often the best option). Hit enter to accept the default (if you already have a key by this name, use whatever name you choose here throughout this tutorial in place of id_rsa). Then enter the passphrase when prompted.
Enter Passphrase (empty for no passphrase):
Adding a passphrase is an important step for securing the local key, which otherwise will be usable by anyone who acquires the key itself. Choose a passphrase with the same rigor that you would use to create any secure passphrase. Some clients can be configured to save passphrases for a true “passwordless” access experience, while others may require it to be entered with each use. This will be covered in more detail later in the tutorial.
Type a passphrase (it will not be displayed, even though you are correctly entering it) and hit Enter (or hit Enter to continue with the default of no passphrase). Confirm the passphrase when prompted. The result will look similar to this:
With the initial step to set up SSH passwordless login using ssh keygen completed, you now have two files:
- id_rsa contains the private key.
- id_rsa.pub contains the public key.
Step 2: Create SSH directory on server
Next, add the public key on the server you want to connect to. With your existing username and password, connect to the server using SSH, using whatever command line or client program you normally use for such connections. Check to see if the .ssh directory already exists by attempting to list the files within it:
ls .ssh
If it does not, you will not be able to move into that directory and should instead create it:
mkdir -p .ssh
(Note the required dot at the beginning of the directory name, which makes this a hidden directory.)
Step 3: Upload public key to remote server
Uploading your public key with a Linux or macOS client
On a macOS or Linux client, use ssh-copy-id to propagate the public key to the server, like this:
ssh-copy-id user@somedomain
Make sure to replace user with a valid username from the server and somedomain with the valid IP or domain of the server.
Uploading your public key with a Windows client
With a Windows client, you can accomplish this task via the Windows Command Prompt. You will need to refer to the results of your earlier attempt to list the contents of the .ssh directory and see if it contained a file called authorized_keys or not.
A) If you had to create the .ssh directory yourself, or if the remote server doesn’t already have an authorized_keys file, on the client computer command line, enter the following to copy the public key to the .ssh directory on the server (if you changed the name of your key from id_rsa.pub, change it here):
scp .ssh/id_rsa.pub user@somedomain:~/.ssh/authorized_keys
B) If the remote server has an existing authorized_keys file, the new key must be appended rather than overwriting the existing file. This is very important so that existing users do not lose access unintentionally. First, you will copy the file to the remote server. Then on the remote server, use the cat command to append it to the existing file:
On the client: scp .ssh/id_rsa.pub user@somedomain:~/.ssh
On the remote server: cat .ssh/id_rsa.pub >> .ssh/authorized_keys
On the remote server: rm .ssh/id_rsa.pub (clean up after yourself and remove the now-unnecessary key file)
Step 4: Test connection and configure an SSH agent
In your SSH session with the remote machine, update the permissions of the .ssh directory and authorized_keys file in case they need it:
chmod 700 ~/.sshchmod 600 ~/.ssh/authorized_keys
Now, close your connection and your Terminal or Command Prompt. When you reopen it and try to connect to the remote server again from the client where you have your private key saved, you should receive a request to enter the passphrase instead of your username and password. Test it out:
ssh user@somedomain
👍 Success! Now, to avoid entering the SSH key passphrase every time:
- You will need to use an SSH agent of some kind.
For Windows: You will use the OpenSSH Authentication Agent. The agent can be started by searching in the Windows Start menu for "Services," then double click on "OpenSSH Authentication Agent." Set the startup type to "Automatic" and click "Start."; Click Ok and Exit.
For macOS and Linux: The ssh-agent program already runs on session start for most Linux/Unix distributions. It provides an agent that you can add keys to and save passphrases. Once set up, the program will not require further interaction. - At your command line prompt, in either case, type ssh-add. If you used the default id_rsa naming for your key, that’s all you have to do. If you used a passphrase for the key, it will prompt you to enter it. Now the agent will remember your key and passphrase, and you won’t need to enter it on each use. You can also get more specific when adding keys (for example, if you used a different name for your key) with ssh-add parameters.
Step 5: Back up SSH Keys
A public key can be re-derived from a private key, but not vice-versa, making it especially important to back up private keys. To do so, simply back up the directory where they reside, which in our above examples, was the .ssh directory in your user’s home directory. Both keys in the pair will be backed up because you generated them there, unless you removed one of them from the directory.
Optional Step: Disable password authentication
Most servers allow both username/password authentication and SSH key authentication, but if you want to allow only SSH key authentication, then you can disable the use of usernames and passwords. Be certain that you have thought through the ramifications before doing so, because once you take this action, successful certificate authentication will be the only way to access your server.
This is accomplished through the sshd_config file. The exact location of this file varies by Linux distribution. Often it’s in the /etc/ssh directory. Edit this file to include the following parameters:
PasswordAuthentication no ChallengeResponseAuthentication no UsePAM no Drawbacks of SSH Passwordless Logins
SSH passwordless login facilitates remote system login for off-site developers as well as on-site staff and scripted automation, but it comes with some potential complications:
- Private SSH keys sit on the client disk, where they can potentially be stolen (if passphrase protected, this is less of an issue.)
- SSH keys take a bit of work to set up and may require technical knowledge on the user’s end.
- Distributing a user’s public key to all servers the user wishes to connect to becomes a cumbersome requirement in large environments.
- Incorrect file permissions on the remote server can prevent SSH key authentication from working.
- Compatibility problems can arise between versions of SSH. For example, a system running an older version of OpenSSH might require a different key type, such as DSA instead of RSA
- Manual SSH key management consumes a lot of time and is open to errors, although this drawback is shared with the management of usernames and passwords for individual users and servers, as well.
Eliminate passwords with a control plane
Excellent access control and monitoring strategies are a crucial part of any infrastructure plan in today’s highly distributed environment. Yet manually distributing, revoking, rotating, and auditing SSH keys is a lot of work. Incorporating a good control plane is the answer:
- It eliminates the need to provide SSH keys to individual users and administer them across multiple machines.
- Centralizes credential management and access by role via an easy-to-use interface, making onboarding and offboarding simple.
- Enables quick, secure access to any server, any database, local or remote.
- Is compatible with every database, server OS, SSO provider, and cloud.
- Logs every session, capture every query, command, and permission change with a protocol-aware proxy. These logs can’t be beaten for auditing abnormal activity or as a tool for meeting regulatory compliance.
StrongDM improves workflow and simplifies administration. If you’re ready to step away from the hassles of traditional SSH key management to more modern ways of authenticating, securing, and tracking access, give StrongDM a try. You’ll only need five minutes to connect to your first database or server.
SSH Passwordless Login FAQ
Is it possible to use SSH-keygen to create an SSH key without a password?
Yes, it is possible to use ssh-keygen to create an SSH key without a password. When generating a key pair with ssh-keygen, you are prompted to enter a passphrase. If you simply press Enter without typing a passphrase, the key will be created without one. While this allows for passwordless authentication, it is important to note that such a key is less secure because it can be used by anyone who obtains the private key.
Categories:
You May Also Like
Single sign-on (SSO) gives users one login to access everything. SAML is one of the key protocols that makes that possible—passing identity data securely between identity providers and service providers. But while all SAML implementations are part of SSO, not all SSO solutions rely on SAML. Understanding how SAML fits into your authentication stack helps you choose the right tools for modern access control. This guide breaks down how SAML works, how it powers SSO, and how you can manage authentication across every app, service, and environment with zero friction.

The HIPAA Multi-Factor Authentication (MFA) requirement is a security measure that requires users to verify their identity using at least two different factors—such as something they know (a password), something they have (a smartphone or token), or something they are (a fingerprint)—to access systems containing electronic Protected Health Information (ePHI). This additional layer of security is designed to protect sensitive healthcare data from unauthorized access, even if one credential is compromised, and helps organizations comply with the HIPAA Security Rule.
Network Level Authentication (NLA) is a security feature of Microsoft’s Remote Desktop Protocol (RDP) that requires users to authenticate before establishing a remote session. By enforcing this pre-authentication step, NLA reduces the risk of unauthorized access, conserves server resources, and protects against attacks like credential interception and denial of service. While effective in securing RDP sessions, NLA is limited to a single protocol, lacks flexibility, and can add complexity in diverse, modern IT environments that rely on multiple systems and protocols.
With so many advanced cyber attackers lurking on the threat landscape, a simple password is no longer enough to safeguard your sensitive data. There are many reasons to adopt MFA for your business. It supplements your security by requiring additional information from users upon their access requests—and it significantly reduces your risk of incurring a breach. Several multi-factor authentication methods are available, with varying strengths and weaknesses. Be sure to compare the differences when selecting the best fit for your operations.