Discover how role-based access control (RBAC) tools from identity providers to cloud IAM and workflow systems work together to enforce least privilege, streamline approvals, and deliver secure, auditable access across modern infrastructure.

Contents
Secure Access Made Simple
- Full Access to All Features
- Trusted by the Fortune 100, early startups, and everyone in between
“Does this person in this role need access to that system?”
That question is at the core of Role and Access Discovery—and a critical step to addressing privileged access management (PAM) and zero trust. You can’t restrict access without clarity around who actually has or needs access.
Which raises the next question—how do you define who has and needs access to each system? To that end, here are six distinct steps (and a free workbook) that you can use to get the process started. Before we jump in, some quick terminology:
- Test Cases: Real-world examples from within your organization that specify who needs access to what and why. These will be used later in the process to validate your Slices and Roles.
- Slices: A Slice is a single use case for access, and may include access to multiple systems or apply to multiple Roles. For example, “reconfiguring all cache servers.”
- Roles: An individual Slice or group of Slices that represent the access required for a specific task within your organization. Specific job titles may have multiple Roles based on the specific tasks they are responsible for managing. (Example: A cashier [job title] at a restaurant may need the receiving cash [role 1] and accepting orders [role 2] Roles.)
Step 1: Solicit Test Cases
To get started, we recommend reaching out to users to collect tangible examples of access required by Role. The idea is to start here, then move on to steps two and three while your stakeholders are simultaneously providing this information.
The easiest way to collect Test Cases is to create a "Test Cases" form and send it to anyone that likely requires access. Make sure to aim for a large number of examples, even at the risk of repetition and inconsistency. Refining and reducing these cases to a usable set of Roles and access will be significantly easier than generating a set from scratch.
The form itself should follow this framework:
- As a _______ I need access to _______ so that I can _______.
- Example: As a data scientist I need access to raw traffic logs so that I can ingest them to our data lake.
The intent is to use this information as a real-world starting point for access that needs to be provisioned based on your organization.
Step 2: Gather your “who” for each list
Next, you’ll need to identify which individuals fit each list/profile. Who should be in the marketing profile? What about data science? This is a logical collection of individuals based on Role.
Often, it’s easiest to use a directory such as your HRIS, your email system, Active Directory, or an SSO—export a list of all users, ideally including their department and business title. You won't need to match every user during the discovery process, but you should use the list to identify possible gaps in your discovery, such as Roles that did not appear in your Test Cases.
Step 3—Gather your “what” for each list
Now you’ll need to identify your list of systems that employees need access to. For SaaS applications, check if IT or HR maintains a list of services considered during onboarding or offboarding, which can serve as a great starting point.
For Data and Infrastructure, you’ll want to use inventories of existing servers, databases, environments, clusters, applications, and data lakes that may exist in one or more of the following locations: public cloud listings, configuration management systems (e.g., Chef, Puppet, Ansible), provisioning systems (e.g., Terraform, CloudFormation, Pulumi), or k8s clusters. Seek out as many listings as possible, but expect the items to be of dissimilar types (e.g., S3 buckets, virtual machines, Snowflake instances).
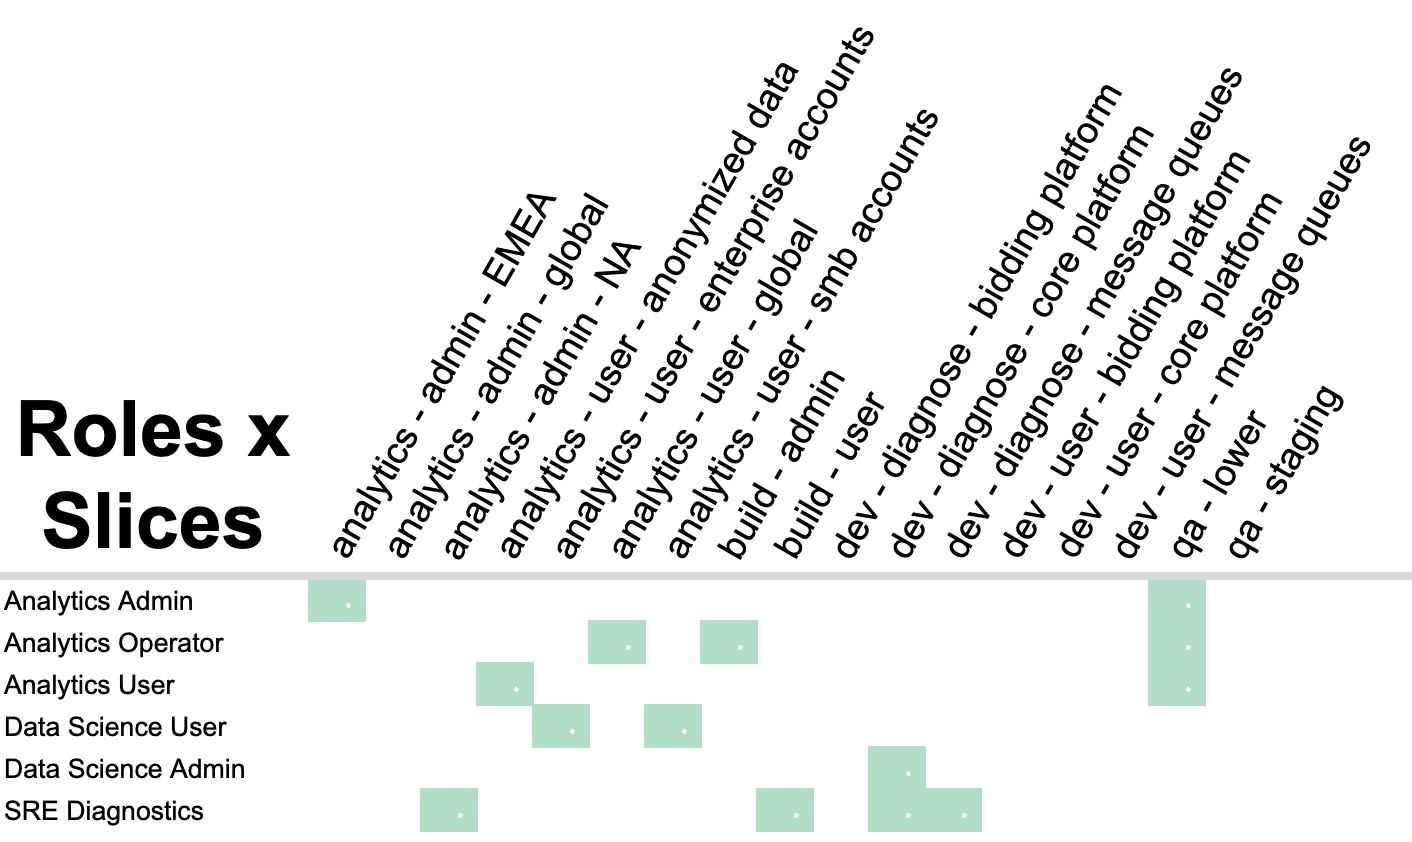
Step 4—First rollup: Slices
Slices capture the access necessary for a limited use case across one or more resources (e.g., "reconfigure all cache servers"). You can use Slices to assemble Roles, which will closely align with a specific team member's responsibilities.
Step 5—Second rollup: Roles
Roles are easily understood groupings of access across your infrastructure. A Role may contain as little as one Slice but will often contain many. In most cases, users will have more than one Role. The collection of Roles that are given to a specific user will determine which systems they have access to.
Step 6: Review and Test
For each submitted Test Case, attempt to match the case to a Best Role. When you find that an existing Role confers too much or too little access, you may need to split an existing Role into two smaller Roles.
Get Started with the Role & Access Discovery Workbook
Download our Role & Access Discovery Workbook, an interactive tool that will help drive the process forward. The workbook includes:
- The steps required to run a Role & Access Discovery project
- Tabs that you can use to track who, what, Roles, and Slices
- Example Test Cases that show how you can attempt to match the case to the best Role
You can also check out our webinar, Getting Started with Access Management, where we walk through each of the steps and get hands on with how to use the workbook. Check out the webinar here.
You May Also Like

Fine-grained access control systems determine a user’s access rights—to infrastructure, data, or resources, for example—once past initial authentication. Unlike coarse-grained access control (CGAC), which relies on a single factor, such as role, to grant access, FGAC relies on multiple factors. For example, it may consider policies (policy-based access control, or PBAC), attributes (attribute-based access control, or RBAC), or a user’s behavior in a certain context (behavior-based access control, or BBAC).
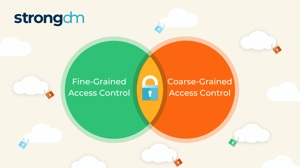
If credentials fall into the wrong hands, intruders may enter a network and launch a disastrous attack. In fact, 46% of cybersecurity incidents involve authentication credentials, according to the Verizon 2022 Data Breach Investigations Report. Organizations have two general ways to determine someone’s access rights once past initial authentication: Coarse-grained access control (CGAC), which relies on a single factor, and fine-grained access control (FGAC), which relies on multiple factors. Traditionally, CGAC has been the easier option, while FGAC offers superior security at the cost of more complex implementation.

In this article, we will look at three important types of access control in security. You’ll learn about the different types of access control, how they work, and their pros and cons. By the end of this article, you’ll understand what type of access control will work best for your organization and meet your security needs.